

 Yesterday we described the foundation hardware you’d need for the ultimate home 3D printing setup, including printer, scanner and computer. But of course, you’ll need a variety of other minor items to actually make your ultimate printing life comfortable. Here’s our list, in no particular order:
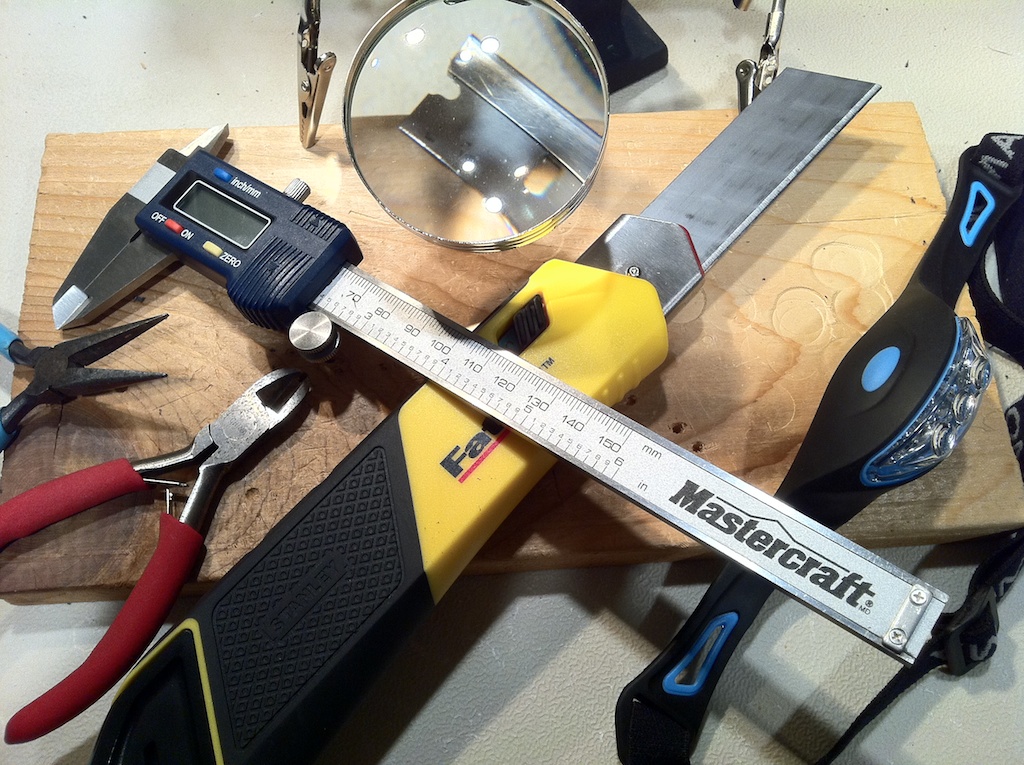
- Block of Wood: You’ll be working on cutting and trimming printed models, even drilling holes in them. Do it on a block of wood, trust us
- Razor: A sharp single-edge razor blade and/or craft knife to trim those stringy bits off your extruded model
- A Big Knife: Often necessary to pry sticky stubborn models off of a print platform. Get an Australian-sized one
- Electric Drill: For sure the holes you carefully designed aren’t big enough, so you might as well have a drill handy to make them so
- Needle Nose Pliers: Very useful for grabbing tiny stray bits on printed models, recovering lost nuts and washers that have fallen off and especially for removing excess boiling hot plastic from extruders
- Probe: An instrument with a small but sharp end is frequently useful for clearing holes in models, finding loose portions and generally poking around
- Sandpaper: Can be useful to smooth out rough portions of a printed model, but be careful as this treatment can also degrade a shiny surface into a dull grunge
- Loupe: There are many kinds of loupes, which are simply a magnifying glass on a stand. Some are large or small, some are equipped with built-in illumination and others might include tiny clamps. The loupe is wonderful for inspecting the fine detail of a printed model, particularly when you are calibrating your 3D printer
- Digital Micrometer: This amazingly useful device can provide very precise measurements of physical objects. In other words, if you are designing something to be printed, you can quickly figure out precisely how big it needs to be. You can also measure your printed models to see if you made the holes big enough, etc.
- Lamp: At times you will be intensely interested in the physical operation of your printer, perhaps while you’re calibrating it, or maybe you suspect problems and need close observation. In any case, a directional lamp would be a great help
- Headlamp: If you don’t have a good directional table lamp or have lame eyes, consider one of those nerdy LED-headlamps. Put them on and you can see all the flaws in your printed model, especially through your loupe. Just remember to take it off before you head out for dinner
- Fan: Most 3D printers get hot. Really stinkin’ hot. Get a fan and point it at the printer. Or yourself
- Glue: Some of your models may be printed in several parts; ensure you have a suitable glue to hold them together
- File: Useful for removing large amounts of offending protrusions in a uniform manner
- Sidecutters: Snip off plastic filament with flourish!
- Trophy Bag: You are doing this to print great models, aren’t you? Keep the good ones in a place you can easily find for show-and-tell
- Rags: Your printer probably has been oiled, and you’ll need something to wipe off the grease when you inevitably touch the wet components
- Paper: For 3D printers without endstops, a simple piece of paper can help you position the printer to a very precise Z=0.000
- Book: Any book will do, so long as you find it interesting. Why do you need a book? Because 3D printing takes a long time, and you’ll eventually get bored watching that 3D Beethoven slowly emerge over a 2 hour print session
- Notepad & Pen: You’ll no doubt conjure up more ideas for 3D prints, and you’d better have a method of writing them down
- Brush: To remove the inevitable tiny bits from your work area
- Trash can: To receive the inevitable tiny bits from your work area
- Bandages: Oven-level heat, sharp knives and razors can mean only one thing: bandages, and lots of them. Be careful!
- Table: All of this stuff and your foundation hardware will be on a table. Make sure it’s suitable for lots of hardware action. Cutting, hot drips, scrapes, etc., are certain to occur
That’s our list – what did we miss?