

At the Fabbaloo Lab we’ve performed 3D scans using a variety of handheld scanning equipment, ranging from el-cheapo Microsoft Kinect hacks to pricey USD$50K units. The experience can be both frustrating and elating; it’s normally a learning process of discovering what to do and what not to do. Today we thought we’d list a few of the rules of thumb we’ve discovered for you to enjoy.
- Setup time: Good scans take time – and it’s not only the time spent doing the actual scan. Be prepared to spend time setting up your scan environment and equipment, which may take a lot longer than you suspect.
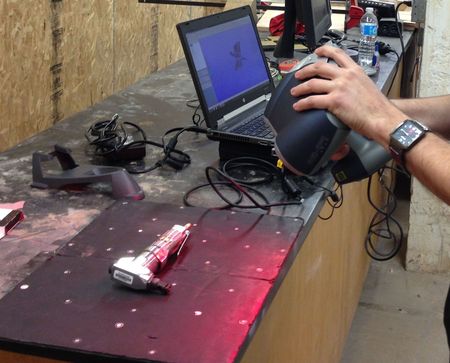
- Cabling: Most handheld 3D scanning equipment involves a bunch of cables to shuttle electronic signals between components. When you set up your scan environment, plan on having a lot of slack in any cables attached to the handheld scanner, because you’re going to be moving it around a lot. For larger subjects the maximum cable length could be an issue. Consider walking around with the cables attached to see if they work from all scan zones because you don’t want to be part-way through a scan and suddenly find you can’t get the scanner around to the subject’s next corner.
- Live Feedback: Unlike desktop scanners, which typically capture a shape automatically, a handheld scanner requires you to move around the subject. Here’s the troubling part: if you can’t see a monitor that provides feedback on what portions have been successfully captured, you’re basically operating blind. When setting up your equipment make certain you can see a screen for instant feedback, otherwise your scan could include a lot more holes than desired.
- Resolution: Some handheld 3D scanners, particularly the more expensive versions, offer the capability of setting the scan resolution. Be very careful of this, as there is a tendency to immediately select the highest resolution. High resolutions require very, very slow scan movements. With a heavy handheld scanner, this could be difficult. Instead think first of how much resolution you actually need and then set parameters appropriately.
- Nooks and Crannies: Before scanning take a very close look at your subject and try to imagine how you will point the scanner to capture the entire surface. You’ll probably find some nooks and crannies that require wacky positioning. Be prepared to make those unnatural moves during your scan.
- Backgrounds: Some 3D handheld 3D scanning solutions require a patterned background in order to interpolate the scanner’s position. This is often easily done by simply avoiding “monotonous” backgrounds, or placing random objects in the scene. One thing you must avoid: moving objects in the background that will confuse the scanning software. And don’t even consider scanning something with a crowd of people around.
- Nearby Stuff: Ensure that the scanning area is relatively clear of other objects that might accidentally make it into your scan. While they won’t break the scan, they will add more work later to remove them. Also: any objects in the vicinity WILL BE STEPPED ON.
- Props: In some pathological scanning situations there may be surfaces that are obscured unless the subject is raised higher, permitting you to scan “from below”. If this is the case, you’ll need to place the subject on top of an appropriately-sized something.
- Color and Lighting: Some 3D scanners capture color information along with the shape. While it’s not particularly useful for most personal 3D printers that print in only a few colors, a good color map can be used with 3D print services for full color output. But color can only be obtained properly if you have good lighting. Overcast outdoor natural lighting is best, but if you’re scanning indoors, we’d strongly recommend proper lighting from all sides. If you illuminate only one side you’ll likely get an underexposed side to your object and it will 3D print darkly compared to the lit side.
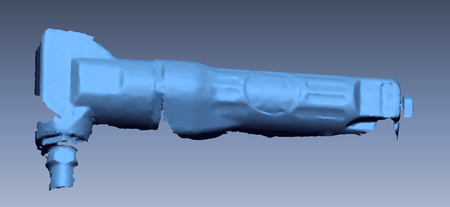
- Cleanup: Once the scan is complete you’ll need to convert it into a 3D model. While some scanning solutions include software that does so, some solutions do not and you’ll have to do that by hand with your own software. In almost all cases, however, you’ll need to fix the model in some way by filling holes, smoothing surfaces, simplifying an overly complex mesh or removing extraneous bits.