

One of our technical readers took a deep dive into the new Powerbelt3D Zero 3D printer kit.
Powerbelt3D Zero
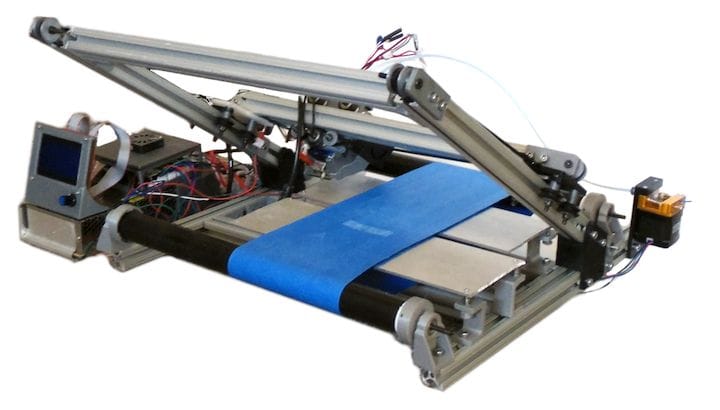
The Powerbelt3D Zero is one of a very few options available for a belt 3D printer, in which the print surface acts as a conveyor. This transforms the Z-axis to one of infinite length, as the print can simply continue onward as long as the conveyer belt turns. You can also 3D print “infinite” quantities of small objects as they just peel off the bed as the next ones are 3D printed.
The few belt 3D printers available vary considerably in price, with the top model being the original Blackbelt3D device. Since its introduction there have been several more belt 3D printers announced.
One of them is the Powerbelt3D Zero, which was announced last year. It’s proven to be extremely popular, likely due to its rock-bottom price of only US$399 during launch. One reason for the low price is that it’s a kit and buyers must assemble it before use.
Impressively, the folks behind Powerbelt3D recently announced they’ve been able to ship all units to their crowdfunding backers, something many Kickstarters never do in the 3D printing market. Powerbelt3D’s Adam Fasnacht explains:
“We are excited to announce that we have successfully shipped all printers from inventory! It has been quite a journey with long days to get to this point. All printers that were purchased in our pre-order campaign just under 1 year ago, as well as all the printers purchased this year (non-back order) have been shipped to their owners. It has been great hearing feedback from our very first users, which will help us create even better products in the future.”
But with any low-priced item you can’t expect perfection, as machine design decisions attempt to get at that low pricing. That’s to be expected, but what kind of experience can you expect with this device?
Powerbelt3D Zero Experience
I haven’t tried the Powerbelt3D Zero myself, but it turns out one of our readers has. Lykle Schepers is the founder of Zesty Technology, makers of the Nimble extruder, and knows a thing or two about 3D printer hardware. He obtained one of the first Powerbelt3D Zero kits shipped, and he was able to get the machine running.
But his keen hardware eye noticed a number of potential improvements to the device. I’m not sure if the Powerbelt3D folks would be able to implement them, as some may cause the price of the machine to change.
Nevertheless, it seems that Schepers does indeed like the machine.
Schepers’ thoughts:
The printer is not an easy printer to assemble, and especially the CoreXY belt system is hard to install. The fact that there is no build manual does not help, even though there is a video of the assembly process. It is incomplete and full of mistakes.
Overall, the design looks ok. It is a lot wider than the printable surface, but that is not an issue. The frame is angled quite steeply and is a bit flimsy, perhaps it would have been good to add a support at the top end? It uses the ubiquitous V-slot profiles with steel plate corners and brackets. Overall the frame looks pretty good and will do the job.
Powerbelt3D CoreXY
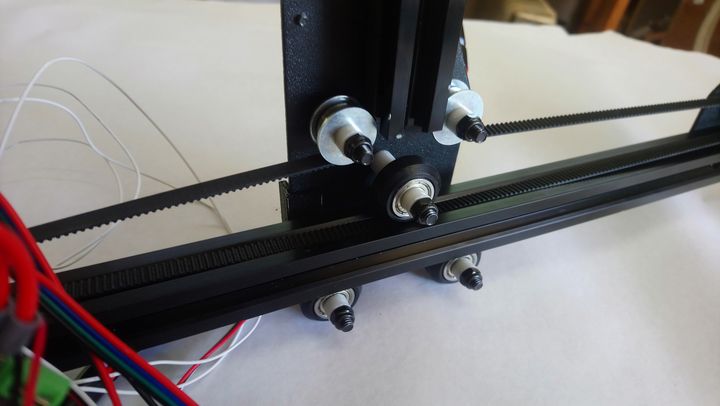
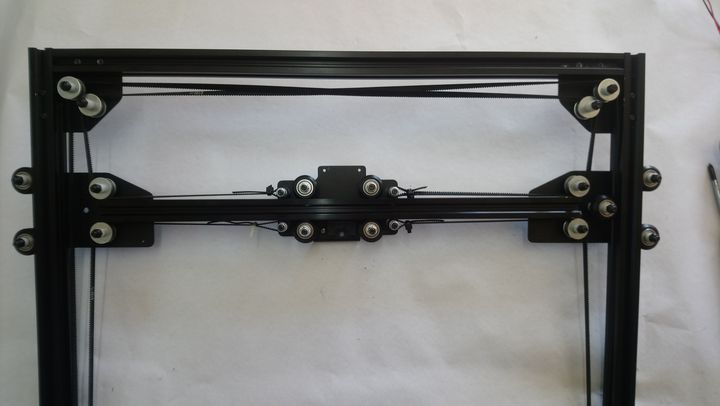
The CoreXY system itself is flawed. None of the belts that must run parallel, do so. Each belt is not in a single plane, so the belt needs to bend up and down. One part of the CoreXY belt runs inside the 20×20 profile, but on the corners of that belt it doesn’t. It uses the V-slot wheel to bend around, rubbing against it with the toothed side.
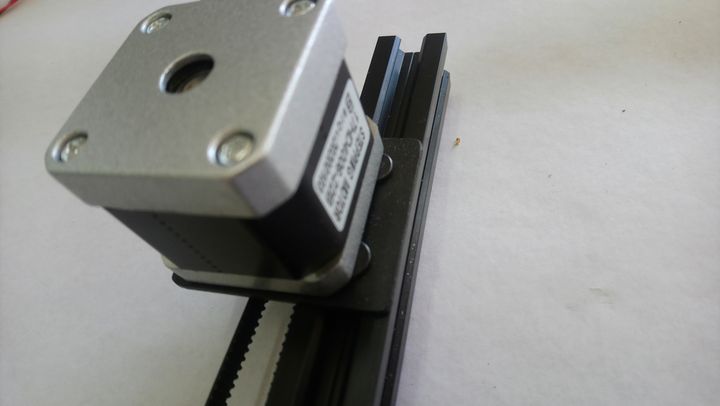
There is no way to adjust the tension, other than fiddling with tie-wraps. The stepper is mounted at an angle, as the screws for the mount plate sit under one edge of the stepper, so there is no way to use those screws to adjust the position of the stepper. However, this has been fixed in the next version.
The X carriage is very large, especially in the X direction. That is why, despite the fact that the printer is about 60 cm wide, the printable area is only 20 cm wide. Changing the CoreXY system can improve on that.
Why is this a problem? If the belts are angled and not parallel, the tension changes according to the position. In this case, the higher you go, the tighter the belts become. But because one belt pulls on the top side of the X carriage, and the other at the bottom side, it tries to skew the carriage and that jams the Y carriage. Rubbing a belt on anything is never a good design choice, unless you are designing a brake system.
What I would like to see is straight parallel belts, all the same height. Toothed pulleys when the teeth are on the inside of the bend, smooth wheels where they are on the outside. Adjustable tension. Less racking, by moving the belts closer together on the X carriage.
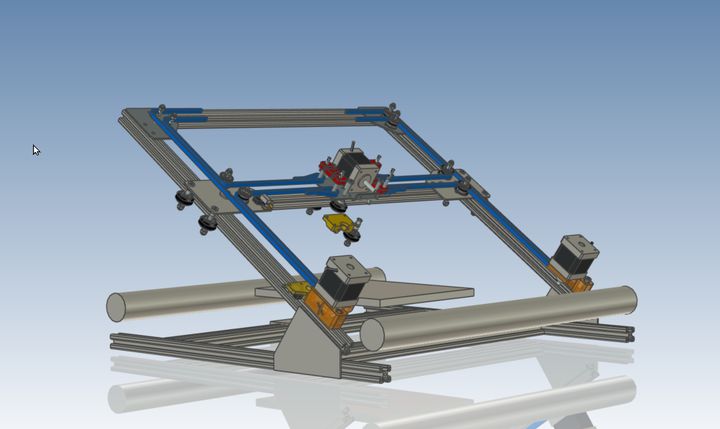
Personally I prefer the belts to run at different heights, left belt below the right belt. This makes crossing over at the top less of an issue, no belts rubbing together.
For the X carriage, instead of using a single plate of steel, look at a 3D printed part that can be made a lot more compact.
The motion system is V-slot profiles and wheels. This is normally quite a workable system, but this one does not have adjustment options. None of the wheels have an eccentric nut to adjust the play. Also, the wheels are a long way off the plates they are bolted to, with long plastic spacers.
Why is this a problem? There is no way to adjust the wheel pressure on the V-slot. There is no way to make sure the wheels will run smoothly, with no play. This combined with the belts being non-parallel, results in locking up when the motion is +X on my printer at least.
The long spacer means they will flex, and especially so due to their length, and the spacer being soft plastic. Flex in wheels means they do not run true, increasing the issues with the lack of tuning ability.
What I would like to see is the addition of eccentric nuts to the inside wheels of the Y carriage and the bottom two wheels of the X carriage. Reduce the distance of the plates to the 20×20 profiles. Use of standard components, like the OpenBuild parts.
Powerbelt3D Zero Printhead
The hot end is a mixture of different parts. A clone V6 with a MK8 nozzle. The thread on the nozzle is a lot shorter than on the V6. Result: the heat break screws down so far, the thin walled part is inside the heat block. And as per instructions, there needs to be 10 mm between the heat block and heat sink. So the heat break is only inside the heat sink by 2 or 3 threads.
Why is this a problem? There are two potential problems with the hot end. In the instruction video the MK8 nozzle is screwed all the way into the heat block and tightened on it. Then the heat break is screwed in as far as it will go. There is no way of tightening this enough, so I expect a lot of leaking between the nozzle and heat break.
By not screwing the heat break far into the heat sink, you will get clogging, due to heat creep. The heat break cannot dump its heat fast enough.
What I would like to see here is consistency. Use one brand of hot end and make it work. For instance, it looks like the Creality type hot end will fit and will work with the 35 deg angle chosen. Else, use the Mosquito, or an adapted V6 nozzle.
Powerbelt3D Zero Print Belt
The print belt. The print surface is made using a corrugated cardboard backing with a smooth plastic sheet glued to the top of it. Why corrugated cardboard? Why not just use the plastic sheet that is stuck to it?
Why is this a problem? Corrugated cardboards is a good thermal insulator. Adding an insulator between a heated bed and your print surface is not a good idea. Also, corrugated cardboard is just that, corrugated. The goal is to get a smooth and flat build surface, so why add corrugation? I expect to see Z banding happen just because of this.
What I would like to see is the way NAK 3D Design do it. Steel belt with Buildtak surface. Or a spray coated PEI surface. At least remove the cardboard!
Powerbelt3D Firmware and Documentation
The control system. I have not been able to get it to work. For one, it uses an old version of Marlin (corrected in the updated design) and there is an issue with the end stop cables getting very hot. The display looks to be a nice display but it is not working (yet). For now, testing continues on the excellent Duet 2 board. The materials that were supplied look to be good stuff, but do not work together.
What I would love to see here is the Duet Maestro board being used. The configuration of the RepRap firmware is so much easier and there are countless configs available for CoreXY. Even a perfect configurator to make your own.
Finally, the documentation. Or rather, the lack of any. I know, making a manual is not a fun job, I had to make 4 already for the Nimble. But if you want to sell a product (especially if it is a kit) you need to have a good manual. A good sequence of assembly, clear diagrams what goes where and what part to use. The assembly video helps, but is full of mistakes and does not contain the latest parts.
Because of Covid delays, Powerbelt3D had a lot of waiting time before they could ship. Perfect moment to build the manual.
Powerbelt3D Conclusion
The interesting thing is, having said all of this, I still like the printer. It is a fixable design, it has an active Facebook group, Powerbelt3D are actively communicating and when I needed help with one or two of the parts (in my design process for an improved CoreXY system) they sent the required files quickly. Also, for me the main reason I am keeping the printer, it is the cheapest Belt printer out there and since I need a belt printer, I am sticking with it.
My personal conclusion: If you have the skills and knowledge to tinker and improve, it is a workable printer that can be made to perform well. It is not for the plug and play crowd.
Via Powerbelt3D