
I’m watching a fascinating video showing an unusual technique for smoothing FFF 3D prints.
The FFF process is notorious for presenting surfaces with visible layer lines. That’s because the depositions are essentially a “tube” of softened material. The prints look like a pile of automobile tires if you look close enough.
For many parts that’s not an issue because the purpose of the part might be mechanical. Surface quality doesn’t help hold up your shelf or stop a lever from moving.
However, there are certain classes of parts that do indeed require proper surface finishes. One popular application of this type is cosplay. Costume components are intended to be visually inspected, so they must have the best possible surface quality.
How do you smooth out the surface of a FFF part? There are multiple approaches, ranging from acetone dipping (if ABS or ASA), sanding, epoxy coatings, machine tumbling and more.
But this week I saw an approach that I’ve never seen previously: using 3D printer resin.
YouTuber DaveRig published a video detailing this unique approach.
The idea is to fill in the layer line gaps with 3D printer resin, which can then be cured. However, resin can be pretty liquid and it would flow freely. Dave’s approach is to mix in corn starch into the 3D printer resin to thicken it up.
In the video, Dave suggests a 2:1 ratio of resin to corn starch, making a kind of “creamy” substance.
This was applied to a sample 3D print for testing with a foam brush. Afterwards, the FFF print with resin coating was placed in a UV curing station. That’s probably the first time I’ve seen a FFF print in that position!
I’ve done this sort of thing before with clear resin. By painting the resin print with the same resin and then curing it, you can gain a very smooth surface.
However, the layers are much more coarse on a FFF print, so I was curious to see how this experiment proceeded.
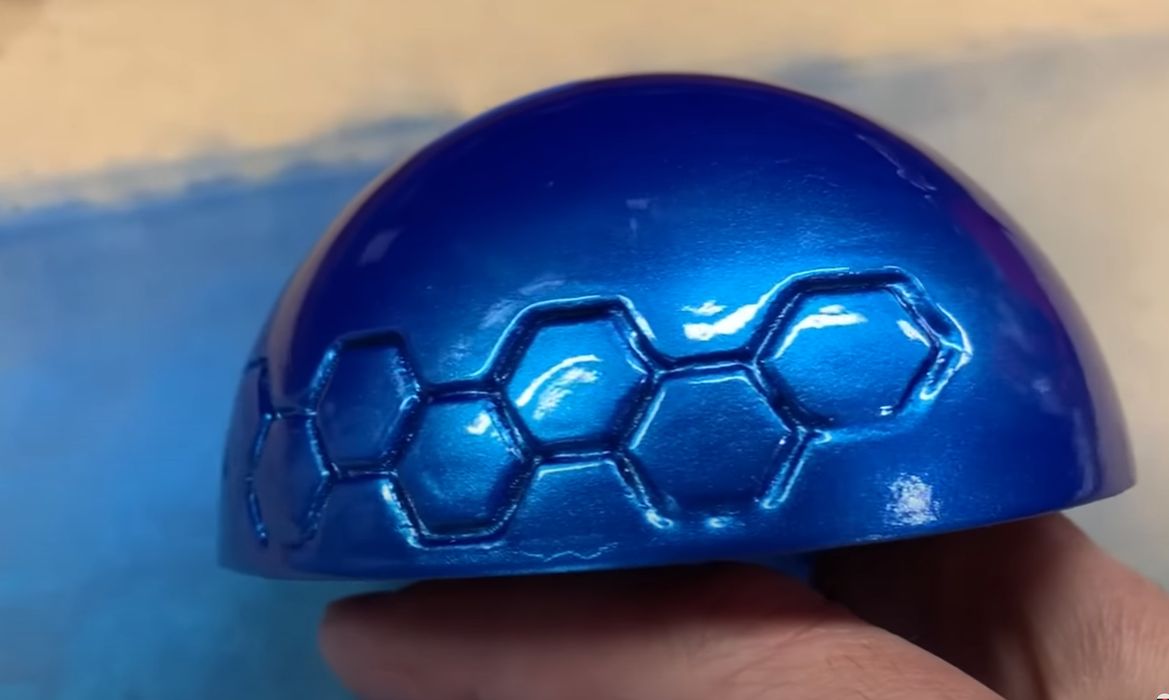
It turns out that it took multiple applications of the resin mix, followed by curing and sanding to achieve a smooth result. Dave then applied several coats of primer, followed by sanding with increasingly fine grits, to obtain a polished look.
This is reminiscent of the epoxy approach, where a thin layer is applied. Once cured, you sand it — and importantly — don’t blow off the dust when applying the second coat. That dust becomes part of the structure, just like Dave’s corn starch.
Finally, Dave’s test print was spray painted with a metallic blue finish and clear coat.
The result is very good, but my goodness, the amount of work required to get that done is quite incredible. There must have been several days of post processing required to finish all the steps.
Would this approach work? Certainly, and it’s perhaps a bit more handy than the usual epoxy approach because many 3D printer operators will have 3D printer resin handy.
However, regardless of the “fill” material, there will be repeated steps to achieve a good polished surface.
If you’re looking for a new approach to smoothing your FFF 3D prints, this could be one to check out.
Via YouTube