

Often you’ll hear someone talking about “dialing in” their 3D print. What does this mean?
What it means is to “tune” the machine to perform well and reliably so. At first, such a procedure might sound quite daunting, as there are dozens of mysterious parameters apparently involved.
In fact, this is true; there are probably over 100 separate parameters that govern the movement and behavior of the tool head on a filament-based desktop 3D printer. These must be set correctly in order to receive a good quality print.
But where to start? Those with experience likely spent considerable time iterating through these parameters, gradually learning what each setting meant and whether it was really important or not. It turns out many are not critical to the print, and quite a few are completely obvious.
This leaves a few that you really need to worry about.
You start by ensuring you have the very basic things set correctly: the type of material in your 3D print slicing program must match the material you intend on printing with, for example. Does the nozzle size on the machine match the nozzle size specified in the slicer? You must ensure the dimensions of the machine match those in the software, and so on. That’s easy stuff.
But then you attempt to 3D print something and find the print has poor quality. Perhaps the layers are not properly adhering to each other, or the surface quality is poor. Maybe there is excessive stringing between non-contiguous areas. These can mostly be resolved by “dialing in” your 3D printer.
Dialing in is the process of slowly and iteratively homing in on the optimum set of printing parameters for the specific machine and material being used. If you change the material, then you likely have to change the parameters.
And by “change the material”, I mean any change! A spool of, say, PLA from vendor A is more than likely not quite the same chemically and dimensionally than that of vendor B. Thankfully most vendors do provide consistent materials within their own product set, however.
The process is fairly straightforward, but can take a while to complete:
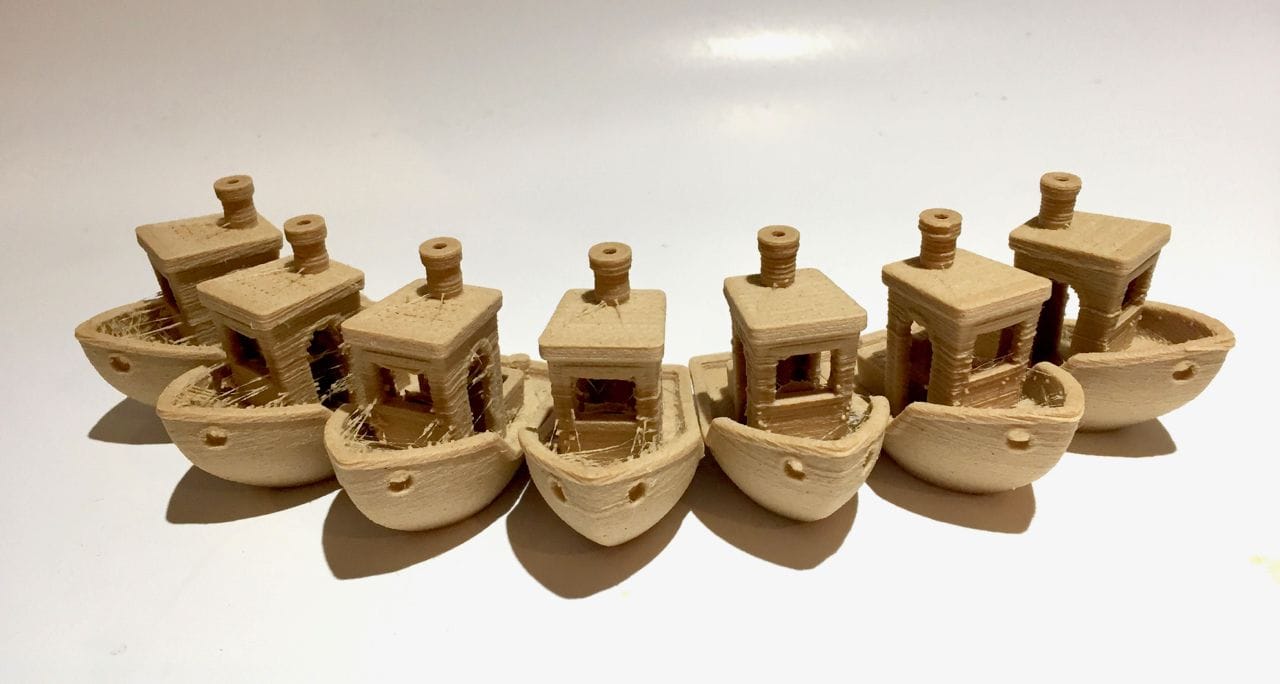
- Confirm Test Object: Select a standard print object that offers a variety of geometric testing conditions. One good object for testing is the famous #3DBenchy boat, designed specifically for this purpose, although there are many others. Just pick one and stick with it for the duration of the experiment.
- Print: Select some basic settings that are perhaps close to what you expect, like using the manufacturer’s PLA settings for a spool of random PLA, and print your test object.
- Label: Get a marker pen and label the print so you know which one it was. I don’t care if you label it with the parameters you printed with, or just a number indicating which print it was so you can look up on a separate chart for the parameters. You just have to be able to identify what was used to get that print.
- Inspect: Once completed, carefully inspect the print. Look at all the interesting geometric components of the print, including: drippiness of degrees of overhangs, limp bridging, rough surfaces, incomplete surfaces, blobs, gaps, layer delimitation, etc. Make note of each issue.
- Analyze: Based on your findings, attempt to resolve the issues one by one. Don’t try to change multiple settings as you will rapidly get confused. Yes, this takes longer, but your brain will not explode.
- Adjust: Change the settings in your slicing software with your attempt to resolve the situation. Remember, just change one.
- Repeat: Go back up to the Print step and do it all again. You’ll be repeating this process over and over, perhaps twice, or maybe twenty times, but hopefully each attempt will get you a bit closer to the optimum settings.
That process is fine, but what knobs do you turn? Which of the 100+ settings are most important. There are many things you could change, but I find that the following six items seem to have the most affect on the print quality.
- Speed: Generally speaking, print quality increases if you print slower. If you see things as looking wobbly, particular on corners, slow the print down. Once you get the other settings correct you could then consider gradually raising the speed to see how fast you can go without causing troubles. And what is slow? It depends on your machine, but a good starting point might be around 40mm/second.
- Temperature of Extrusion: Some filaments are quite sensitive to temperature, while others are not. Here you are looking for layers that don’t stick together well, which usually means your temperature is too low. On the other hand, if you observe slumpy parts or dripping overhangs, then perhaps your extrusion temperature is too high.
- Temperature of Bed: Usually you don’t have to fuss with this, but sometimes materials are cranky – that is to say, they don’t stick very reliably to the bed – and you have to raise the bed temperature a bit. But be careful as too high a temperature could cause deformations on the lower portion of your print.
- Extrusion Multiplier: This is a very important knob, as it can increase or decrease the amount of material being extruded. If you find gaps in a surface, for example, you might want to increase the extrusion multiplier to put out more material to fill those gaps. On the other hand, if you observe blobs, perhaps there is too much extrusion and you want to reduce the amount of material coming out.
- Retraction: “Stringies” are very common and are caused by leaky nozzles. The solution is to perform a slight retraction of the filament to slurp up these drips before they come out of the nozzle during non-printing movements. However, some materials are more drippy than others. If you see strings, increase the retraction amount. And then do it some more.
- Z-Gap: Your first layer is critical, as its adhesion largely determines whether the print will succeed. There are plenty of guides on the net for this, but ensure that your Z-gap is tight enough to ensure a good, smooth first layer. If your first layer looks stringy, or even wobbly, the gap is too much. If the extruder is choking because there is insufficient space between it and the print surface and cannot extruder, then it’s too tight.
These are my simple methods for dialing in a 3D printer filament. Do you have some additional steps to add?