
![Making 3D print slicing much smarter [Source: CNC Kitchen]](https://fabbaloo.com/wp-content/uploads/2020/05/slicing-ov_result_img_5eb09d181350b.jpg)
After watching a fascinating video showing a powerful strengthening technique, I am convinced we have a long way to go with 3D printing software.
The 3D print world is served by a selection of “slicing” programs that convert a solid 3D model into an executable toolpath for 3D printers to use. This is the same CAD–>CAM process that’s used for other digital manufacturing equipment, but tuned for the needs of 3D printing processes.
The most popular 3D print slicing systems are Simplify3D, Slic3r and Cura, with the latter two being free, open source options.
While these systems offer a number of features that can be used to tweak the GCODE generation to better suit specific part needs, there always seems to be a requirement for making stronger parts with an optimum amount of material.
Recently I’ve seen a very powerful technique to overcome these limitations, as described by Stefan Hermann, who operates the fascinating YouTube channel “CNC Kitchen”. Hermann’s videos often deal with highly technical testing of 3D printing equipment and materials, frequently using his purpose-built test gear.
In this video, Hermann explains an amazing way to strengthen parts in the most optimal way:
It’s a multi-stage process.
First, he takes the part in question and performs a finite element analysis using Autodesk Fusion 360’s simulation feature. This results in a 3D model of a hypothetical “optimal part” for the forces involved, but it’s essentially a subset of the original, non-optimized 3D model.
![Optimizing a part using Autodesk Fusion 360’s simulation feature [Source: CNC Kitchen]](https://fabbaloo.com/wp-content/uploads/2020/05/image-asset_img_5eb09d187b217.jpg)
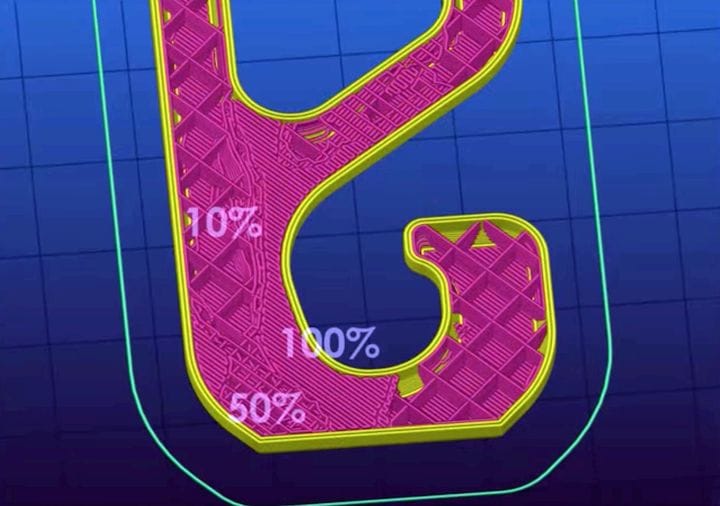
Hermann then overlays that optimal subsection with the original 3D model and uses obscure features in Slic3r or ANSYS to create a region in the print that has different slicing parameters. Basically, the “important” region is set to have higher strength attributes by increasing the infill density, for example.
His subsequent tests show a very clear improvement in the prints’ strength using this amazing technique. This is something almost any 3D printer operator could make practical use of.
![Testing the strength of 3D prints with optimized slicing [Source: CNC Kitchen]](https://fabbaloo.com/wp-content/uploads/2020/05/slicing-testing_result_img_5eb09d18b5a9a.jpg)
While Hermann’s innovation is startling, it also tells us something about today’s slicing software: it’s not as smart as it should be. This technique makes basic slicing look “dumb”. It could be far smarter.
I have had thoughts similar to Hermann many times as I tediously observe the toolpath being executed on a 3D printer. I might think, “why couldn’t you do this or that?” and sigh because the slicing concepts are so basic from all of these tools.
Yes, they are designed to make life easier for those who are new to 3D printing or don’t want to learn the ins and outs of more advanced 3D printing. But what about the much more advanced users? Are they left to purchase and use only powerful tools that come with the most expensive 3D printers?
Surely there are ways to make much more powerful slicing systems, ones that integrate with CAD tools to prepare far stronger, durable parts.
Perhaps this is what Simplify3D has been hinting at with their mysterious version 5 upgrade, where they say they will be making a “massive update”.
Via YouTube


No one seems to offer collaborative 3D printing modes on dual extrusion devices. We explain why this is the case.