
![The usual result of a 3D print becoming unstuck from the print plate [Source: Fabbaloo]](https://fabbaloo.com/wp-content/uploads/2020/05/image-asset_img_5eb08bcaea8e1.jpg)
3D printing is usually an exercise in hope, as the odds of a failed 3D print job are pretty high as compared to other making activities.
This is particularly true in filament 3D printing, or, as it is popularly known, the FFF process. In FFF the material is applied to the print bed where it must stick to the bed for the duration of the print job.
It must then paradoxically release the print easily somehow after the print completes. This requirement for both sticking and not sticking results in solutions that try to ride the line between both objectives, and sometimes it doesn’t work too well.
One of the most frequently encountered 3D print fails is that the print doesn’t stick to the bed. A print that becomes loose is actually worse than just having a print fail, because that loose chunk of plastic can often get tangled up in the 3D printer’s motion system and cause significant damage.
A very typical scenario occurs when the loose print sticks to the still-moving hot nozzle. This effectively plugs the path for material emerging from the nozzle, so it often piles up around the hot end. Sometimes you’ll unfortunately find your entire hot end and extruder surrounded in a giant, solid blob of expensive thermoplastic.
These situations are definitely to be avoided. But why does a 3D print not stick to the print plate? I’m listing seven common reasons for this to occur, and what you might do about each.
Build Plate Chemistry
![3D print came apart from the print plate due to insufficient glue stick application [Source: Fabbaloo]](https://fabbaloo.com/wp-content/uploads/2020/05/image-asset_img_5eb08bcb42b7d.jpg)
There are many different types of thermoplastic used in FFF 3D printers, and they have different chemical reactions to each other and the print surfaces. Some will stick naturally. Some will stick so hard they cannot be removed. Some will not stick at all. For example, if you’re 3D printing PLA on a cold, bare aluminum plate, it is not going to stick.
Solution: For a given material, there are correct build plate surfaces that can provide appropriate level of adhesion. Be sure to match them. In some cases the adhesion can be provided by an additive applied to the build plate, such as a glue stick or a commercial solution. Another solution is to acquire a third-party semi-permanent film coating for the build plate, such as those from BuildTak.
Temperature and Warping
![A 3D print in the midst of warping off the print plate [Source: Fabbaloo]](https://fabbaloo.com/wp-content/uploads/2020/05/image-asset_img_5eb08bcb7eeda.jpg)
When the material is first extruded, it’s hot. And that means it has expanded. But as the print proceeds, the originally hot material slowly cools, and it corresponding shrinks. The shrinkage manifests itself as a warped print that gradually peels itself off the print plate during printing.
Solution: Many 3D printers today have heated print plates, which attempt to maintain the expanded size of the initial extrusion through temperature. However, even with a heated build plate, the operator may not set the temperature to a level high enough for the specific material being 3D printed. Always ensure the build plate temperature matches that required for the material.
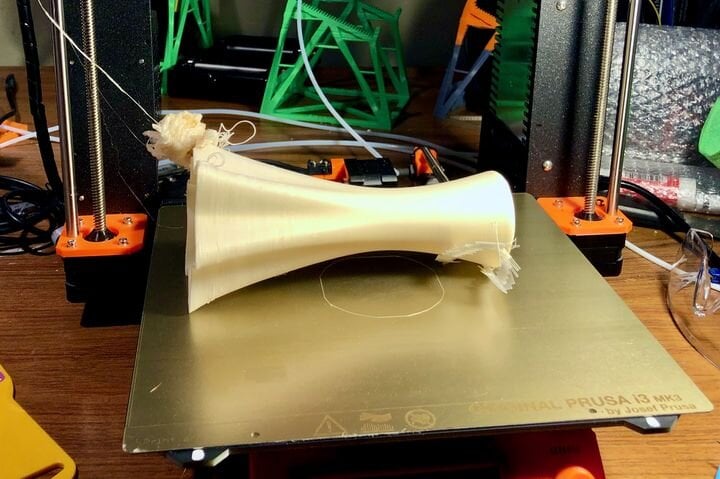
Tower Torque
![A tall, tipped over 3D print that didn’t stick properly [Source: Fabbaloo]](https://fabbaloo.com/wp-content/uploads/2020/05/image-asset_img_5eb08bcbd42bf.jpg)
I’m not quite sure what to call this one, but I made up the name “Tower Torque”. This effect occurs when you have a very tall 3D print. At the top of the print, near the end of the job, the print is quite high and as the nozzle moves along the top surface, it can present a slight pull on the “tower” as the extruded material emerges.
In some cases that repeated slight pull is enough to gradually unstick the tower and tip it over.
Solution: For tall tower 3D prints, always ensure there is a very solid base. Usually this means a large, flat bottom. If need be, a brim can be added to make a larger base, and this can be pulled off the print after the job completes.
Non-Flat Bottom
3D models with flat bottoms are the easiest to 3D print because the bottom will stick very well. But sometimes they don’t!
What usually happens is that an inspection of the so-called flat bottom reveals it isn’t flat. There might be a small portion that extends downward. That small portion becomes the first layer, and it’s nowhere near large enough to support the rest of the print above it.
Solution: Do not assume a 3D model that appears to have a flat bottom actually has a flat bottom. Open the 3D model in a 3D viewer and view the mesh directly to see if there are protuberances. If any exist, slice them off with a 3D modeling tool.
Dual Extruder Misalignment
Some 3D printers have two extruders, and it’s up to the operator to ensure they are properly aligned. In practice, this means they are both exactly at the same height. However, sometimes they are not. As a result, it is possible for the “other” not-in-use extruder nozzle to impact on a portion of the 3D model and loosen its grip on the build plate.
Even if the two nozzles are perfectly aligned, it’s also possible for a glitch in a previous extrusion or slight warping to present a portion of the print “above the line”, where it can be struck by the moving nozzles and loosen the print.
Solution: The best solution is to not use dual nozzle 3D printers. However, there are some machine designs that lift the unused nozzle high enough to avoid any possibility of collisions.
Large Z-Gap
If the machine is poorly calibrated, then the first layer is extruded too high to achieve proper contact with the print plate. Only a small portion of the thermoplastic will touch the plate, leading to poor adhesion and a likely print failure.
Solution: Always calibrate the 3D printer properly, and in particular, pay close attention to the Z-gap, the distance between the nozzle and the plate. Many current machines provide a “Live Adjust” feature that is incredibly useful for this calibration. My approach is to 3D print a large one-layer object and twiddle with the Z-gap until it’s perfect.
Top-Heavy 3D Model
Imagine 3D printing a classic diamond shape, with a pointy bottom and a fat top. More than likely, it will not succeed because the weight of the top is too much to be handled by the spindly bottom that attaches to the print plate. Eventually when the top-bottom weight ratio changes as material is added, the print could simply tip over.
Solution: Before slicing a print job, ensure the majority of the material is on the bottom. Sometimes this means the print must be re-oriented, or even upside down. But that’s ok, 3D printers can 3D print in any direction.