![Preparing to anneal — heat treat — a 3D print [Source: Reddit]](https://fabbaloo.com/wp-content/uploads/2020/05/image-asset_img_5eb0984de868e.jpg)
Many 3D printer operators are unaware of a technique for transforming materials into stronger versions: annealing.
Annealing, as described by Wikipedia, is:
“A heat treatment that alters the physical and sometimes chemical properties of a material to increase its ductility and reduce its hardness, making it more workable. It involves heating a material above its recrystallization temperature, maintaining a suitable temperature for a suitable amount of time, and then cooling.”
This initially sounds unworkable, as heating a thermoplastic might cause the original object to lose its structure, but in an annealing process, the temperatures are carefully selected to prevent that — mostly — from happening.
Most 3D printer operators are familiar with the most common materials, and in particular their engineering properties: PLA is easy to print, but has a low softening temperature and isn’t particularly strong. ABS is harder to print, but can withstand higher temperatures, etc.
But it is possible to change the properties of the prints after they complete through annealing. However, the results vary depending on the specific material involved — especially including the slight material variations provided by many 3D print material vendors — and even the geometry of the parts themselves.
The process is quite straightforward. The completed prints are placed on a non-heat-conductive platter and then placed in an oven at the suitable temperature for a period of time. For plain PLA, that temperature is said to be 100C. Cooling must be done very slowly, and sometimes takes many hours to complete.
The results are usually:
-
The object has greater mechanical strength, sometimes as much as a 40% increase.
-
The object becomes much more brittle and can more easily break.
-
The object is somewhat more temperature resistant.
-
The object shrinks in the XY axes and curiously expands in the Z axis.
The strength increase is the most desirable feature, and one can design around the expansion/contraction aspect if the ratios are known ahead of time.
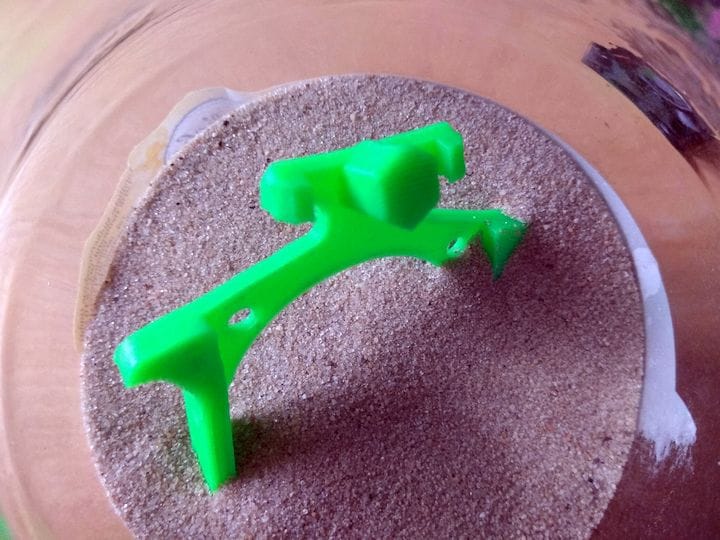
Reddit contributor Goliat Skipson provided an interesting tip for 3D print annealing: bury the object in sand when heating. This prevents, or at least minimizes, warping during the heating process.
![Two annealed 3D prints. Top example was treated in sand, while the bottom example was not and warped [Source: Reddit]](https://fabbaloo.com/wp-content/uploads/2020/05/image-asset_img_5eb0984e3a2e3.jpg)
Several videos of 3D print annealing have been made, and they also include detailed test results from a number of experiments with different materials, including PLA.
This one is from Thomas Sandlerer:
And here’s another from Stefan of CNC Kitchen:
Finally, Fabbaloo friend Joel Telling also attempts annealing in a case study to print a car shifter knob that must endure hot vehicle temperatures without deformation.
For anyone 3D printing mechanical parts, annealing is a process that should be considered, particularly if the application involves exposure to higher environmental temperatures.
It’s a relatively easy process that any 3D printer operator should be able to handle.