

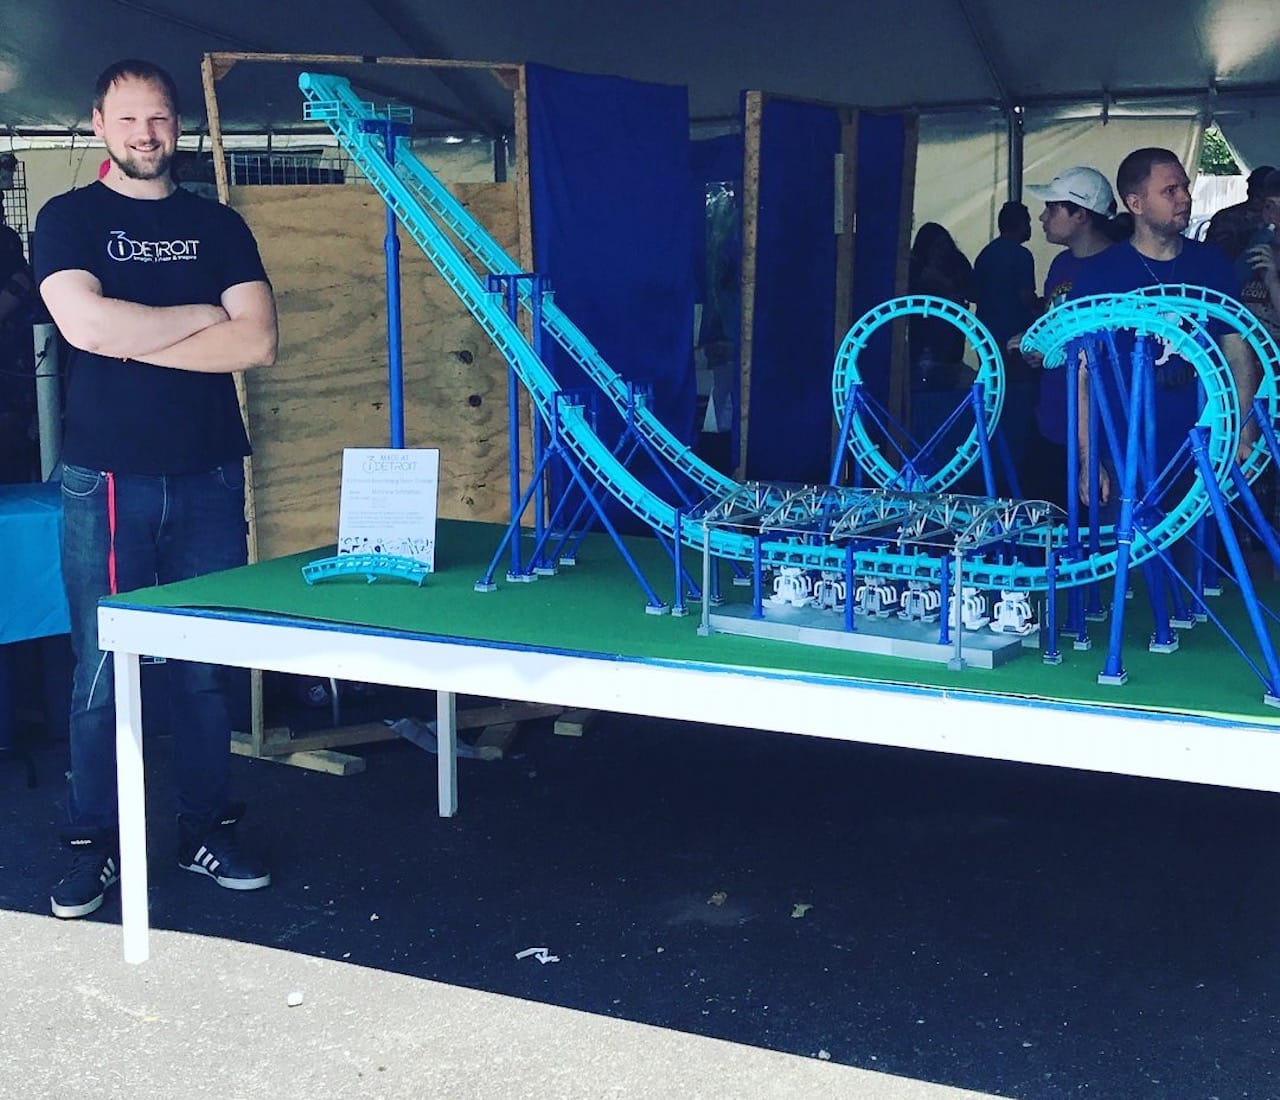
Matt Schmotzer, a graduate student at Purdue University for mechanical engineering, has always had an affinity towards both roller coasters and 3D printing.
While studying for his master’s degree, as well as working at Ford Motors, Matt decided he also had enough time to throw in a side project to work on. In his project he combines both of his passions, as he has now 3D printed and constructed a replica of the Invertigo Roller Coaster; which he designed completely in SOLIDWORKS.
Haven’t heard of this roller coaster? It is the one of three inverted boomerang styled roller coasters in the United States. This particular ride is located at King’s Island Amusement Park, in Mason, Ohio. After viewing his design and learning about his display of the model at the Detroit Maker Faire, I had to follow up with Matt to ask him some questions about his experiences in creating the roller coaster, as well as his aspirations in what he believes this project can do for him in the future.
Connor Burke: What gave you the idea of designing the Invertigo in SOLIDWORKS, 3D printing the necessary parts, and then constructing it in real life?
Matt Schmotzer: Right now I’m a grad student at Purdue. I graduated from Purdue with my undergraduate in Mechanical Engineering, and a minor in Manufacturing Graphics, which essentially is just CAD design. I took a bunch of courses with CATIA, and then through the school of Mechanical Engineering, they teach you SOLIDWORKS, so I’ve actually been using CAD software for the past seven years, even more… but the reason I picked to do a roller coaster design is because, I love roller coasters and I like 3D printing, so why don’t I just combine both of those, and do a 3D printed roller coaster?
The next decision I said to myself was, ‘If I do this, which ride am I going to make?’ So I wanted it to be a ride I’ve ridden on myself, and I wanted it to be a ride that’s small enough so that when I build it, it can fit in my garage; because roller coasters can have a giant layout and they’re all unique in their design… I actually started the design back in January, when I was fiddling around with SOLIDWORKS for another class project, which was a fuel sender we were working on. I did that project and I just was playing around, making the roller coaster design in SOLIDWORKS. Then once I got it about 80% complete, I was like, ‘I should just start 3D printing this!’
It wasn’t until about a month ago where I had enough free time to kick off all the printers and actually start printing out all the parts, so the past week I’ve been just trying to get it all assembled, and fully operational. I haven’t gotten there yet, but I’m hoping once it’s all complete I’ll be able to post it by actual CAD files on Thingiverse, so anyone with a 3D printer can go and just print it out without having to do any of the leg work for the design; so that’s kind of a work in progress to come.
Connor Burke: What did you mean when you said the main focus of this project was to create a “working” roller coaster?
Matt Schmotzer: I thought about having it work in SOLIDWORKS, but when I say working, I want it to physically work so I’d 3D print out all the parts, and then have the train run on the track and on the rails physically. I never actually thought about doing it virtually through SOLIDWORKS [simulation]. I know it’s possible, but I’ve never actually played with simulations in SOLIDWORKS. I’ve never tried that, but I know it’s possible, and that would be something that I could potentially do in the future.
Connor Burke: Are you certified in SOLIDWORKS?
Matt Schmotzer: Not that I remember. The school had the software available in the lab, and it wasn’t really well thought out from the school’s aspect, because in mechanical engineering a lot of the kids didn’t even have any experience with CAD design. So for my senior design project, that was the first time I used SOLIDWORKS, and that was back in 2012. The school basically said, ‘Here’s SOLIDWORKS. Just go at it!’ A lot of kids struggled because they’d never used it, and the instructor essentially told us, ‘You got to start playing around and using it sometime, because if you’re going to be an engineer, you’re going to have to be able to do design work.’
It wasn’t the best way to go about it, but through my minor, through the School of Technology… they gave you intense training on how to use CATIA, which DASSAULT SYSTEMES owns both programs; so once you know one program, it’s kind of easy to learn the other one… There was a bit of a learning curve, but I caught on really quickly.
Connor Burke: Have you finished your project completely?
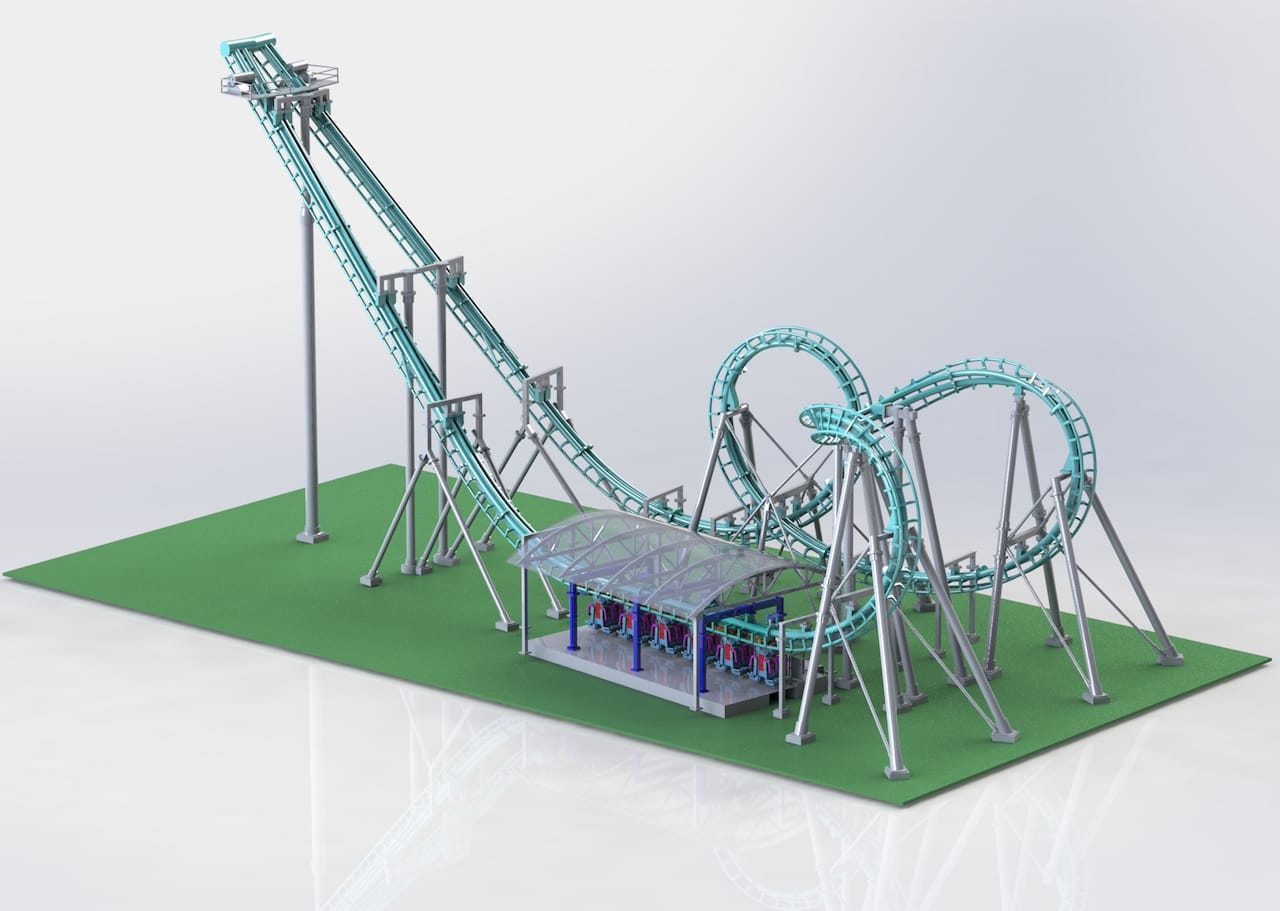
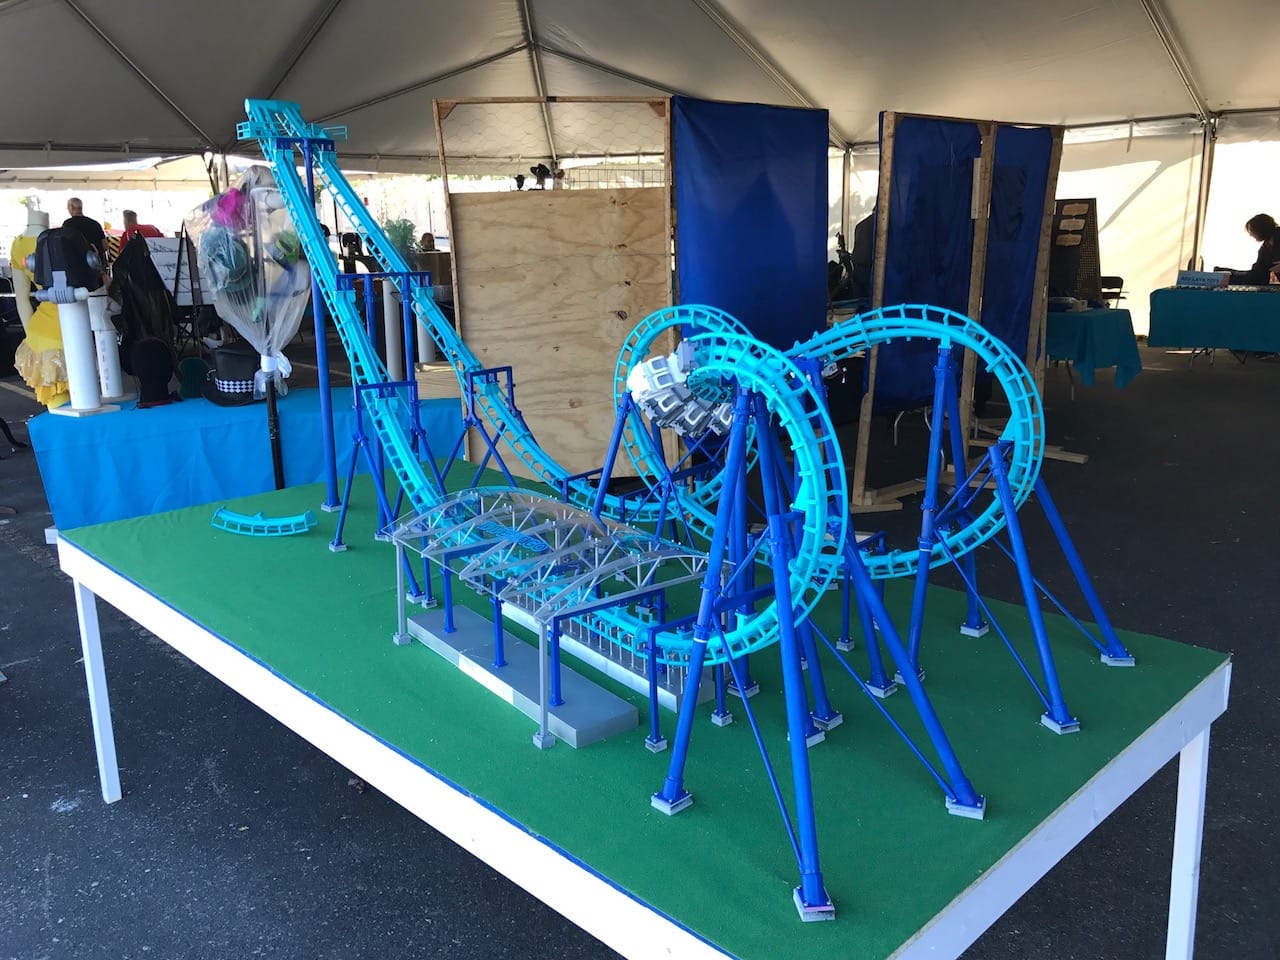
Matt Schmotzer: It’s not complete. It’s a fully complete static model, meaning I have the whole structure built, all the supports and the track put together. What’s not complete is I want to have the train physically running on the track, and the train was also designed in SOLIDWORKS and 3D printed.
The hiccup there is, when you do a scale model you are scaling everything, but you are not scaling gravity. When you think about momentum and getting the train through the whole circuit, momentum is mass multiplied by velocity; so you need to make sure if you’re scaling this down to 1/25th scale, your mass of the train has to be at least 1/25th the weight of an actual train to keep the momentum to go through the whole circuit. I need to make sure I reduced all the friction on the wheels and the rails, so I’ve got to sand it to make sure it’s all fine-tuned, and then I also have to make sure I get bearings on the wheels that are low friction bearings.
Connor Burke: How do you plan to circuit the train around the whole track?
Matt Schmotzer: Hopefully it’s going to function like a real roller coaster, so it’s going to be all gravity driven. It is a chain drive that, I don’t know how familiar you are with the physical ride, but what happens is, it’s a shuttle roller coaster. It starts you at the station and the chain takes you to the top, and then releases you. Then you go through the whole circuit up to the second tower, and it takes you back up, and then it drops you and you do the whole circuit backwards… So it’s all going to be gravity propelled, just like the real thing. You just have to make sure the 3D printed part rains are finely sanded.
Connor Burke: How long does it take to 3D print each part of the roller coaster?
Matt Schmotzer: The average track piece is about 10 inches long, and about 2.5 inches wide, so it takes about 12 hours to print one track piece, on average.
Connor Burke: Tell me about the process of printing out each part, then assembling them together. How long did it take to assemble the roller coaster together?
Matt Schmotzer: I have six personal printers, because once you buy one, you kind of have to go buy more because it’s such a fun hobby, and you just want parts faster. I have two LulzBot TAZ 5s, a LulzBot TAZ 6, a MendelMax, a VORON CoreXY, and a Flashforge Finder. However; all the track pieces were printed on the LulzBot TAZs, because they can support up to a cubic foot of print space. Then the other three printers were just doing all the support structure, and all the support materials.
The vertical supports that are cylindrical, those are just dowel rods, but everything else is 3D printed. The cool thing about this project is that from the CAD, you can see the footer layout. This is one of my favorite parts that I love in SOLIDWORKS! You can lay down a sheet and extract all the footer locations as a DXF [file], and use the laser cutter at the shop to laser cut the plywood sheet so I could get the actual exact location of the footers for all the supports.”
“This was a life saver because when you’re assembling it, it’s kind of like an art in the sense of, ‘Do I put the footer here?’ You’ve got to measure it out, and it was super easy in this case. All I did was export the DXF and then the laser cut all the bolt hole locations on the ground, so I could just easily assemble the footer. It knew exactly where it was going to go.
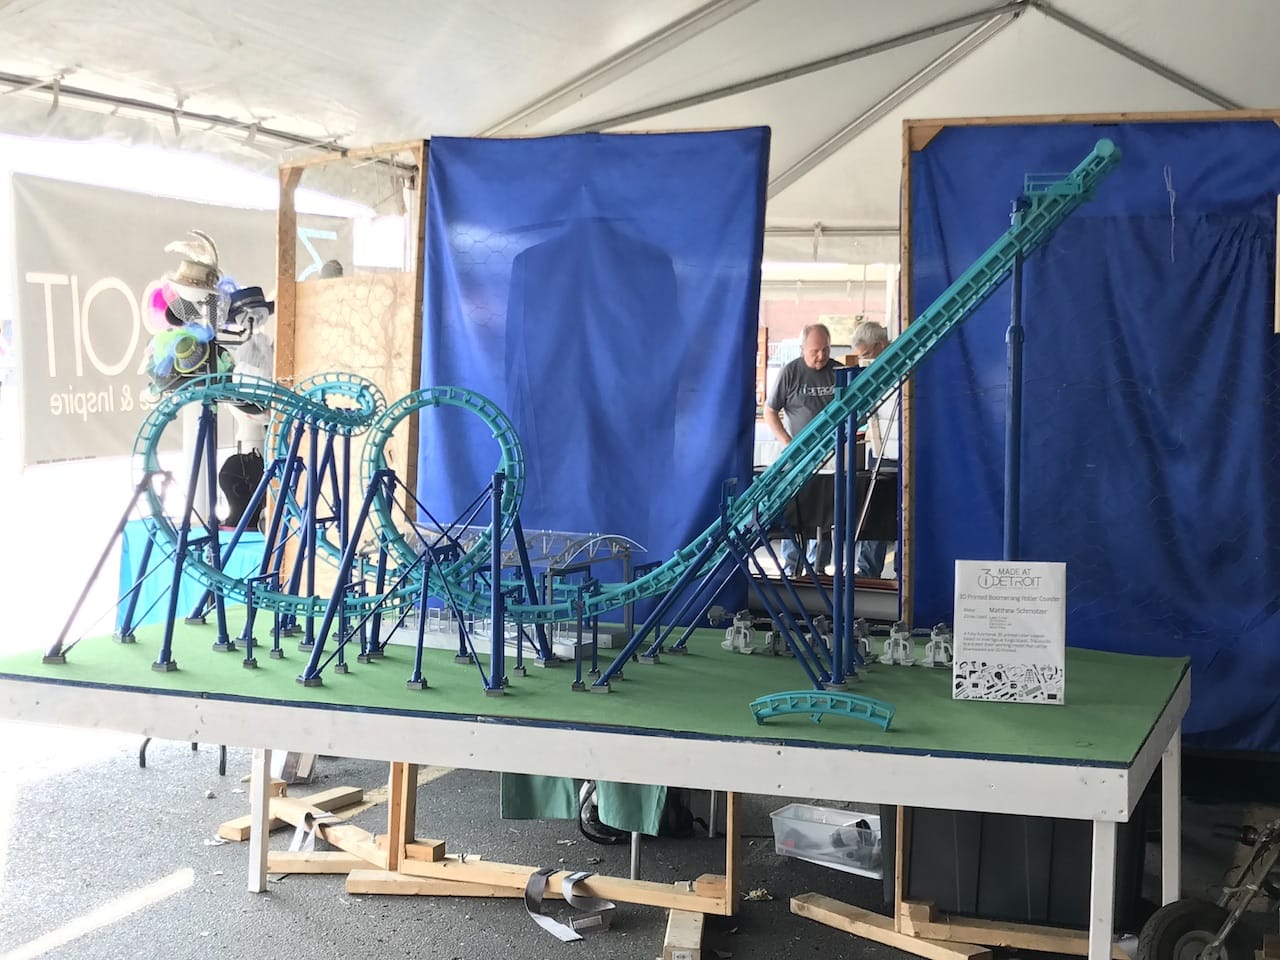
Then I just poked a little hole through the little fake grass, and I just bolted it down. So, it’s actually bolted physically to the table, just kind of like how a real one is, where they would fasten it right to the cement concrete footers.
If you asked me before I assembled it, I would’ve told you, ‘It should probably take a day or two.’ It took about a week and a half, and like two full days over a weekend to get it all assembled because each track piece is bolted together; just like an actual roller coaster. When they manufacture a roller coaster, they manufacture each individual track section, and then they bolt it together on site. I wanted it to be as authentic as possible, so I wanted to do it the same way. I’ll 3D print each individual track piece, and bolt it together with M2 fasteners. It took a long time because each part has about four M2 screws that have a nut on the other end, that can fasten together. It just takes a lot of time, because you have to fit your Allen Wrench in between all these track pieces, and there’s some that have a really tight clearance to get the wrench in there.
Connor Burke: How were you able to transport the Invertigo model in and out of the Detroit Maker Faire?
Matt Schmotzer: The Maker Faire was at the Henry Ford Museum in Deerborne (Michigan), and they got it pretty well regimented. You have to come at these certain times to drop it off, and when you pick it up, they form a line for all the vehicles… For the Maker Faire, I used my father-in-law’s box truck, and it just fit right in, so he helped me with that. We just pick it up, throw it in the box truck, and we’re out and on our way. The whole model is on an 8’ by 4’ table, and it stands about 6’ high, with the roller coaster and everything; so it’s not small, but you can definitely transport it.
Connor Burke: What other projects have you designed in SOLIDWORKS? Do you plan on doing any for the future?
Matt Schmotzer: I originally was thinking about all other projects that I’ve done in SOLIDWORKS, and the first one that came to mind was an automated pizza slicer for my senior design project. They made us use SOLIDWORKS at school, and that whole pizza slicer was designed in CAD by myself. I really wanted to grab a picture of it in CAD, but I couldn’t find one. It’s probably on my old laptop that I used for school.
[Another project I previously worked on, which was] in this last class I was in called… ‘Design for Manufactured Ability’… In the class, we had to come up with a product and design it, or take an existing product and redesign it, so that it’s either more efficient or more functional. We used a fuel sender, which is this component that goes in the fuel tank of your vehicle and pumps the fuel from the tank up to the motor.
Our design was just making it more modular so that when you are assembling on the assembly line, it’s just easier to install than the current design that most automotive companies use; and that whole design was made in SOLIDWORKS… While I was working on that, I was tinkering around with [the Invertigo project] on the side, and that’s how it became to be.
For future projects, as long as I still have access to [SOLIDWORKS], I really want to do another roller coaster that’s bigger; but before I get kicked off on that, I want to finish this one. I want to make it so I can take all the files and just upload them onto Thingiverse, so that anyone can just download it for free, and just kind of get momentum… but I haven’t posted anything yet. I kind of went dormant, because I’ve just been trying to get it done, and just putting it together has taken a lot longer than I anticipated. I figured in the future, in the next few months, I could probably design another one… but that’s a project that’s probably further out once I get this model complete.
Connor Burke: Do you plan to use your Invertigo model to help outsource yourself for future career paths?
Matt Schmotzer: As I said, I want to put it on Thingiverse so that anyone can have their hands on it. One of the cool things about just knowing CAD design, engineering, and product development, is it always helps. It just shows that you understand the tool, and one of my professors always said, ‘The best CAD software is the one you know,’ because once you know how one function, you can switch between using software like CATIA and SOLIDWORKS.
I really like 3D printing. I guess the image I want to put out there is if you really like roller coasters, you can 3D print your own and kind of just make it a community base where everyone’s feeding off their ideas.
Connor Burke: Have you thought about making tutorial videos on the process of designing this model?
Matt Schmotzer: Definitely, because even on Reddit people have been asking me, ‘How the heck do you model this?’ I know a thousand ways not to build a roller coaster, because I’ve just tinkered around with it so much.
To answer your question… I always thought I could put a little tutorial video out there and be tell viewers, ‘If you want to design a roller coaster, here are a couple few steps to get you started, and some of the obstacles you may encounter.’ I would also explain how to properly attack those with SOLIDWORKS.
Matt plans to graduate with his master’s degree in Mechanical Engineering this December. For more information about his Invertigo model, click the following link to visit his Reddit and Instagram pages.