
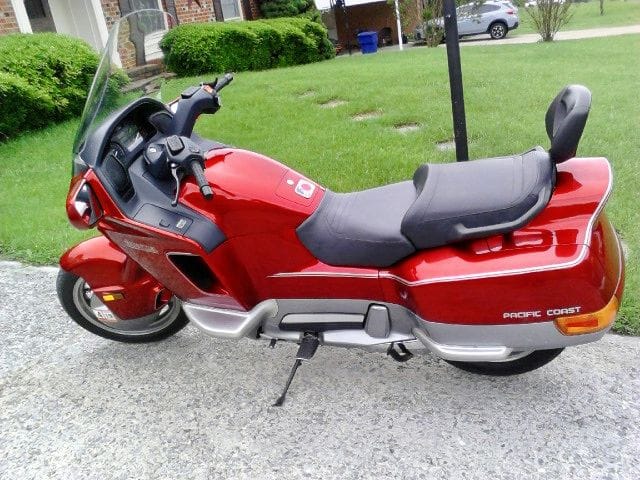
![A beauty of a motorcycle - before the accident [Source: Tim Brogan]](https://fabbaloo.com/wp-content/uploads/2020/05/image-asset_img_5eb094f37384c.jpg)
How could one re-engineer parts for a motorcycle?
Reader Tim Brogan asks:
“I have a 1990 Honda PC800 and there are NO used right side mirrors/signal assemblies available.
This is a motorcycle that has a ‘cult’ style following of owners and being that it was only made for 7 out of 10 years of its production run and being less than 15,500 made world wide. There are no OEM body parts and no NOS on the shelves at dealers.”
This is quite an impressive motorcycle, as Tim shows in some images he’s passed to us.
Unfortunately, someone backed into this beautiful bike and smashed the right side mirror/turn signal assembly. Here you can see the damage to the vehicle:
![One side mirror assembly broken off the motorcycle [Source: Tim Brogan]](https://fabbaloo.com/wp-content/uploads/2020/05/motorcycle-parts-reengineering-broken-mirror-1_img_5eb094f3ba4f4.jpg)
Tim seems to have exhausted all the usual sources of actual spare parts to repair the motorcycle and now intends on resorting to custom building a replacement part — or parts. But how does one do so? Could 3D printing do the job?
One approach might be to find a custom auto/motorcycle parts company, one that is accustomed to developing parts on demand. I’m not sure of any specific companies here, but I am quite certain they exist. However, while that option would probably produce a near-exact replica of the original parts, it would probably be quite expensive to do so.
The reason for the price is the series of steps that would have to be undertaken to produce the part. In this project, as all 3D printing projects, one starts with a digital design, 3D printing of the model, post processing, and finally assembly. This motorcycle project is no different.
But there are some challenges.
Challenges To Re-Engineer Motorcycle Parts
First, let’s look at the digital design step. Unless you are Honda and have access to their deep CAD libraries, you likely won’t have the actual digital design. Thus it must be reproduced.
There are two approaches to creating the digital design. One would involve hiring a CAD expert to examine the surviving module and design a 3D model from scratch based on that. The designer would carefully measure the structures from all directions and gradually build up a 3D model. From the looks of the parts, it could be challenging to do so and take considerable time.
There’s another complication here: the side mirror/turn signal assembly is not one part, but likely several parts bolted together. These would each have to be identified and separately 3D modeled in CAD so that each could be produced. One way to do this would be to disassemble the surviving assembly.
The second way to obtain a digital model would be via 3D scanning. But really, this is simply a short cut to the first approach: the parts would be 3D scanned and their rough representation would be imported into a CAD system where an expert would “trace” on top of the scans to re-develop the 3D model.
Once the 3D models are designed, then it’s a matter of producing the real objects. This can, of course, be done with 3D printing. However, it’s highly likely the 3D models are not quite right yet. Thus some prototypes should be printed with inexpensive materials first. These would be then tested for fit on the bike. If they don’t fit quite right, then it’s back to the 3D modeling tools to make adjustments.
This stage will probably incur several iterations to achieve the correct 3D model.
![Dashboard view of the motorcycle with missing right mirror [Source: Tim Brogan]](https://fabbaloo.com/wp-content/uploads/2020/05/motorcycle-parts-reengineering-dash-1_img_5eb094f4093d2.jpg)
3D Print Materials for Motorcycle Parts
Then it’s time to produce the final parts. The materials for the parts must be carefully considered. For example, if any exposed plastic is present, then it should be made from a weatherproof material such as ASA, and not ABS, which degrades in UV sunlight.
On the other hand, some of the parts will be painted, thus providing a layer to protect them from the outdoor elements.
It’s likely that the several parts may be best 3D printed in different materials to best match their function.
Then there is the post-processing step, where the printed parts are “finished”. This means they are cleaned from any stray support structure material used during 3D printing, and their surfaces are sufficiently smoothed. For the internal parts, the surface quality likely doesn’t matter much. But for the main mirror housing, yes, you do want a very smooth finish to accommodate the paint.
Smoothing in this case is probably best done manually by iterating using increasingly fine sandpaper grits. When the housing is sufficiently smooth, it can be painted in the usual manner, so long as you can find a color match with the rest of the bike.
Finally, all of the parts must be assembled and tested. That’s probably the easiest part of this entire sequence.
Re-Engineering Motorcycle Parts Costs
Tim, if you’re still reading at this point, you may now understand why re-engineering a vehicle part can be quite an expensive proposition. It may seem like the logical thing to do: print a replacement, but without the 3D model — being held in jail by Honda — a great deal of CAD work must be undertaken.
Unless you happen to be a CAD expert, you probably have to hire one, and they are paid by the hour. I suspect many hours would be required to produce the models in this scenario.
The costs of printing would be more acceptable, and in particular the cost of prototypes would be pretty cheap. They could be 3D printed on many inexpensive 3D printers, so long as the build volume is sufficient to hold each of the parts individually.
The production parts may be more expensive, as they might have to be printed in an engineering material. If 3D printed in a less expensive material, like ASA, then it may not be a big deal.
The cost of painting is likely relatively inexpensive and could be found at your local auto body shop.
As you can see, this is a non-trivial project that could be quite expensive to attempt. In fact, it may even be cheaper to scour junkyards and other sources to find a replacement part rather than attempting a re-engineering project.


1 comment
Comments are closed.