
Prusa Research just released PrusaSlicer 2.9.1, and there are two very interesting new features.
The first feature is a new capability they call “Smart Sequential Printing Arrangement”, and Prusa Research believes this is the first implementation of this method. They have good reasons to believe this, as you will see.
What’s sequential printing? It’s a little-used feature that is enabled when there are multiple separate objects being printed on a FFF 3D printer. The idea is to fully complete each object sequentially, rather than building them all simultaneously, layer by layer.
Why do this? It’s a way to reduce risk. Imagine printing a 10 x 10 array of small parts on the print plate. Each layer makes up a small part of each of the 100 parts.
Now assume the job fails halfway through. How many good parts did you get for your half-finished job? Zero. None were completed, and you have 100 half-made pieces.
In sequential printing, each part is completed fully before any of the next part is begun. A failure halfway through the job would yield 50 complete parts in our example, and there wouldn’t be much waste if the job stopped at that point.
Also eliminated with sequential printing is most of the travel movement between parts when doing a layer. That’s because the toolhead “hangs around” each part until it’s complete, meaning there’s only one big movement to the next part’s location.
Another big benefit is when using Vase Mode. In this mode, the printer prints the object (usually a vase) with a single wall in a continuous upward spiral. They look terrific, but you can normally print only one of these in a job. With sequential printing, you could print several within a job.
These benefits seem so clear and obvious that you’d think everyone would use this capability all the time on each and every multiple-object job.
But we don’t.
The reason is that it’s complicated. FFF printers operate layer by layer for one major reason: It automatically prevents collisions between the partial print and the toolhead. When printing a layer, you know that there is by definition nothing above that layer to collide with.
This changes in sequential printing. The toolhead could indeed strike a previous object if the height of the object was enough to encroach on the tool path for subsequent objects.
Sometimes collisions can be avoided by a careful placement of the parts so that the toolhead doesn’t have to go near previous objects. However, this is a painstaking process to do, and there’s no guarantee that it will work. You could easily make a mistake and wreck the parts — or even the printer itself.
Enter the new Smart Sequential Printing Arrange feature. This feature automatically positions the parts in such a way to prevent collisions. The printing order of the parts is also produced, and the combination should yield a successful job.
Prusa Research writes:
“We implemented this feature in cooperation with Professor Pavel Surynek from the Czech Technical University in Prague, who created the advanced printing algorithm, which will soon be published in a scientific paper. This is one of the excellent outcomes of our long-term collaboration with academia.”
And that’s the reason this is very likely the first implementation of this approach.

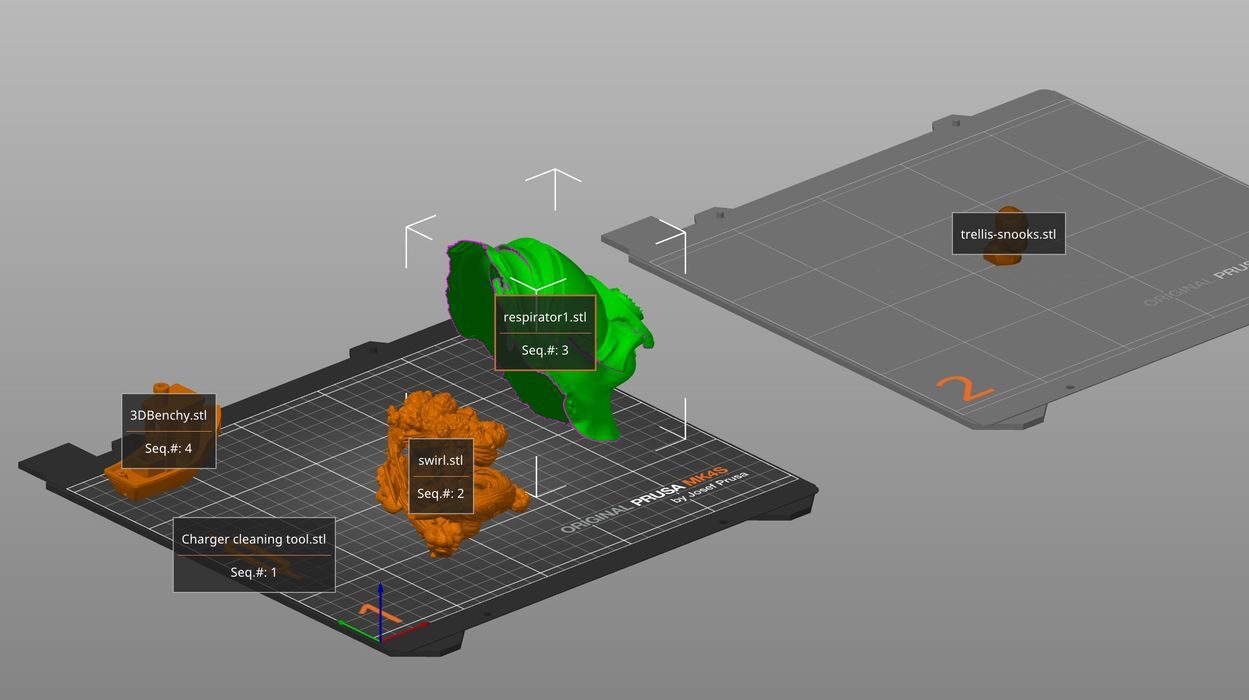
I did a quick test of this feature, and it seems to work. Above you can see the initial dump of random parts I applied, and below you can see the result after automatic arrangement.

Note that the system determined that not all the parts could be fit onto a single plate, and the work was divided into two jobs. At top you can see the print sequence of these parts.
Prusa Research notes that at its initial release, the feature will work only on Prusa equipment. That’s because the feature must have very specific knowledge of the toolhead’s geometry to calculate collisions. They say they may add some third-party equipment in the future.
The second feature might be a bit more familiar. It’s called “multi-material interlocking”.
The concept is to enable blending of two different materials within the same print job, even though the chemistry of the materials prevents bonding.
The joining of the materials is done by creating a cross-hatch boundary, which interlocks the two materials together mechanically, rather than chemically.
For example, one could print an object in PLA and in TPU. The new slicer feature would create a hatch pattern that interlocks the two materials, even though they don’t normally bond together.
The most obvious use of this feature is for adding flexible bits to an object, such as a grip, hinge, or bumper. However, it’s possible to mix any extrudable materials using this technique.
Multi-material interlocking is clearly a great feature, particularly for multimaterial FFF 3D printers.
While the first feature was entirely new, this second feature actually first appeared in Ultimaker Cura almost two years ago.
As both slicers are open source, it was inevitable that the feature would eventually appear on the other slicer, and here we are.
Via Prusa Research