


A fork of PrusaSlicer adds some extremely interesting features.
There are only a few major 3D print slicing systems used by most people these days: Ultimaker Cura, PrusaSlicer and Simplify3D. Two of these are open source, so you’ll frequently find variants — that’s how open source software works.
Most often you’ll see Ultimaker Cura variants, as that is the most common slicing system bundled with 3D printers. It’s easy for the manufacturers, as they don’t have to do much to come up with a customized version for their product.
There are far fewer variants of PrusaSlicer, even though it is also open source. Note that PrusaSlicer itself is a variant of the earlier Slic3r system, but these days PrusaSlicer seems to have blossomed far more features and support.
One reason why there aren’t that many variants of PrusaSlicer is that it is a relatively complete system that is constantly being updated: there is little reason to make a new version.
But one person did.
GitHub user SuperMerill created “SuperSlicer”, a variant of PrusaSlicer that adds some intriguing features that somehow are not included in the base PrusaSlicer distribution.
It seems that SuperMerill was interested in certain functionality and didn’t want to wait for Prusa Research to include them, so they simply built them on top of PrusaSlicer.
What extra features appear in SuperSlicer? There are quite a few, although most are minor in nature, including:
- Surface ironing tuning parameters
- Denser infill for top layers
- Better thin walls
- Hole dimensions improvements
- Brim and seam options
- And more
But to me, the keystone feature of SuperSlicer is its calibration menu.
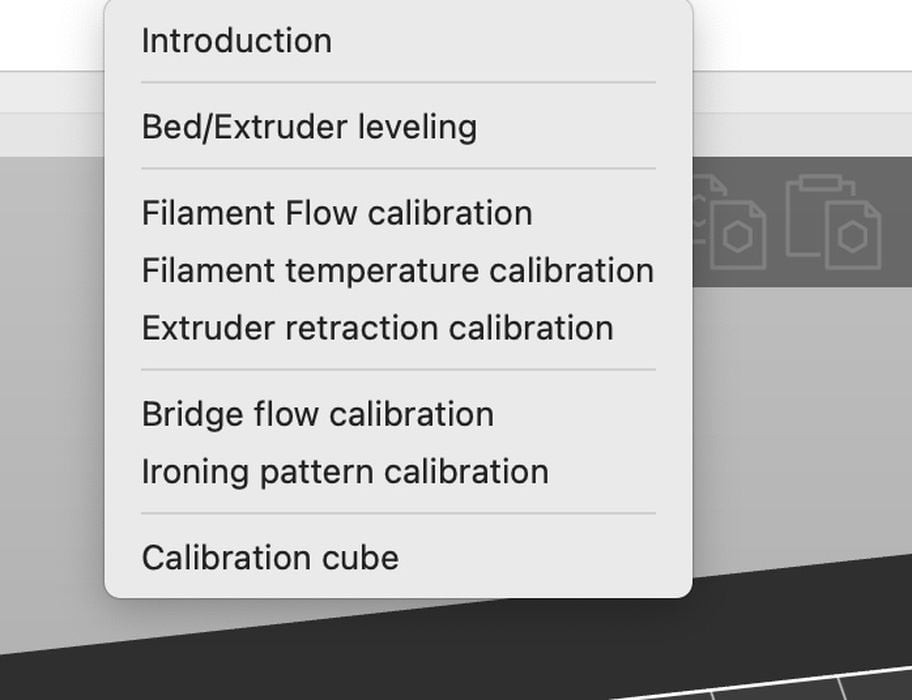
The calibration menu provides a series of automatically generated calibration models to enable calibration of:
- Bed leveling
- Z-Gap
- Filament flow
- Hot end temperature
- Retraction
- Bridge flow
- Ironing
- Dimensions
To be sure, these are things everyone should absolutely do before using any FFF 3D printer, or indeed even when using a new filament type. Most people tend to level the bed and set the z-gap but don’t do the rest of the tests, relying on default settings from the manufacturer. Those may work, but they are almost certainly less than what can be achieved on the machine.
Most 3D printers these days are very capable hardware devices. However, they suffer from a lack of proper calibration that very often results in less than perfect prints.
Why don’t 3D printer operators do calibration more often? Some do, but the vast majority don’t because they may not understand the need or can’t be bothered to go through the tedious process of calibration.
Usually the process of calibration involves:
- Understanding what has to be calibrated — which is not really described by most 3D printer manufacturers
- Understanding the process for each type of test
- Obtaining the necessary 3D models for each test
- Configuring the complex jobs needed for each test
- Running each test
- Comparing results and adjusting parameters
This is simply too much work for many people, so they just don’t bother. But SuperSlicer could show a way to greatly simplify the calibration process.
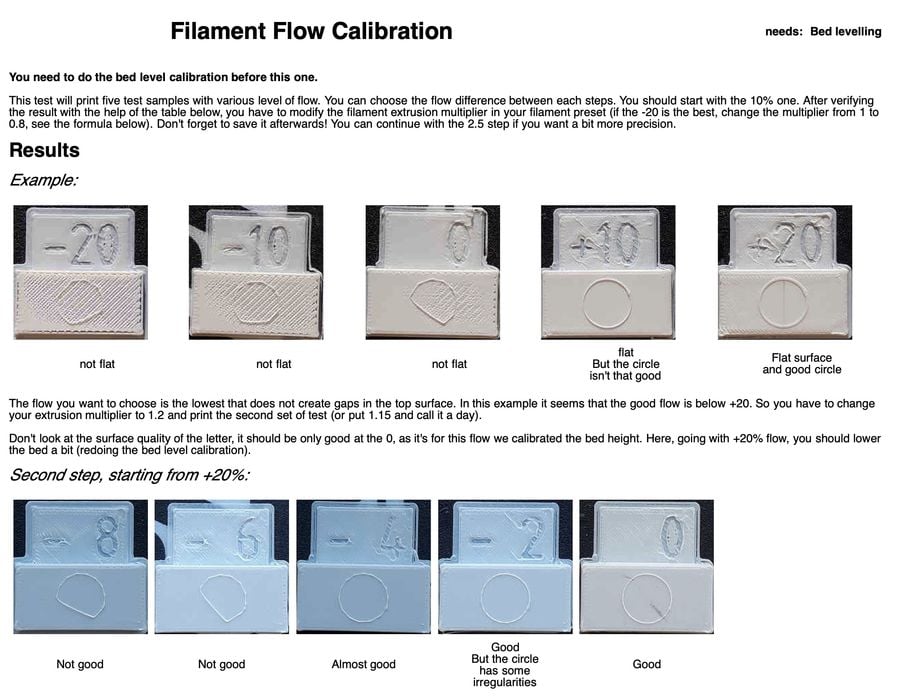
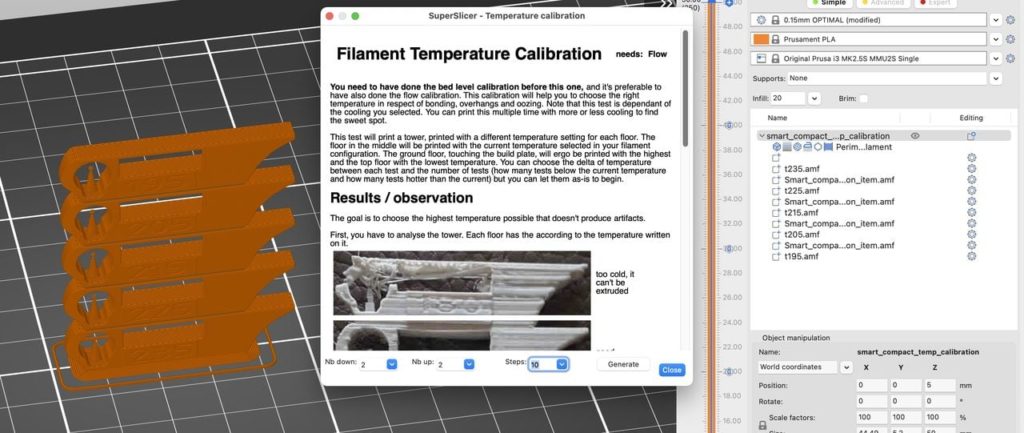
For each calibration type, SuperSlicer provides a detailed explanation of what is being calibrated, and shows images of both good and bad results that are easily understood. Finally, it literally generates the necessary 3D models, places them on the build plate, sets up the often complex print parameters (for different temperatures, etc.) and finally slices the models ready for printing.
From that list of tedious steps above, we instead have:
- Generating the tests with a touch of a button
- Running each test
- Comparing results and adjusting parameters
Note that SuperSlicer’s calibration tests are also provided in the correct sequence for proper results. When doing tests on your own it’s far too easy to do them in the wrong order, if you even get that far.
This is enormously simpler, and likely something that could be handled by far more 3D printer operators, even novices.
I’m hoping Prusa Research takes notice of these calibration features and incorporates them into the base PrusaSlicer code. After all, SuperSlicer is itself open source, too. If so, the company would certainly make life easier for many of their customers, and possibly even cut down on the number of support calls caused by misconfigured machines.
There’s little reason not to use SuperSlicer; it IS PrusaSlicer, just with a few extra features.
Have you tried SuperSlicer?
Via GitHub