
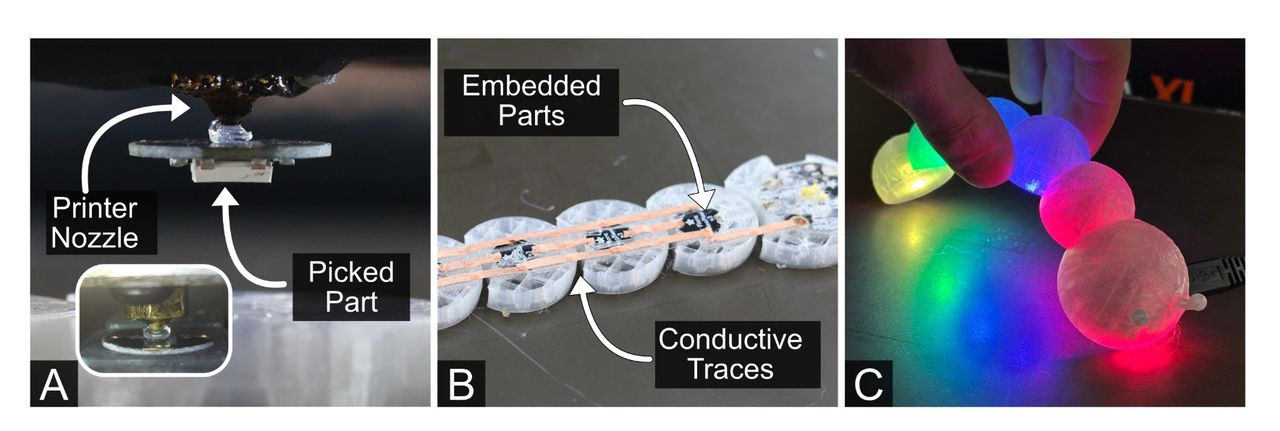
The 3D printer’s toolhead can also be a gripper.
It’s called “Print & Place”, a technique developed by researchers at the University of Bristol and Hasso Plattner Institute that allows an ordinary FFF 3D printer to automatically install electronic components while printing an object.
And it does so without a specialized toolhead!
The researchers realized that softened, sticky thermoplastic could act as a temporary adhesive. By extruding a small amount of PLA onto an electronic component and then cooling the nozzle, the plastic solidifies and bonds the component to the nozzle.
The printer can then lift the component, move it to a prepared spot in the partially printed object, and land it there. A sideways movement breaks the temporary bond, or the nozzle reheats to release the component.
It’s a really simple approach, quite brilliant. I am surprised no one thought of this before.
The researchers implemented the technique on a Prusa XL using ordinary PLA and a 0.4mm nozzle. Custom GCODE controls the movements, extrusion amounts, and temperature changes. A nozzle cleaning brush helps remove leftover plastic between operations.
But picking up electronics is only part of the problem. Those components must also be electrically connected.
The researchers experimented with copper foil, braid, and conductive fabric, eventually selecting a copper-polyester shielding cloth because molten PLA adhered more reliably to its woven structure.
The printer picks up precut strips of this material and presses them into the printed surface. It then applies additional pressure at connection points to establish electrical contact.
Small copper rivets provide vertical electrical connections between layers, allowing circuits to extend throughout a three-dimensional object.
This combination permits conventional electronic components to be embedded inside printed structures, without relying entirely on conductive filament.
The process begins with a specially generated component tray. The operator loads the electronic parts and precut conductive strips into their designated positions. After that, the printer automatically retrieves and installs them at the appropriate layers.
A custom design system built around Rhino3D, Grasshopper, and PrusaSlicer generates the cavities, component tray, and required GCODE operations.
The researchers demonstrated the ability to manipulate components as small as 0805 resistors, measuring 2 x 1.25mm. Smaller 0603 components proved unreliable. At the other end, they successfully lifted a 45mm diameter circuit board weighing 4g.
Conductive strips as narrow as 1.25mm could also be placed.
Electrical testing produced contact resistances ranging from 0.08 to 0.19 ohms for different connection configurations. These are encouraging measurements, although the experiments don’t establish long-term electrical reliability.
There’s another issue: speed.
Picking up a rigid component requires the hot end to cool substantially before lifting it, then reheat afterward. Consequently, the researchers measured a placement rate of only 14.5 rigid components per hour. All that heating and cooling (especially the cooling) takes quite a bit of time.
Conductive strips were faster, at 42.3 placements per hour.
This would be hopelessly slow as compared with regular electronics assembly equipment. However, Print & Place is intended to insert relatively small numbers of components during a typical 3D print, replacing repeated manual interruptions for the operator.
The researchers demonstrated three functioning devices, including an illuminated articulated caterpillar, an electronic refrigerator magnet, and a tiny vibrating robot that actually moves off the print bed after fabrication.
That last demonstration exposed an important limitation.
The robot contained nine embedded parts, and approximately ten design iterations were required to obtain a reliably functioning build. Problems included components detaching and electrical connections failing because insufficient solid material existed beneath the connection points.
There is also no automatic electrical verification during printing. Once components are planted, repairing or even diagnosing a failed connection isn’t really possible.
I suspect this technology’s greatest opportunity lies in relatively simple objects containing a handful of sensors, lights, or electronic modules.
It’s pretty amazing that an ordinary desktop printer might eventually produce these devices without anyone having to stop the job and install the electronics manually. I am now wondering if one of the major 3D printer manufacturers might consider adopting this technique into one of their machines. After all, it’s mostly just a software change.
Via ACM