
![Hands on with the ANET ET4 [Source: Fabbaloo]](https://fabbaloo.com/wp-content/uploads/2020/05/et4-ov-1_img_5eb08f0328cfd.jpg) Hands on with the ANET ET4 [Source: Fabbaloo]
Hands on with the ANET ET4 [Source: Fabbaloo]
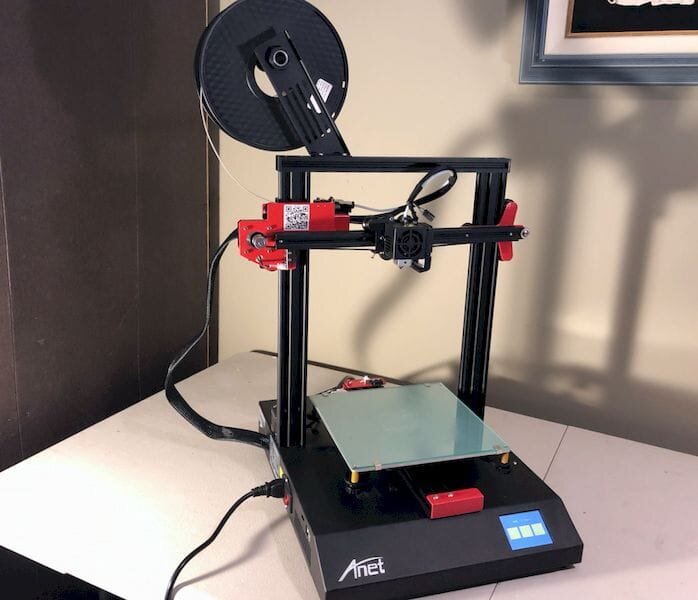
We were fortunate to obtain a brand-new ANET ET4 3D printer and spent some time giving it a good test.
This is part 1 of a 3 part series:
The ET4 is an inexpensive — actually very inexpensive — desktop 3D printer using 1.75mm filament. Sold at a very low price, we weren’t expecting very much, as we’ve seen many apparently similar Asian machines. There may even be more than 100 models available that would appear similar to the ET4.
But I was quite surprised with the ET4 as it turned out to be a rather nice machine, particularly at this price point. It’s a new machine from ANET, a long-term producer of inexpensive desktop 3D printers.
ET4 Safety
Some 3D operators have expressed concerns about certain previously sold ANET 3D printer products, and I asked ANET’s representatives about this directly.
They assured me that any safety issues have long been resolved. They told me that all their systems now include thermal runaway protection, which means it is not possible for the machine to overheat the hot end.
With that out of the way, let’s look at the ET4 more deeply.
ET4 Unboxing
![The ANET ET4 ships in a rather small box [Source: Fabbaloo]](https://fabbaloo.com/wp-content/uploads/2020/05/image-asset_img_5eb08f0391f54.jpg) The ANET ET4 ships in a rather small box [Source: Fabbaloo]
The ANET ET4 ships in a rather small box [Source: Fabbaloo]
It is a kit, so to speak.
I was a bit concerned as I have a long history with 3D printer DIY kits that often involve dozens of hours of assembly and many plastic bags of tiny parts. But that was definitely not the case with the ET4. I managed to put the entire 3D printer together, while taking my time, in less than an hour.
The ANET ET4 is packed in a relatively small shipping box, notably smaller than several other similar 3D printers I’ve received. ANET has done a very good job of packing this machine and it seems quite complete in the provided components.
![Major components of the ANET ET4 to be assembled [Source: Fabbaloo]](https://fabbaloo.com/wp-content/uploads/2020/05/et4-parts-1_img_5eb08f03d37b1.jpg) Major components of the ANET ET4 to be assembled [Source: Fabbaloo]
Major components of the ANET ET4 to be assembled [Source: Fabbaloo]
The package is in fact mostly assembled already, as the bulk of the work is already done at ANET’s factory. The major pieces requiring assembly are the large lower portion of the machine, and the upper gantry, as well as the X-axis carriage.
![Parts included with the ANET ET4 [Source: Fabbaloo]](https://fabbaloo.com/wp-content/uploads/2020/05/image-asset_img_5eb08f043a1e8.jpg) Parts included with the ANET ET4 [Source: Fabbaloo]
Parts included with the ANET ET4 [Source: Fabbaloo]
Also included in the ANET ET4 package are a complete set of tools, many of which I did not have the opportunity to use; therefore ANET is thinking ahead for a time in the future when I might have to use a tool for some maintenance or repair purpose. That’s good thinking.
A relatively small curl of PLA is included, so you will certainly have to obtain additional filament spools. The ANET ET4 can easily accommodate 1kg filament spools after it is assembled.
There are only a few bolts required for assembly, but ANET has also included a USB stick with software and test print GCODE. They even include a spare hot end nozzle for some reason, something I haven’t seen many other manufacturers do. A fuse is in the package, but I am not sure where it goes and there seems to be no need for it until some future event. There’s also a spare belt, which I ended up not using. It’s labeled for the Y-axis, but the Y-axis already had a belt properly installed. Good to have a spare, though.
Everything required for full assembly and operation was included in the shipment.
ET4 Assembly
The ET4 package includes some assembly instructions, but I found them a bit cryptic and tiny to read. Instead I used an easy-to-follow YouTube video that walks you through the steps:
Assembly turned out to be rather anti-climactic, except for one issue, which I’ll describe in a moment. Erecting the upper gantry was trivial, with only four bolts required. After installation, the gantry was quite sturdy.
The relatively tricky part of the install is the X-axis carriage. It’s not the extruder itself, as this Bowden-style machine has the extruder already installed at the factory on the upper gantry. No need to work on that.
![Installing the X-carriage the ANET ET4 [Source: Fabbaloo]](https://fabbaloo.com/wp-content/uploads/2020/05/image-asset_img_5eb08f048faca.jpg) Installing the X-carriage the ANET ET4 [Source: Fabbaloo]
Installing the X-carriage the ANET ET4 [Source: Fabbaloo]
However, the X-axis carriage, which includes the hot end, cooling fans, etc., must be mounted on the X-axis. This is easily done by simply rolling it onto the end of the X-axis.
![ANET ET4 electronics connections - before [Source: Fabbaloo]](https://fabbaloo.com/wp-content/uploads/2020/05/et4-connections-1_img_5eb08f04e3a9d.jpg) ANET ET4 electronics connections – before [Source: Fabbaloo]
ANET ET4 electronics connections – before [Source: Fabbaloo]
At that point you’ll have to hook up a series of cables from the X-axis carriage to the main board.
At first it looks daunting, but in fact it’s pretty easy, as ANET has properly labeled both connector and receptacle ends. I had it done in only a moment. That is perhaps the most challenging aspect of assembling the ANET ET4.
![ANET ET4 electronics connections - after [Source: Fabbaloo]](https://fabbaloo.com/wp-content/uploads/2020/05/image-asset_img_5eb08f0532cf4.jpg) ANET ET4 electronics connections – after [Source: Fabbaloo]
ANET ET4 electronics connections – after [Source: Fabbaloo]
I did have one problem, however.
ET4 Y-Axis Problem and Resolution
The build platform and Y-axis are pre-assembled at the factory and are included in the lower unit as above. But once I had the major portions of the assembly done, I noticed that the build platform would shift only about half-way through its normal range.
![The ANET ET4 built plate carriage is off track and is hitting that bolt [Source: Fabbaloo]](https://fabbaloo.com/wp-content/uploads/2020/05/et4-off-track-1_img_5eb08f057fe45.jpg) The ANET ET4 built plate carriage is off track and is hitting that bolt [Source: Fabbaloo]
The ANET ET4 built plate carriage is off track and is hitting that bolt [Source: Fabbaloo]
Eventually, I realized that one of the wheels under the build plate was striking a bolt from the lower housing. If pushed hard enough, the platform would ride over the bolt. But that would not permit proper 3D printing.
I enquired at ANET and their helpful techs suggested simply pushing the wheel up. This I did with a screwdriver and suddenly there was a slight “thunk” and then all was well. Evidently one of the wheels had come off track during shipment, but a push placed it back in order. I have not encountered problems with this wheel since.
After plugging in the power cable, the machine was ready for power and setup.
The ANET ET4 is priced at US$249 on ANET’s web store. If you’d like to buy one, we’ve made arrangements for you to receive a discount of 10% if you use the code “FABBALOO” at checkout.
Alternatively, if you’d prefer to purchase one on Amazon, we’d truly appreciate if you used our link to do so, right here. It won’t cost you anything and helps support this publication.
This is part 1 of a 3 part series:
Via ANET