

Resin 3D printing is quite challenging, but three concepts truly helped me understand how the process really works and made my printing more reliable.
While most people are introduced to 3D printing via FFF devices, many then move on to resin devices, typically using the MSLA process, to produce higher resolution objects. These machines are inexpensive to use, but fundamentally different.
The process uses liquid resin, which just happens to be toxic. This implies use of significant PPE during operations and a robust workflow for safety.
That aside, print jobs can easily fail on MSLA devices for a number of reasons, so operators are quite concerned with the print parameters, particularly the exposure time.
The exposure time is indeed important: if it’s too short not enough resin will be solidified and you risk having weak structures. If the exposure is too high, then you will have swollen structures that lose detail. Exposure time is important.
But there are other things to be concerned with when printing with MSLA equipment that I didn’t realize for quite a while. After I understood these, MSLA 3D printing made a lot more sense to me, and it was easier to understand why mysterious failures were occurring.
Peeling
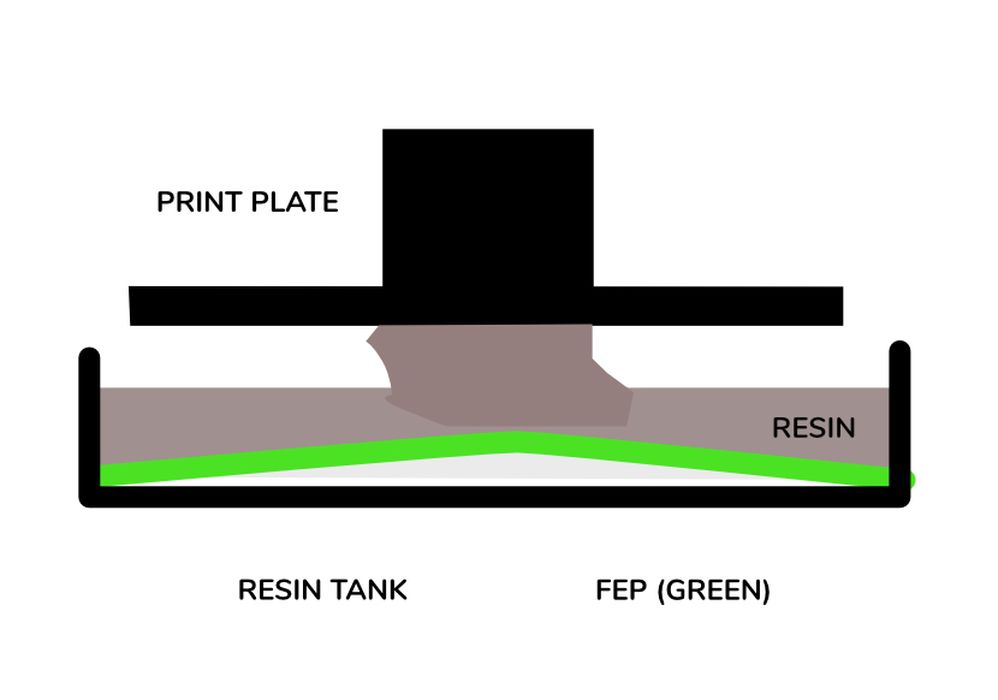
Every MSLA 3D printer operator knows that each layer must be peeled off the print vat, but what exactly does that mean?
It’s actually quite an unusual process and more complex than many realize. Initially, one might assume that the plate is simply lifted upwards, and it rips the material off the vat bottom.
That’s not what happens.
Instead it’s a “peel”. The bottom of the resin vat is a deformable membrane. As the plate moves upwards, the membrane bows upwards from printed object.
This bowing continues until the force is sufficient to begin detaching the printed portion. The detaching process begins at the edges of the layer and works inwards as the plate continues to be raised.
Let’s first consider a small print in the middle. It wouldn’t take much height raised to peel that off the membrane, since the peel distance is short.
Now consider the case of a very large print that takes up a lot of area on the print surface. How much peel distance would be required? Quite a lot.
The peel distance is lengthened by raising the plate higher. In other words, for prints with large surface areas on any layer, the layer lift height should be set to a high value. The specific value depends on your machine and 3D model, of course.
If the lift height isn’t set high enough, the peel won’t reach the middle and you then have a corrupted portion of the print that could lead to failure.
Cantilevers
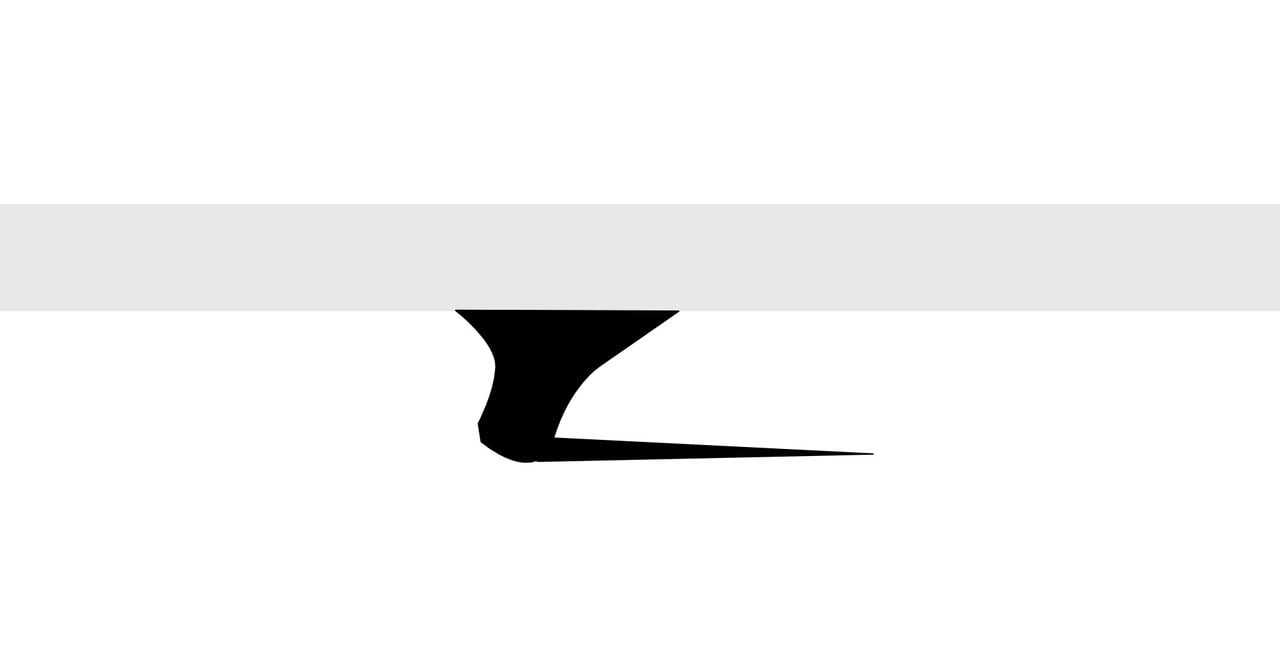
With FFF 3D printers you can often print quite large overhangs without requiring support structures. That’s the same with MSLA printers, but the overhangs must be far, far shorter.
Typically models are tilted slightly in MSLA jobs to ensure there are no huge flat layers being printed (see “Peeling” above).
The tilted models inevitably result in slight overhangs. These are ok, unless the overhang is too long.
Consider the graphic above, where we’ve cut off the layers at a certain point to illustrate what happens. Note that there is a long cantilevered section: a segment of solidified material that sticks out with nothing holding it from falling (remember MSLA devices print upside down).
This segment, while solidified, is still quite soft, particularly when thin. Basically it’s a loose, floppy end that isn’t particularly fixed in place.
Now imagine the peeling process ripping away at this cantilevered section. That’s right, it could rip it off! It can also shift its position to somewhere it shouldn’t be. It could cause the segment to detach and muck up some other aspect of the job.
The concept here is that you do not want long cantilevered segments on any layer if at all possible. The graphic above is screaming for support structures to hold it up.
The message here is that the MSLA operator should always carefully inspect each and every layer in the sliced print job to ensure that there are no large cantilevered segments. If there are, support structures should be added.
Weight
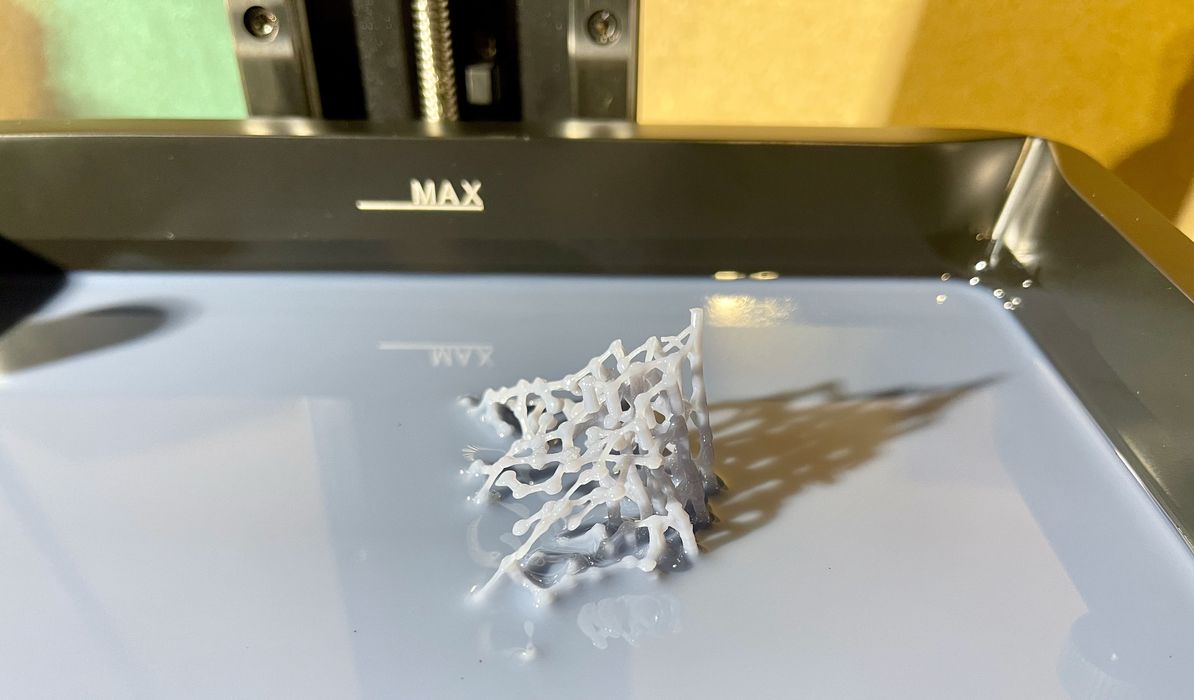
Sometimes prints just don’t work at all, and I’ve found the reason in some cases to be the initial support structures.
Consider the idea of printing a tilted cube, with a pointy corner down. The supports should be attached there because the rest of the structure depends on that support.
In some 3D models those initial supports must literally hold up the weight of the entire object, or significant portions of it. However, there’s a tendency to use lighter supports to minimize surface damage.
The concept here is to view the 3D model as a heavy object and then consider whether the supports are able to hold it up at each layer. Thin supports don’t hold very much, and as the print proceeds, the weight slowly grows.
This is why sometimes you’ll see a print fail in mid-print: the supports break and the partial print falls into the vat, as shown above. The supports weren’t strong enough.
Conclusion
Those are three important concepts to keep in mind when setting up any resin 3D print job. If you understand these, you will understand more deeply what’s really happening during an MSLA 3D print job.
Don’t think FFF, think MSLA instead.