
![Repairing an old chair with a powerful 3D printing technique [Source: Reddit]](https://fabbaloo.com/wp-content/uploads/2020/05/image-asset_img_5eb09e5b9f354.jpg)
This week’s selection is a repair technique for an old chair by Reddit contributor Will_-.
We don’t know much about Will_-, but his technique is quite interesting and is an approach we haven’t seen previously. It all began with a worn out chair that required repair.
Will_- explains the situation:
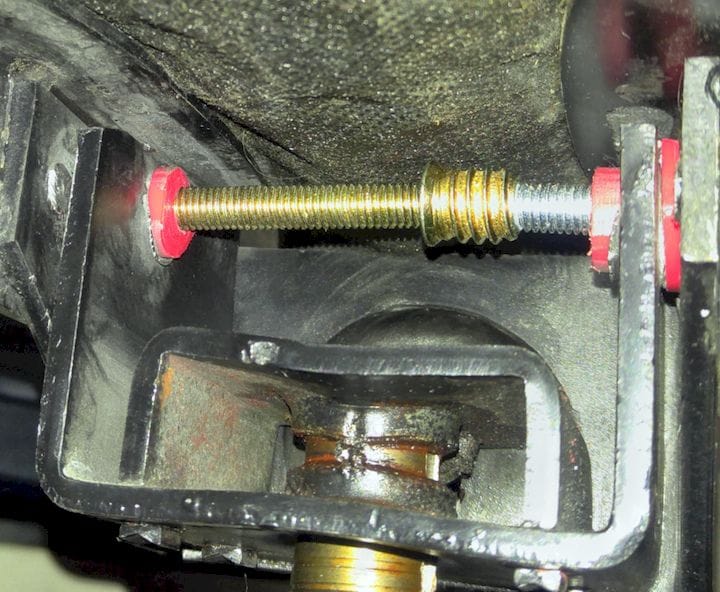
“I got a fairly nice chair that was comfortable and in good shape except a couple bushings had broken and the metal-on-metal contact wore the round holes into odd shapes over time. I took photos of the resulting hole with a ruler in the picture, brought it into FreeCAD and designed a couple bushings to fit exactly into the holes. They were a snug fit and only required a few taps with the hammer to set them in place. Something you could only do with 3D printing. They are holding up so far so good.”
You can see in the images the state of the “round” holes – they were definitely not in original condition. This means that manufacturer-supplied spare parts would not fit, and more than likely required replacement of major components that would negate the financial value of the chair entirely.
![The worn-out hole that required a repair [Source: Reddit]](https://fabbaloo.com/wp-content/uploads/2020/05/image-asset_img_5eb09e5c0f857.jpg)
In other words, when using traditional analysis, the chair was a “write off”.
However, 3D printing is a technology ideal for producing one-off components and this is the perfect scenario for doing so.
This technique would not work for every such situation, as some more complex situations might require a 3D scan of the target area and considerable tweaking in 3D CAD tools. Fortunately for Will_-, this particular situation was essentially “2D”.
This allowed Will_- to simply take a 2D picture of the area and insert it into a CAD tool for development of the replacement component. It’s simply a matter of tracing over the target image to develop a near-perfect replacement shape.
![Building a repair component for a broken chair using an image overlay [Source: Reddit]](https://fabbaloo.com/wp-content/uploads/2020/05/image-asset_img_5eb09e5c67f92.jpg)
This is a technique that I believe more 3D printer enthusiasts should employ, and in some cases it could save a considerable amount of money; replacing a part instead of re-buying the broken item.
In fact, there are likely situations where using this technique even just once would justify purchase of the 3D printer that produced the replacement part.
![One of the 3D printed repair inserted mounted [Source: Reddit]](https://fabbaloo.com/wp-content/uploads/2020/05/image-asset_img_5eb09e5cb2e9c.jpg)
For this component replacement, Will_- was challenged by other Reddit readers about the viability of the printed replacement, which Will_- made in PETG material. The suggestion was that the replacement part might wear out quickly – after all, the original metal part did wear out under the same forces that the replacement would be subjected to.
The answer here is obvious: just print another one, because you can.
Via Reddit

This week’s selection is a 3D printed Coronavirus!