![A simple way to save a great deal of operating cost [Source: Fabbaloo]](https://fabbaloo.com/wp-content/uploads/2020/05/image-asset_img_5eb0a29cebf8a.jpg)
Stratasys’ venerable uPrint 3D printer produces fantastic output, but at a cost. Now there’s a way to reduce that cost.
The uPrint, which has been available in various forms for over a decade, is one of the most popular low-cost industrial 3D printers in history. For many organizations, it was the first 3D printer used – in times before patents expired and costs dropped in favor of other options.
There’s a lot of them still out there, and indeed Stratasys still sells the machine, now billed as the “uPrint SE Plus”, capable of 3D printing in nine colors of ABS thermoplastic.
While the machine produces great output it is accomplished only at a steep cost. The uPrint uses proprietary materials to achieve these results, by tuning the print parameters optimally for the matching hardware and materials. This often means you’re paying a premium price for the material.
Currently the price for a cartridge of ABS for the uPrint runs a little over US$100, which converts to about $220 per kg, far higher than from many third party sources for ABS filament.
While you can’t easily get around that, aside from buying from an almost-as-expensive compatible third party supplier, there is another cost you must consider: trays.
The uPrint’s process is similar to many filament 3D printers, in that it has an extruder that pushes filament through a moving hot end. But it’s the adhesion system that is a bit different from any we’ve seen elsewhere.
![A fresh tray for the uPrint 3D printer [Source: Fabbaloo]](https://fabbaloo.com/wp-content/uploads/2020/05/image-asset_img_5eb0a29d5c603.jpg)
The adhesion system consists of a specially formed plastic tray that snugly fits with lugs to the base plate of the uPrint inside its build chamber. The uPrint, which by the way is a dual extrusion machine, then lays down a layer of support material as a raft, followed by the actual ABS object itself. The print peels off the tray by bending it, and the support material is dissolved off with a special liquid solution.
These trays are rarely reusable. After a typical print or two, they look like this:
![A used uPrint tray, showing marks where rafts once held [Source: Fabbaloo]](https://fabbaloo.com/wp-content/uploads/2020/05/image-asset_img_5eb0a29daa221.jpg)
And the machine will surely not accept them after several prints – or even one sometimes – as it cannot calibrate on the tray’s surface. Stratasys recommends using a fresh tray for each print.
The problem is that the trays are quite expensive. The last time I looked, they were around US$5 each. If you are printing frequently, this very quickly adds up to a lot of ongoing cost.
Many have attempted to reuse these trays using a variety of homemade techniques. Cleaning them in the support-dissolving solution doesn’t work. Sanding the plates down does not work, and is a lot of effort. An application of Kapton tape does not work.
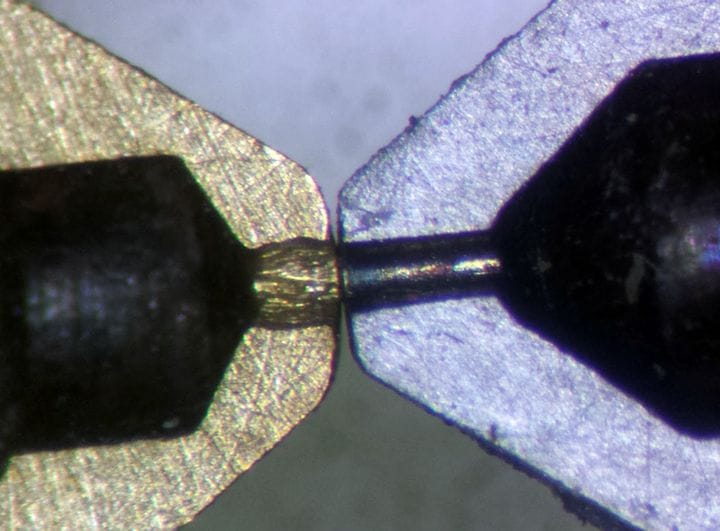
But now we see there is an Instructable that purports to have solved the problem. They used a combination of transfer tape and glue stick.
![Testing the transfer tape method for uPrint 3D printer adhesion [Source: Fabbaloo]](https://fabbaloo.com/wp-content/uploads/2020/05/image-asset_img_5eb0a29df1e0a.jpg)
Yes, transfer tape. This is NOT masking tape by any means; it’s a specialized form of tape typically used for transferring vinyl cutouts to another surface, or protecting materials from smoke damage during laser cutting.
Transfer tape is quite inexpensive. You can get a 50’ roll for around US$100 or less, and it will work fine. On a per-print basis, the tape process is about 100x less expensive than using a fresh tray.
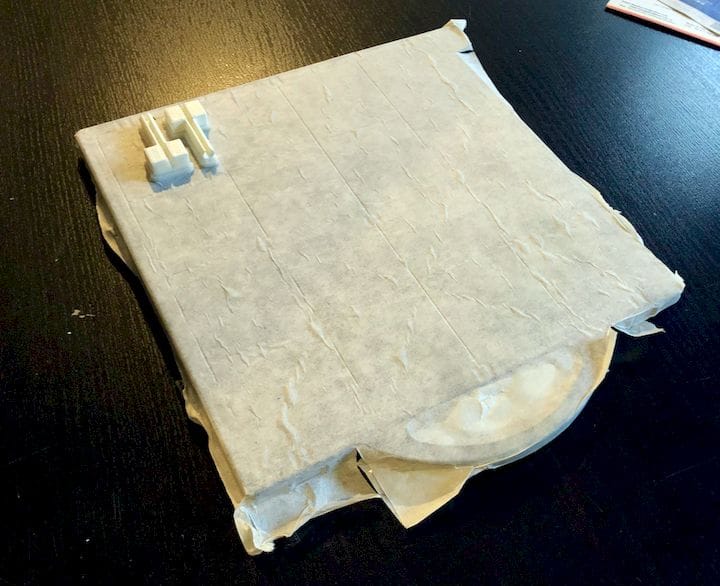
The process is quite simple: slosh on an amount of glue stick to a fresh or used uPrint tray. Then apply a complete, flat covering of transfer tape (which, by the way, is often available in 300mm width rolls). This is best done with a flat tool like a spatula to avoid trapping bubbles. Be sure to have some of the tape hang over the edges to ensure it doesn’t get caught in the print head and be peeled away.
![A nicely completed 3D print on the uPrint using the transfer tape method [Source: Fabbaloo]](https://fabbaloo.com/wp-content/uploads/2020/05/image-asset_img_5eb0a29e43bc5.jpg)
We gave this a test in our lab to see if the process worked, and it turns out it does indeed work, and work very well!
We did notice that after printing, which exposes the tray and tape to considerable heat, the tape did have an irregular surface here and there, even though it was applied completely flat.
![Replacing the transfer tape layer on a uPrint tray [Source: Fabbaloo]](https://fabbaloo.com/wp-content/uploads/2020/05/image-asset_img_5eb0a29e8c285.jpg)
However, these irregularities did not affect the adhesion of the print, which worked very well. It seemed to us that you likely would not want to attempt a second print on the same surface, meaning you probably need a fresh sheet of tape for each print. You don’t often have to reapply the glue, as the previous layer usually holds the new transfer tape down. But the cost of the process is so far below the Stratasys option that it doesn’t really matter.
If you operate a uPrint this may be worth an experiment – in cash savings.
Via Instructables