

This week’s selection is the Tensegrity Planter by Instructables contributor Gammawave.
Tensegrity is a structure that’s based on tension between components. Wikipedia explains:
“Tensegrity, tensional integrity or floating compression is a structural principle based on a system of isolated components under compression inside a network of continuous tension, and arranged in such a way that the compressed members (usually bars or struts) do not touch each other while the prestressed tensioned members (usually cables or tendons) delineate the system spatially.”
Tensegrity structures are visually shocking, because they seem to defy the normal law of gravity, yet are in fact made carefully designed forces.
This tensegrity is a planter, and can actually be used to hold flowers, herbs or whatever other greenery meets your fancy.
The “plant” part of the structure is separately designed as a “liner”. Gammawave recommends 3D printing it in a dark color to avoid discoloration after soil is deposited, which I believe to be a great idea. This is because the plant can be removed for maintenance without disturbing the delicate tensegrity structure.
The Instructables entry takes you through Gammawave’s design process, where these goals had to be met:
- It had to be capable of supporting and displaying a suitably sized plant.
- Designed to be capable of being 3D printed.
- Symmetrical to allow tensegrity.
- Separate liner to isolate the plant & soil from the supported element to prevent damage due to moisture and minerals in the soil marring the structure.
- Attachment points.
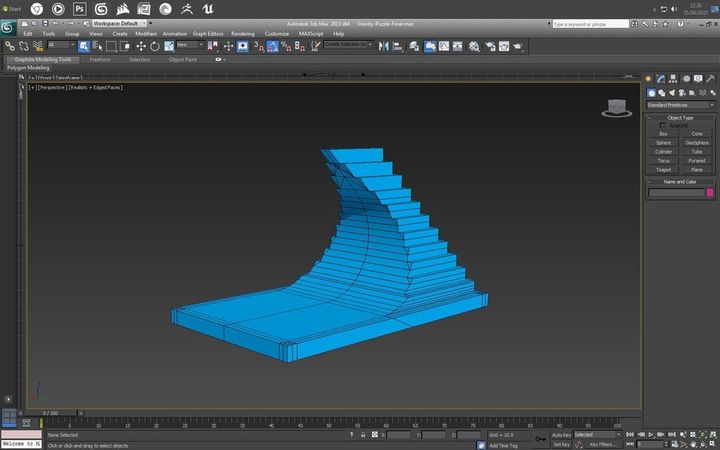
Gammawave provides 3D print parameter advice, which is most important on the liner component, which should be as watertight as possible. For this, 100% infill is used. In all, some 30 hours of 3D printing is required.
It’s recommended that the inner surface of the liner component be carefully sanded smooth, and then coated with a clear epoxy resin to perfectly seal any gaps between layers created during 3D printing. After this step, the liner should most certainly be waterproof and thus able to accommodate a plant.
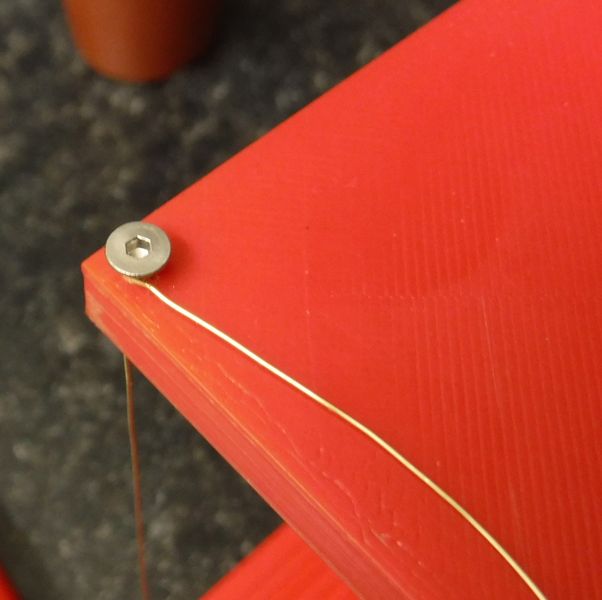
The most interesting part of the process is to assemble the tensegrity structure, and it’s a bit hard to visualize. This is done by adding suspension wires, one by one, in a way to provide equalized tension on each corner. Gammawave recommends using a level to ensure balance.
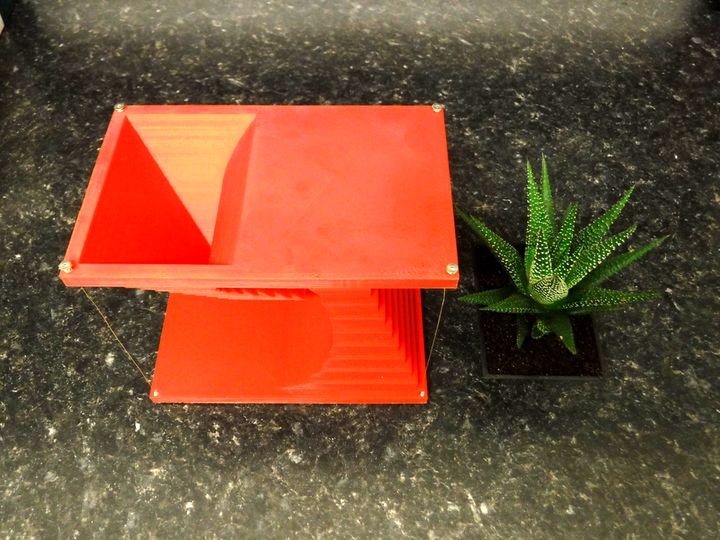
When the tensegrity structure is complete and a plant can be installed in the liner. Note that due to the relatively small size of the liner, Gammawave recommends using only slow-growing plants like succulents. Otherwise you’ll be constantly moving plants in and out of the planter. However, to do so is straighhforward as you need only lift out the liner.
Finally, Gammawave strongly recommends not overwatering the planter, as any spills will get into the not-waterproof base component.
Via Instructables