
Have you heard of “purge calibration”?
Purge is becoming a bad word in the 3D print industry. It’s a process required when changing colors on a multicolor FFF 3D printer: a filament is automatically pulled from the hot end, and another is inserted. There will still be some leftover material from the first filament in the hot end, so the extruder pushes new filament through until it is “clean”.
That material that was pushed through is the “purge”, and it’s considered waste. It cannot be recycled, and cannot be printed. Enormous amounts of purge (or “poop” as some say) can be produced on some print jobs. The other day I ran a job that consumed 160 g of material, yet the part weighed only 11 g — that’s a 93% waste factor.
Can this be reduced? Yes, in two ways.
One way is to toss your existing multicolor 3D printer and replace it with one that doesn’t purge (or purge as much). There are new options from SnapMaker, Bambu Lab, and soon Prusa Research that will do this.
But if you’re not up for a replacement 3D printer, you can actually tune the purge process to reduce waste somewhat.
In most slicers, there should be a feature to adjust the amount of purging that takes place, but it’s a bit more complex than you might think.
Purging means “completely replacing “color A with color B”. It turns out that this can vary by colour. So, imagine if you are changing from light grey to dark grey: in that case, it won’t take very much purging to have the extrusion appear dark grey. On the other hand, if you are changing from red to pure white, a great deal of purging is required to completely eliminate the red, leaving only white colour.
This results in a matrix of numbers: A to B, A to C, B to C, C to A, etc. Every combination is possible, and must be accounted for.
Slicers usually have a default — but very conservative — setting for these colour swaps. But “conservative” also means “expensive”. You really want these numbers as low as possible.
How can you identify the lowest purge amounts? It’s only by experimentation, because the number of possible filaments is very large and therefore it’s hard to maintain a full database of all combinations.
This means you’re printing test objects where colors A, B, and C are printed in sequence with varying amounts of purge. Then you’d eyeball the results to pick the one with the best result and put it in the slicer as your purge amount for that specific combination. That is the process of purge calibration.
Tedious? Very.
But there’s one way you might speed up this purge calibration. On MakerWorld, there is a new entry, “AMS Purge Calibration V2”, which makes the process a bit less tedious.
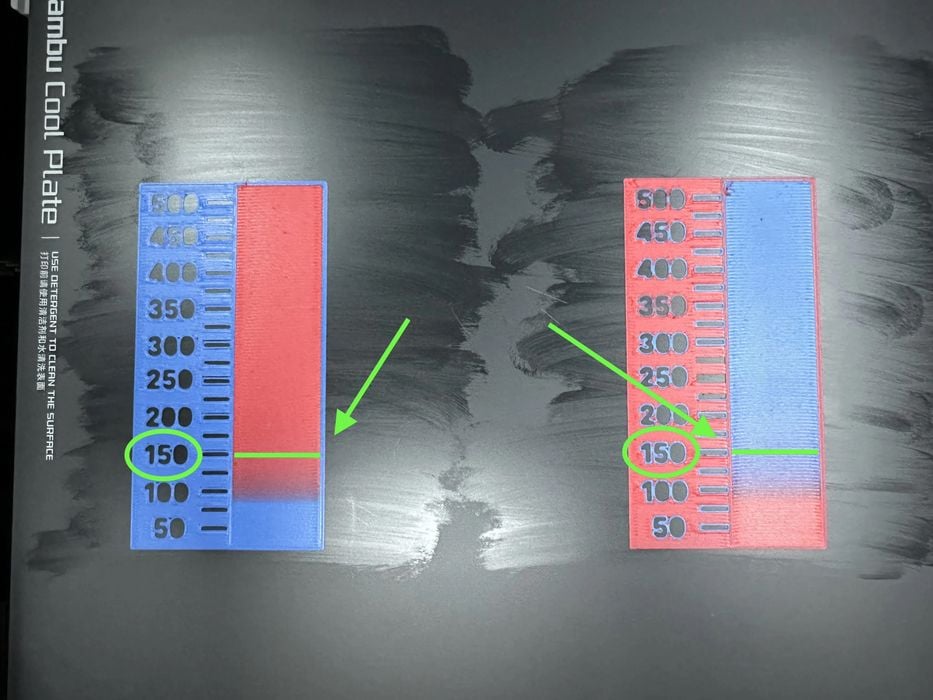
The entry includes a test object along with a detailed procedure for performing the purge test. In the image at the top, you can see one of these tests. The optimal value for that particular combo is 150. Anything more than that is literally wasting valuable filament, and it’s fairly easy to identify the correct value.
Depending on the number of colors in your print job, it might take a bit of work to calibrate all the combinations. Two colors mean there will be two tests: A to B and B to A. But as you add more colors, there will be a lot more testing required. In the case of four colors, there would be twelve tests required.
Yes, that could take some time — but remember that your long print job will actually run a bit faster because the purges will be shorter.
If you are about to print a large multicolor object, calibrate your poop!
Via MakerWorld