
Researchers have found a way to “program” voxels in resin 3D printing.
Resin 3D printing has been around for as long as 3D printing has been a technology, but in virtually all circumstances it is a mono-material process: objects are made only from one resin. This means that you must choose whether your object is going to be rigid, flexible, etc., and you get only one choice per object.
Now researchers have figured out a way to effectively print several material types in a single print job — but using only a single resin.
Instead of using multiple resins, they discovered a method of having a resin react in different ways to produce voxels that were rigid or flexible. In other words, they could program each voxel to have a specific stiffness.
How could this work? It starts with a completely new resin. Instead of the normal acrylate resin, they prepared a new resin that was a mix of Polyurethane acrylate (PUSA) and Hydroxyethyl-based urethane acrylate (HUA). The PUSA is used for elastic properties, while the HUA provides stiffness. The key is in the blend ratio, which controls the stiffness.
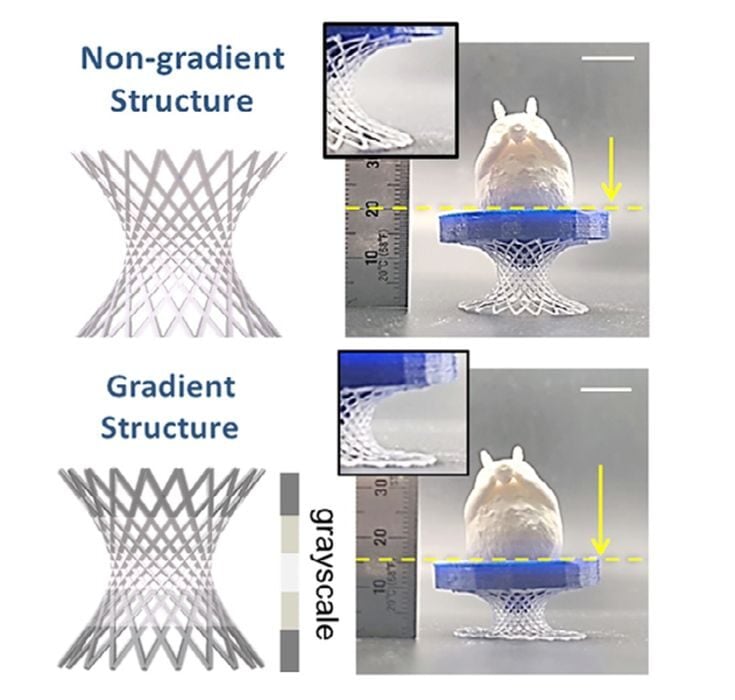
- More light (higher grayscale value = more photons) = higher crosslink density = stiffer polymer network.
- Less light = lower crosslink density = softer, more flexible polymer.
This resin reacts differently depending on the light intensity. The researchers were able to achieve a 5X variation in stiffness per voxel within a single print job by varying the light intensity.
This means that using this setup a 3D printer could use a single vat of resin to produce an object containing both stiff and flexible features.
In their testing the researchers used a DLP resin 3D printer because DLP technology allows for a continuous range of grayscales on each illuminated pixel. LCD resin 3D printers are far less accurate in this regard, and would be much more challenging to implement.
They tested this method by printing several parts with varying flexibility, including a lattice structure with flexible ends and a stiff core [see image at top]; a damper with flexible zones to absorb vibration; artificial cartilage.
Incredibly, this process requires no special post processing steps; the magic occurs during the printing process, not after.
In theory any existing DLP resin 3D printer could implement this method to print hard/soft objects, if loaded with the PUSA-HUA resin and use appropriate slicing software to prepare the proper exposures for each voxel. I expect you’d also need an interesting CAD tool to design a part with hard and soft zones and export it with 3MF for printing.
This technology seems so straightforward I expect at least some resin 3D printer manufacturers to take a good look at this process.
Could you use this process on your 3D printer? Theoretically only if you have a DLP 3D printer. The least expensive desktop DLP 3D printer used to be the Anycubic D1, but it seems to have been discontinued. Nowadays there are fewer options, and they tend to be more expensive than the D1. In fact, a quick look around reveals that many of the inexpensive DLP resin 3D printers have been discontinued!
It might be a long while before we see this technology appear on desktop 3D printers.