


Growing up I would often make my own toys. Using old plastic bottles, cardboard and lots and lots of tape, I would make some really cool, rudimentary toys. This in large part led to an unexpected future career as a professional duct tape artist (it’s a real job, I swear!)
If someone had told me then that as an adult there would be technology that would let me make my own toys, I would first check to see if your pants were ablaze. Second, I would trade my left arm for this tech. Come on! This is a no brainer since I can easily 3D print a newer, better, way cooler robot arm to replace it. NERF rocket launcher anyone? Yes please.
While talking to my friend Kerry, who is a walking, talking encyclopedia of all that is 3D printing, I said how I don’t know anything about this world but don’t know where to start. Since he is also the editor of Fabbaloo, he cocked his head to the side and said. “huh, a newbie’s view of products… could be interesting!”
A few days later, I get an email from Kerry and a link for a site to check out an apparently easy to use, paid online service to create original 3D models that I could then export to a 3D printer to be printed. Kerry said to check it out, make a few things and then he would print them off for me and then write up an article about what I found. No rush.
My inner 8 year old was giddy with excitement. But what do I design? I don’t think I can create a 1:18 scale model of the whole death star, which would be appropriate for my action figures, but might mess with the world’s tides or something. Plus, I am a novice. I need to start with the simple building blocks of creation first.
Then it hit me. I would go back to some of my earliest toys with a remake of my Fisher Price people. They are simply a series of tubes and balls. If this system is as user friendly as they say, I should be able to pull this off with zero training.
![Fisher Price toy concept drawing [Source: Todd Scott]](https://fabbaloo.com/wp-content/uploads/2020/05/image-asset_img_5eb0508ab5652.jpg)
As for that training, SelfCAD had provided a basic video tutorial overview of their system and a few app project run-throughs.
Since I have never used their product or any 3D modeling software for that matter, this was a great starting point for me and helped to grasp some of the basic concepts and the ease of the layout of their system. It also helped to reassure me that I should be able to easily complete my first project with SelfCAD’s basic 3D shapes menu.
I went to SelfCAD.com and activated an account with their online app in a matter of minutes. They sent me an activation code to enter and had 2 hours to use it. Excitedly, I typed in the numbers and their system loaded up a few moments later.
![SelfCAD overview screen [Source: Todd Scott]](https://fabbaloo.com/wp-content/uploads/2020/05/1openingtoolspanel_img_5eb0508b03a58.jpg)
SelfCAD first gives you a basic overview of the layout of its tools and how things have been laid out to easily find them. I had watched the tutorial, so I already knew most of these, but it was a great quick refresher to remind me where that one function I had seen in the video but forgot where it was….
After that, it was off to the races. I do have to say I did race through my first project really fast.
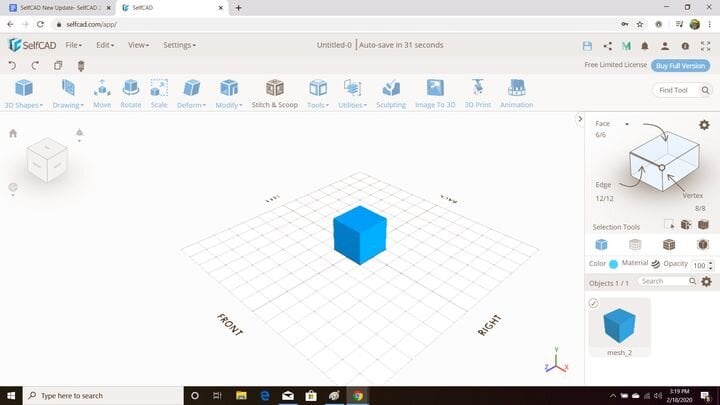
SelfCAD starting design [Source: Todd Scott]
With every new project it starts by offering you a basic cube in the center of the grid. I didn’t need that shape and quickly realized I could select it on the right and then go into Edit and delete it. At that point I have a clean grid and could start fresh. Using the 3D basic shapes menu on the upper left. I converted 2 cylinders and a sphere into a basic person shape in less than 15 minutes.
The first cylinder was quick and easy to conform and adjust how tall I wanted it to be. All adjustments can easily be done on the items dimension list on the left.
![SelfCAD adjustment screen [Source: Todd Scott]](https://fabbaloo.com/wp-content/uploads/2020/05/image-asset_img_5eb0508b7af41.jpg)
The initial radius was fine for me but the height was too tall. By simply changing the height to 40, I could see the corrected size, press the checkmark, and I now had my base. Easy, peezy, lemon squeezy. I may or may not have done a celebratory lap around my house over my new found 3D modeling skills!
The only thing I had a bit of confusion about is figuring out positioning items within the 3D space. When I selected the next cylinder, it appeared over the last one and had exactly the same dimensions. So to me, it looked like the button had done nothing. I had sipped my celebratory juice too soon. Or had I?
Using the undo, redo button I started to figure out the controls. The upper cylinder had to be wider and adjusted the top and bottom diameter to 60. Playing with this function made me think about how easy it would be to make some Xmas trees later. If only I could figure out how to position each segment height… WAIT A SECOND! Position!
![SelfCAD positioning screen [Source: Todd Scott]](https://fabbaloo.com/wp-content/uploads/2020/05/image-asset_img_5eb0508bc10f6.jpg)
At the bottom of the adjustment menu is a section called “Position”. Looking at the x/y/z axis reference on the grid. I knew I needed to adjust my second cylinder to be at the top of the lower one. Since the first one was 40 tall, the Y position was 40. Click the check mark and the smaller bottom piece suddenly reappeared. I now have my signature body. I can confirm at that point, I did give myself a high five when everything magically came back together.
![Combining objects in SelfCAD [Source: Todd Scott]](https://fabbaloo.com/wp-content/uploads/2020/05/5combinedthetwoinsamespace_img_5eb0508c05b8d.jpg)
I just realized now while writing this and looking back at my screen capture. I could have made it so I could have seen all items at the same time if I had just un-clicked the “Hide All Objects” box in the adjustment menu just above the X/Y/Z Position options.
Adding the sphere for the head was simple to do, but since I couldn’t see the positions of the other items, I didn’t correctly judge the height and it had no neck. I had known the height of the tall cylinder but had forgotten to add the extra 40 units due to its starting position in the Y axis.
The undo button was there to save me once again, letting me call a “Mulligan” on my failed attempt. My only problem was when I mistakenly confused the “Undo” icon with the web browser “Go Back” icon. I suddenly was no longer in the SelfCAD web app and staring at a Google search page. My inner 8 year old was not talking to me anymore. The buttons! The buttons, they’re just right there beside each other. I can’t be the only one who’s done this?
Luckily SelfCAD has me covered. Because they are a web app, they have it set up to automatically save your current project to the cloud every couple of minutes. I simply logged back in to find my project saved just as I had accidentally left it. BEST FEATURE EVER!
How often do you normally save stuff? Personally, I only back things up 5 minutes AFTER my computer suffers a catastrophic shutdown. I am usually too tied up creating or problem solving to remember. So once again, BEST feature ever!
![Attaching sphere in SelfCAD [Source: Todd Scott]](https://fabbaloo.com/wp-content/uploads/2020/05/image-asset_img_5eb0508c3d003.jpg)
After adjusting the sphere position, I now had a finished piece. And only 15 minutes had passed since I logged in. WOW! The SelfCAD web app really is user friendly and intuitive.
The final step was to select all the parts and then press the “Stitch & Scoop” tab in the tool bar to fuse all the pieces together into one item. On the left, there are 4 options. The “union” button is the one that will combine all the selected pieces into one.
My next project was trying to make the same person structure, but to put a hole in the bottom section that could sit on a peg.
It took me a bit of figuring out, but in the instructional video they had opened up a box to make it hollow. I may have been distracted by a shiny object when this was going into the actual steps. Luckily the SelfCAD menu system is pretty intuitive.
I did remember I had to select the face icon on the cube image always on right of the screen. That would allow me to choose and highlight the outside faces of the base cylinder I had made. From there I could press the “Modify” tab and “Adjust thickness” option. Because I was adding to the inside thickness. I had to type in “-10” to the thickness. This worked and there was a line running around the inside.
![SelfCAD edit screen [Source: Todd Scott]](https://fabbaloo.com/wp-content/uploads/2020/05/image-asset_img_5eb0508c74809.jpg)
To delete or remove the middle part, I selected the faces on the top and then went into the “Edit” menu and selected “Delete”. Voila! It worked leaving the thickened outside faces.
![Designing in SelfCAD [Source: Todd Scott]](https://fabbaloo.com/wp-content/uploads/2020/05/image-asset_img_5eb0508cb9878.jpg)
I did make a mistake by selecting the top faces; there was a bottom face that remained.
![SelfCAD hollowing example [Source: Todd Scott]](https://fabbaloo.com/wp-content/uploads/2020/05/image-asset_img_5eb0508d09acc.jpg)
I then had to add an additional step of going in and selecting those faces and then deleting. Regardless, in the end, I had a hollow cylinder for my base.
![SelfCAD clear cut [Source: Todd Scott]](https://fabbaloo.com/wp-content/uploads/2020/05/image-asset_img_5eb0508d4ced8.jpg)
As a newly anointed god of 3D modeling (or that is how I was feeling), I had brought to life my finished person! CELBRATORY JUICE BOXES FOR ALL!!!
![SelfCAD design [Source: Todd Scott]](https://fabbaloo.com/wp-content/uploads/2020/05/image-asset_img_5eb0508d889a6.jpg)
I was truly having fun with the ease of using the SelfCAD web app. My inner 8 year old was talking to me again and suggesting tonnes of ideas of what to do next.
Sadly this is where my god like powers started to elude me.
I tried to recreate those signature fringed collar on the little people, but ran into complications. I could create the rough shape by creating a thin cylinder and decreasing or increasing the number of sections. This gave me an angular collar for a partial win.
Unfortunately, no matter what I tried, I just couldn’t figure out how to get the rounded fringed sections like the real collar.
I also couldn’t figure out how to draw the eyes and mouth onto the faces of the face. In the instruction video, they had drawn on the flat surface of a polygon. The multiple small faces of the face might not be possible? More likely just above my VERY novice skill set.
I would have continued to create, but after a couple of hours, I couldn’t create any new projects. I had apparently run out of my free trial and kept getting a restricted use message and saying I needed to upgrade my plan to a paid one to access these features in a full copy.
![SelfCAD restricted access screen [Source: Todd Scott]](https://fabbaloo.com/wp-content/uploads/2020/05/image-asset_img_5eb0508dc905b.jpg)
I am now wondering if the free trial only lasts 2 hours. The authorization code email had said I had to use it within 2 hours. If that is the case, I’m glad I had lunch before I started.
Since I couldn’t save any new projects, I didn’t get a chance to play around with some of the other creation methods. Two of the others I was quite intrigued by was the LOFT option and the FOLLOW PATH.
What I found interesting about the Loft demo was how you create horizontal cross sections of your piece at various heights and then the system will create the 3D wire framework to connect it all. The example they had made was an old fashioned citrus juicer.
There are a few interesting architectural elements and art designs that I think I’d like to play around with using this creation method. Next time?
The Follow Path creation method involves drawing, is briefly discussed in the introduction video and never demonstrated. I am not sure how it works, but I have a feeling it might lead to some unique designs.
Speaking of designs, I would have shown a photo of my newly minted 3D creations. Sadly there is a small hiccup with my “free” trial.
Once I couldn’t create anymore, I sent Kerry my account info so he could download the proper 3D format for his printer. He informed me that he was getting the restricted access message and he couldn’t download the file to print it without upgrading to a paid package. I am tempted to upgrade due to the ease of use and the amount of fun I had creating. I will seriously consider it in the future when I have regular access to a 3D printer.
What are my final thoughts on the SelfCAD web app? I would readily recommend it to any family with children or beginners who are looking at learning the basics to start to model in 3D. SelfCAD is fun, well laid out, intuitive and can easily handle the basics with lots more advanced options as you progress. Personally I just need to find more tutorials to figure those parts out.
With that being said. After signing up, I did receive an email with a link to get alerts when new tutorials are being added to their YouTube channel, plus another link to the channel (see below). I am just scrolling through it now. There are copious videos that get into and explain all the different features and MANY advanced skills that I didn’t get a chance to play with… yet. YET!
[Update] Amongst SelfCAD’s 150+ instructional videos on their YouTube channel, there are a couple of standouts examples. One to make a Baby Yoda, and another to make Halloween superhero helmets for your dog.
I now need a 3D printer, a dog and an upgraded plan. Well played SelfCAD.com, well played!
Other 3D software to try is Tinkercad (https://www.tinkercad.com) (free, Autodesk), DesignSpark Mechanical (https://www.rs-online.com/designspark/mechanical-download-and-installation) (free, subset of SpaceClaim), and Fusion 360 (https://www.autodesk.com/campaigns/fusion-360-for-hobbyists) (free for hobbyists, Autodesk).