
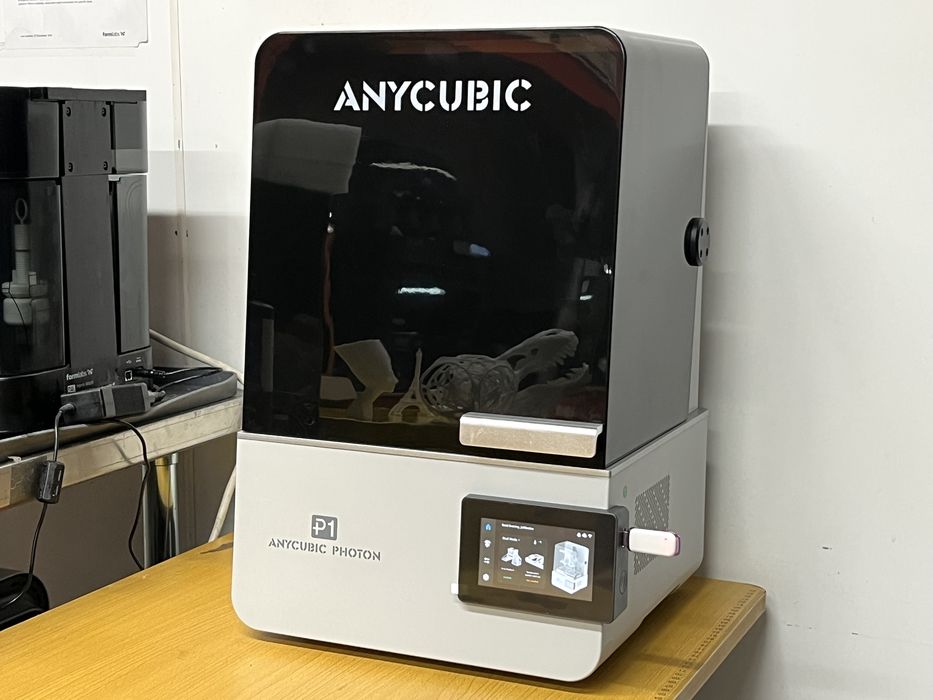
Our review of the Anycubic Photon P1 resin 3D printer concludes with print results and final thoughts.
This is part three of a three part series, please read parts one and two.
Anycubic P1 3D Printer Print Results
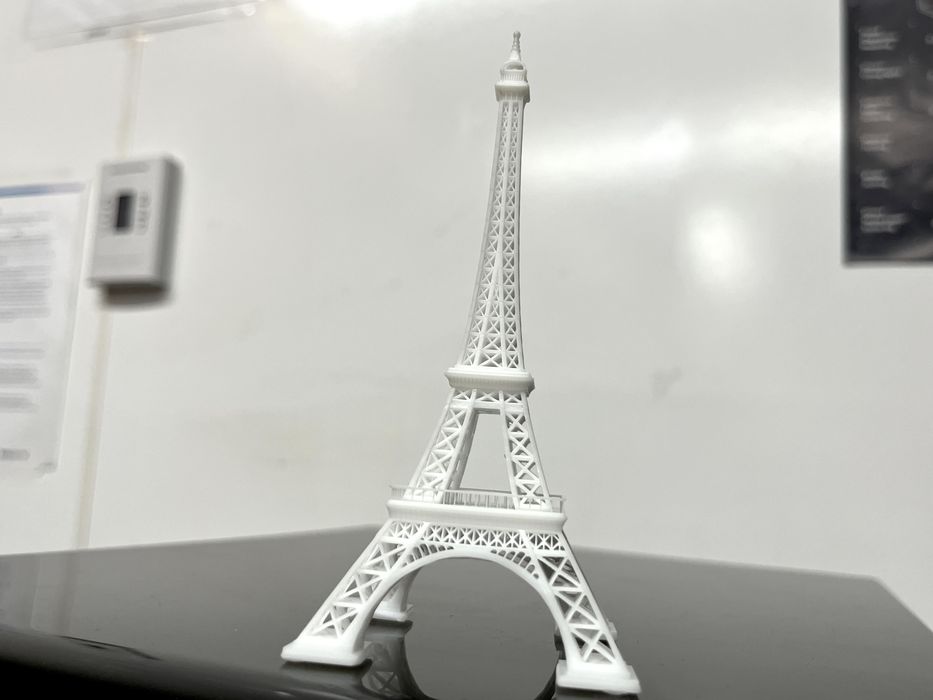
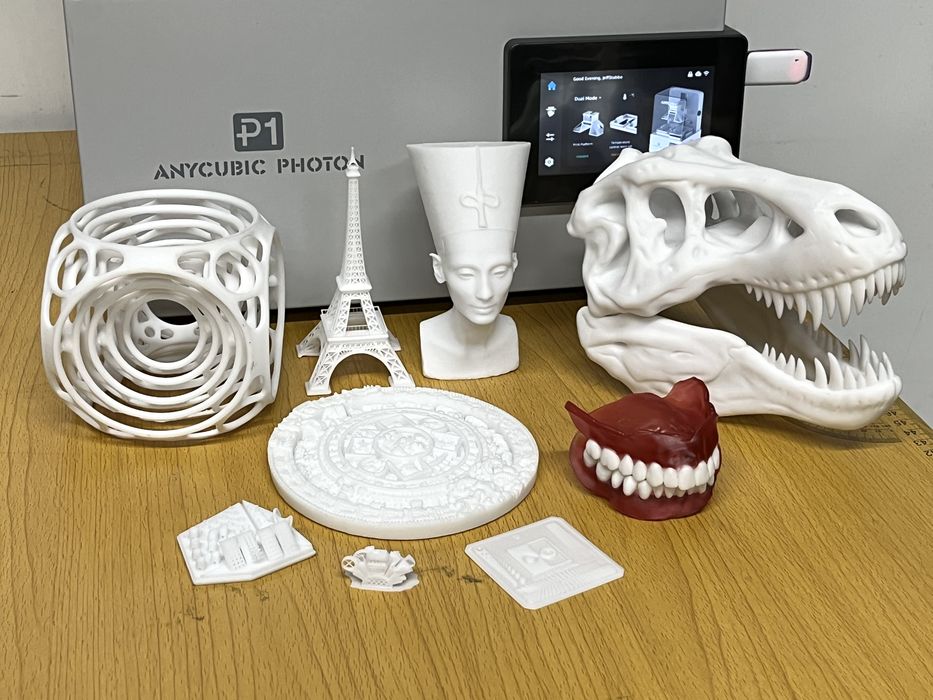
The Eiffel Tower is a fairly challenging print that images directly on the build plate with no raft or support. We sliced in Photon Workshop getting an estimated print time of 5h22m using 12ml of resin.
We were somehow able to remove the finished print from the build platform without damaging it. The print turned out really well with a very high level of detail in the structure. We noticed that the pads for the tower had raised areas that matched the indentation of the screw holes of the build plate.
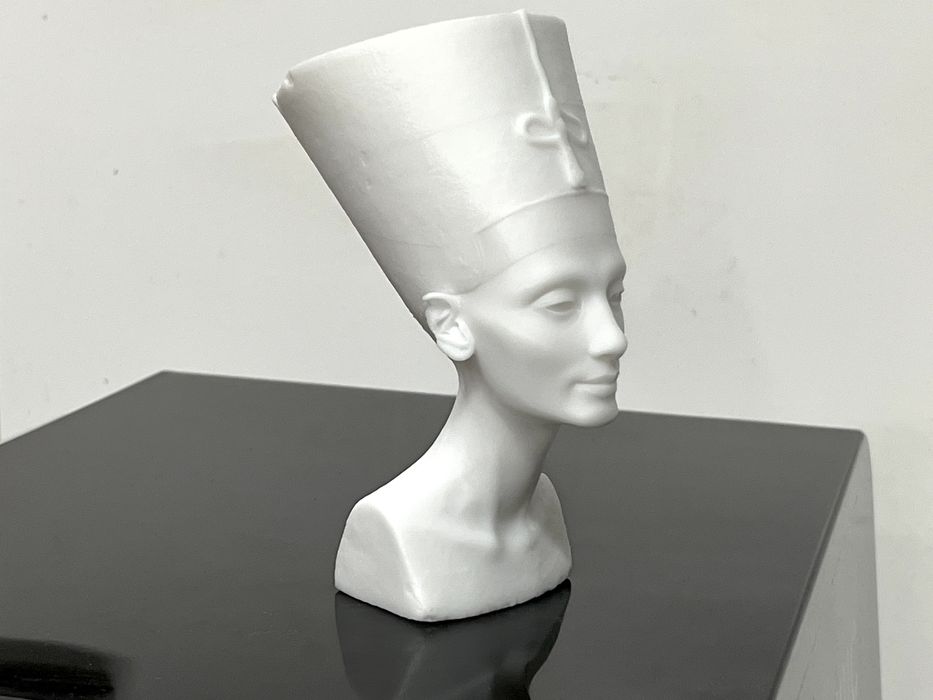
Our next print, Nefertiti, required a bit more effort in the slicer, as we had to hollow, punch holes and add light automatic supports. We sliced the model getting an estimated build time of 6h9m using 84ml of resin. The print completed in just 4h55m, using much less resin than estimated at 69ml. Again, the surface quality of the print was fantastic — but remember the bumps on this model are actually from the scanned original Egyptian sculpture.
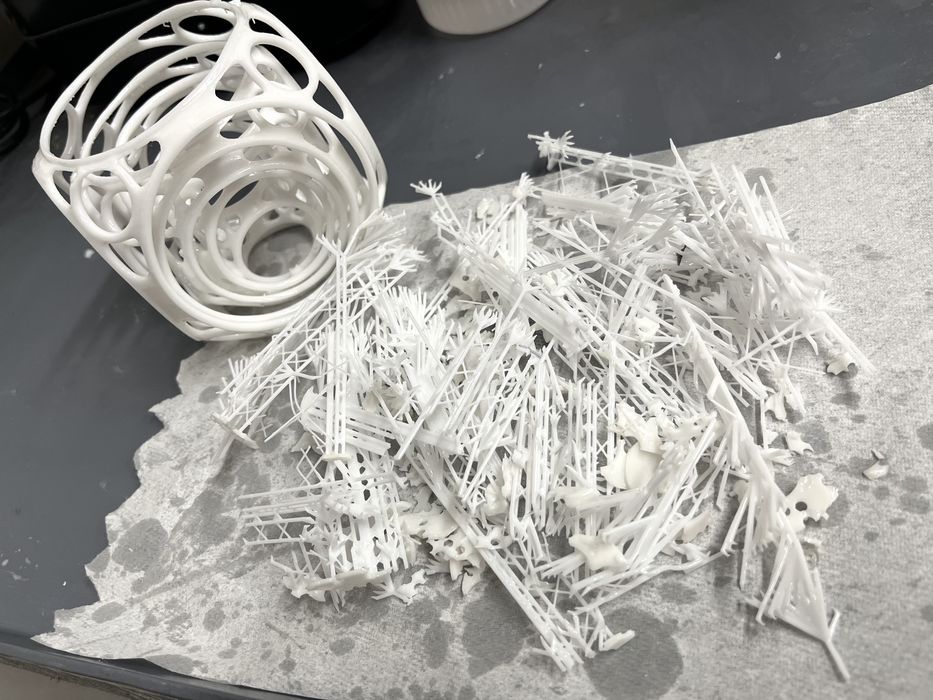
We loaded and sliced Gyro Air, getting an estimated print time of 5h15m using 161ml of resin. We found the supports were easy to detach but difficult to remove from the complicated geometry.
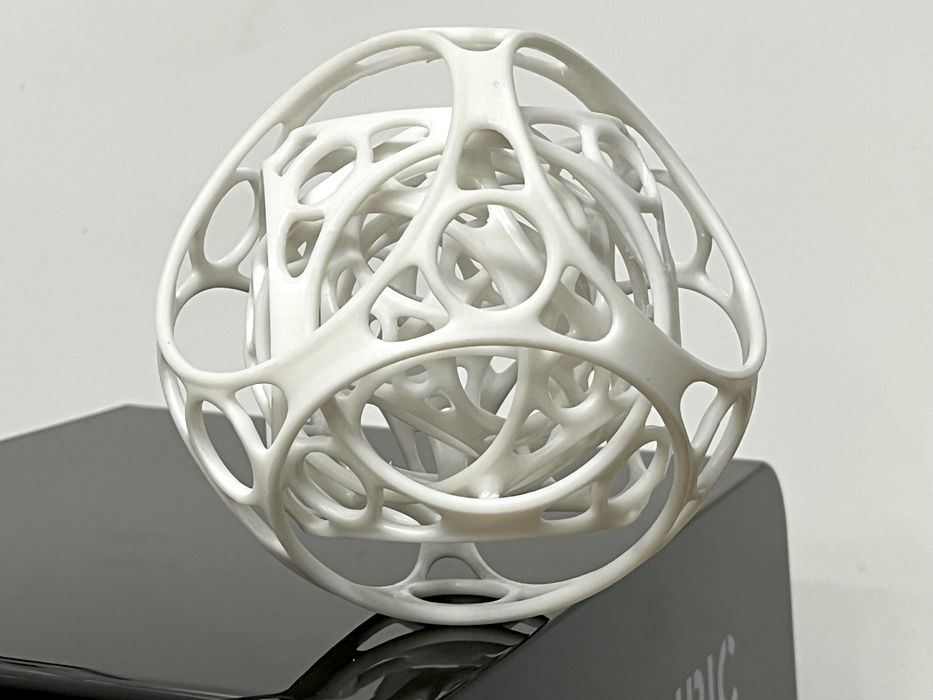
Once cleaned up, washed and cured, the print assembled and articulated as designed. A small layer separation flaw appeared on the bottom of the print, but was limited to a specific area and successfully recovered due to the high amount of support being used.
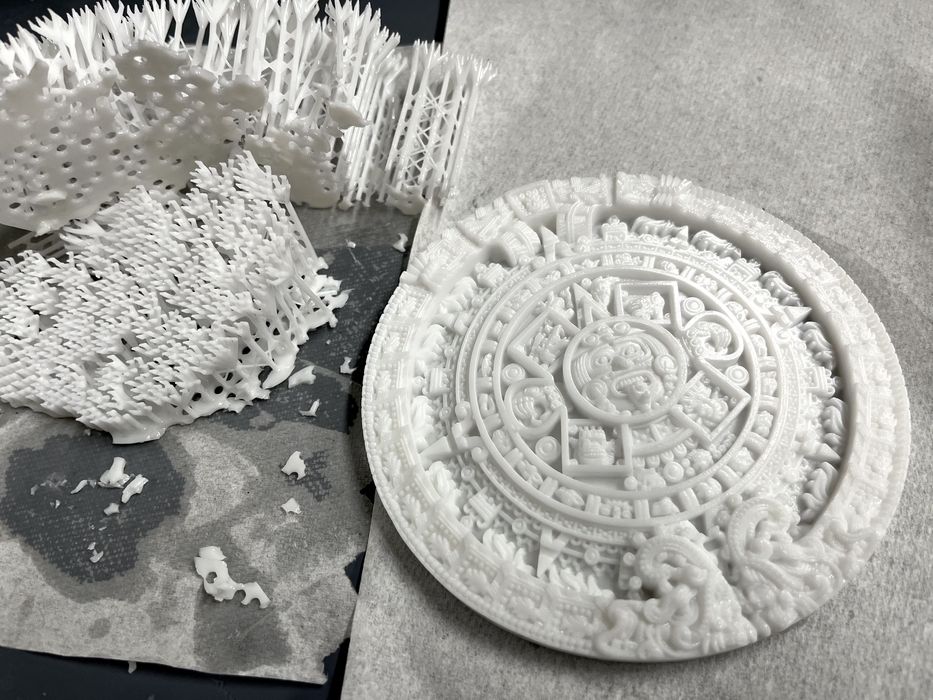
The Aztec Calendar is an excellent model to print for detail, so we sliced it up, getting an estimated build time of 2h59m using 162ml of resin.
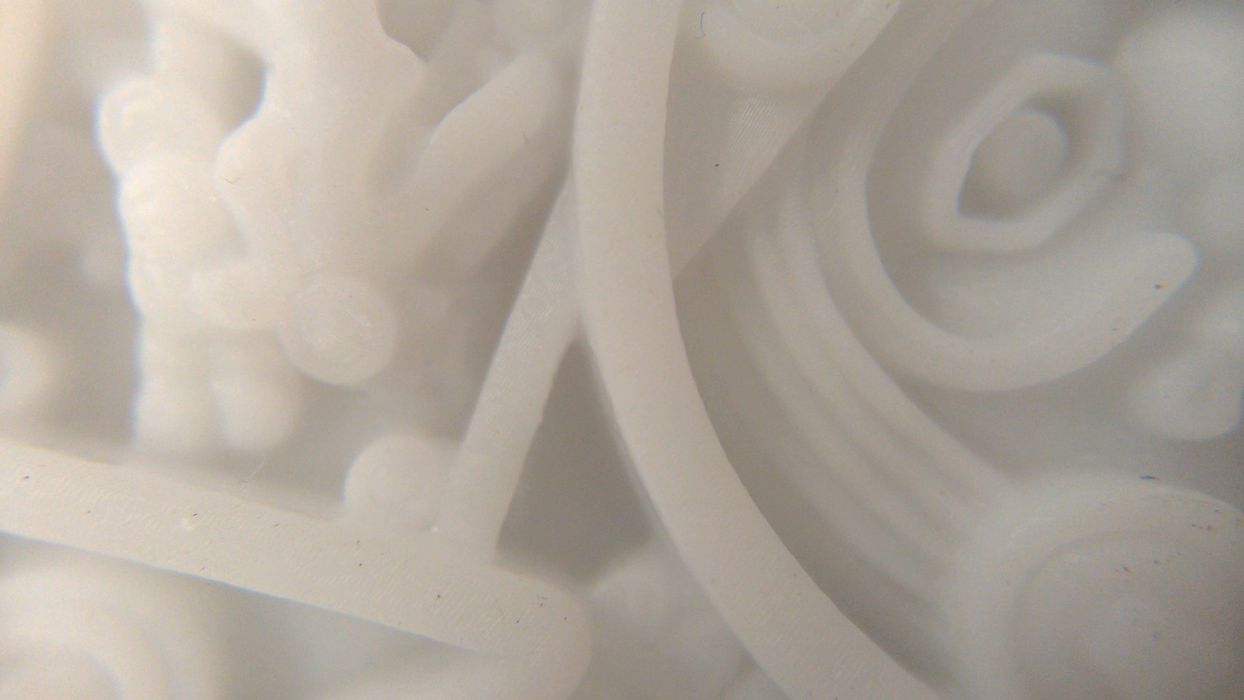
The print completed in 3h5m with excellent quality over the entire surface.
Now it was time to test out a few of the options that Anycubic had sent along. We removed the standard build plate from the printer, making sure to clean any raw resin off of it, as there was no supplied method for storing it away from any ambient UV light. We then placed the perforated build plate onto the Z-axis and clamped it in place.
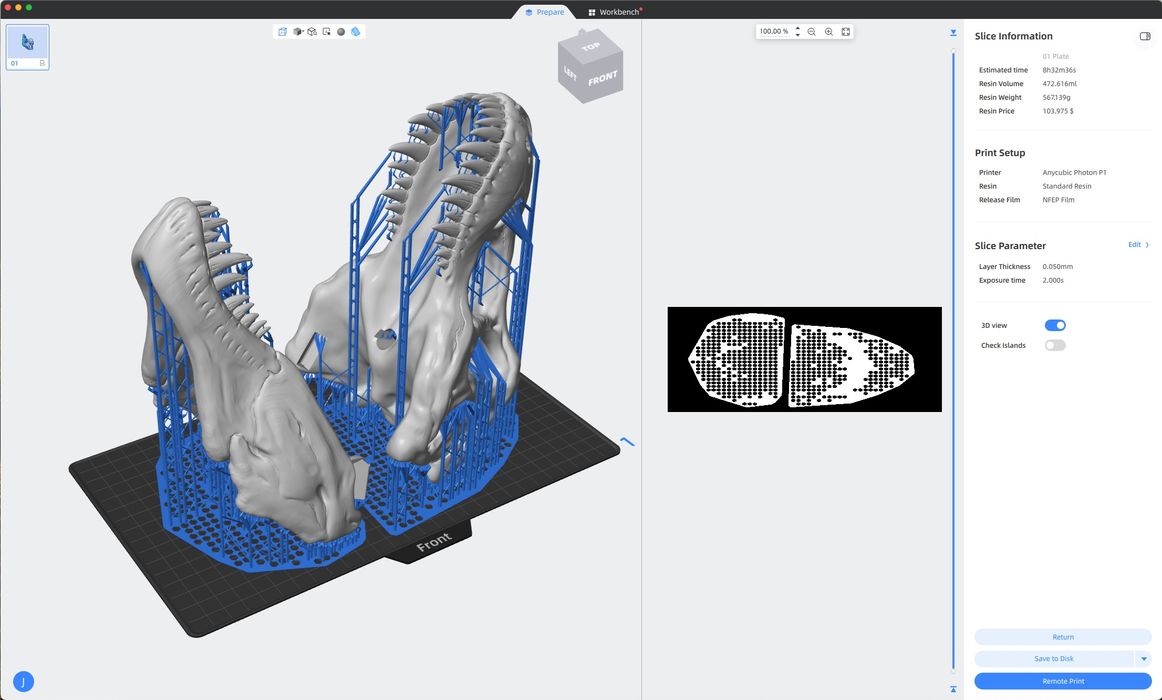
We sliced a T-Rex Skull model, getting an estimated build time of 8h32m, using a whopping 473ml of resin.
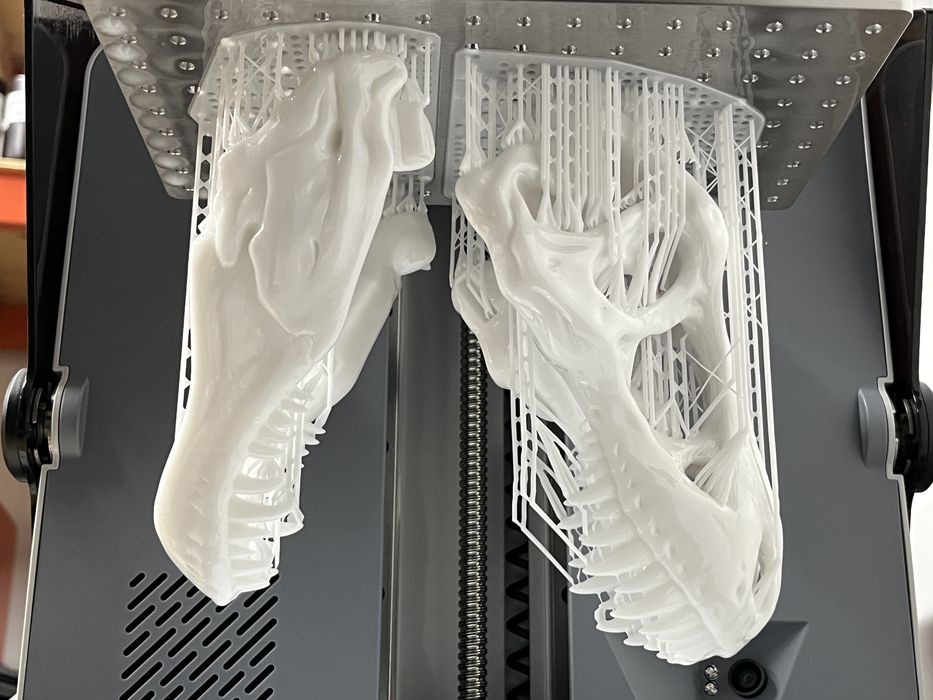
The finished print turned out absolutely perfect and the raft was much easier to remove from the perforated build platform, with less resistance and it didn’t shatter. Was that due to the holes in the platform, or the fact that we had not thought to perform a platform leveling and we had an increased gap? Oops. Thank goodness for the Auto-Leveling Self-Check. If there would have been an issue, then we would have received an alert.
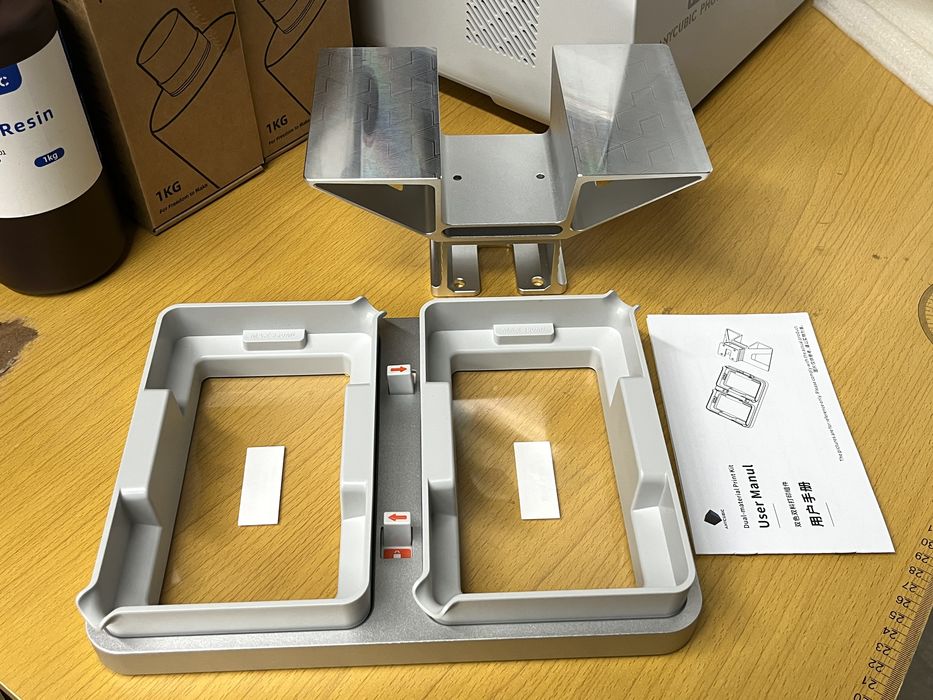
For our next print we decided to switch to the Dual-Material Print Kit. We removed and cleaned the standard vat and the perforated build platform, as again there was no included method for storing and protecting them from curing residual resin in ambient UV light.
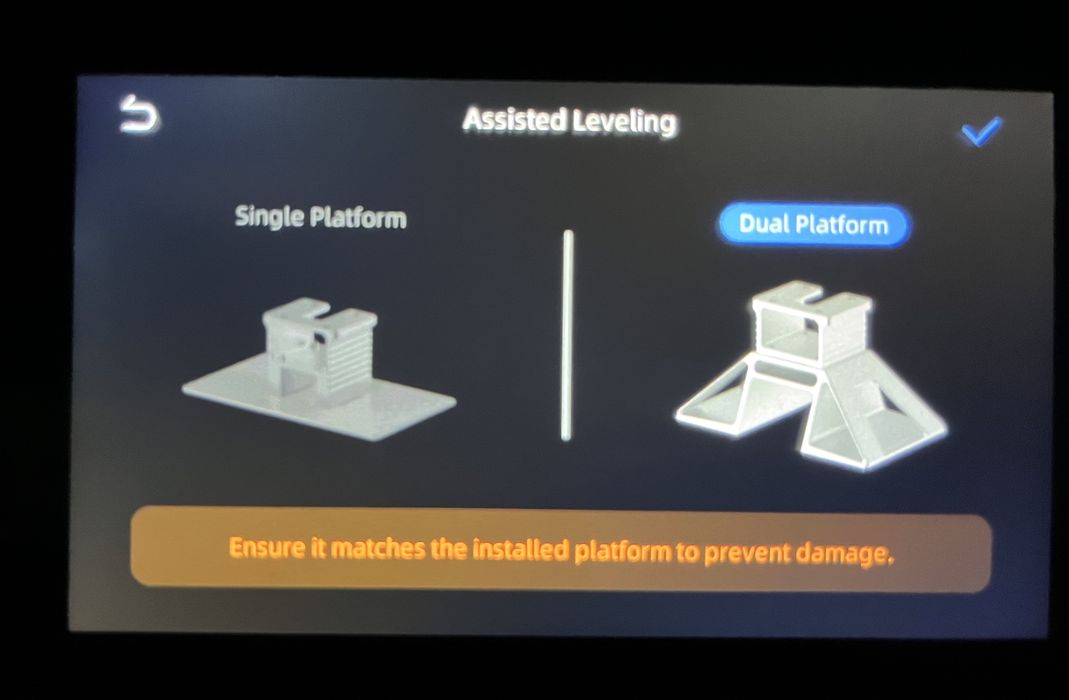
We installed the dual build platform onto the z-axis, went to the home screen on the P1 and chose Dual Mode, then launched the Assisted Leveling procedure.
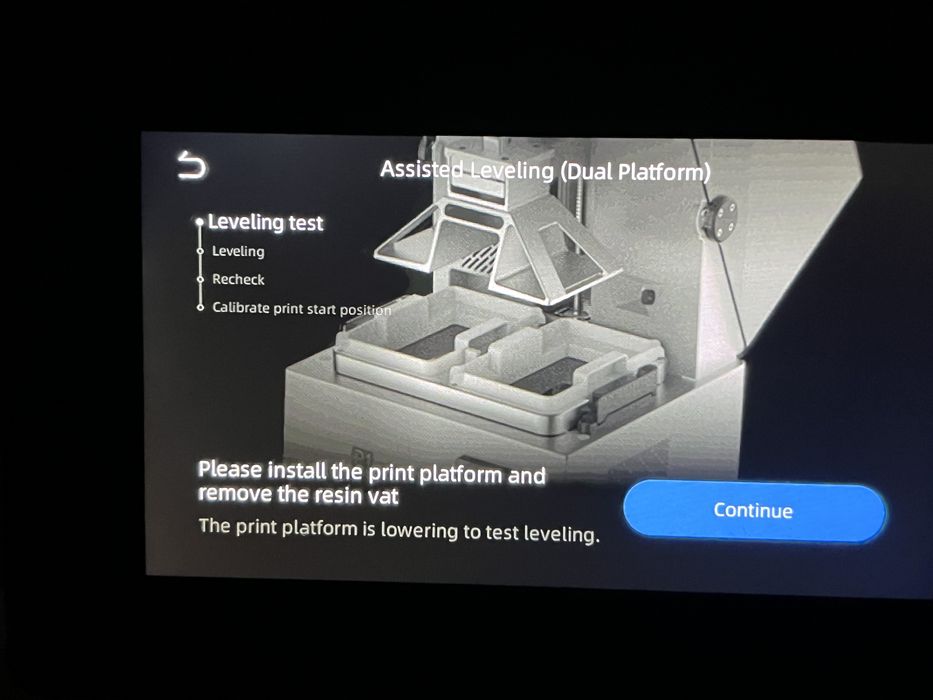
The gist of the leveling process is quite simple and doesn’t take more than a few minutes. The build platform lowers down to the LCD, an operator loosens four screws on the top of the z-axis, the platform then raises and lowers flat to the LCD again. The operator observes the LCD screen and slowly turns any indicated screws in the requested direction, getting real time feedback as numbers increase or decrease on the LCD screen.
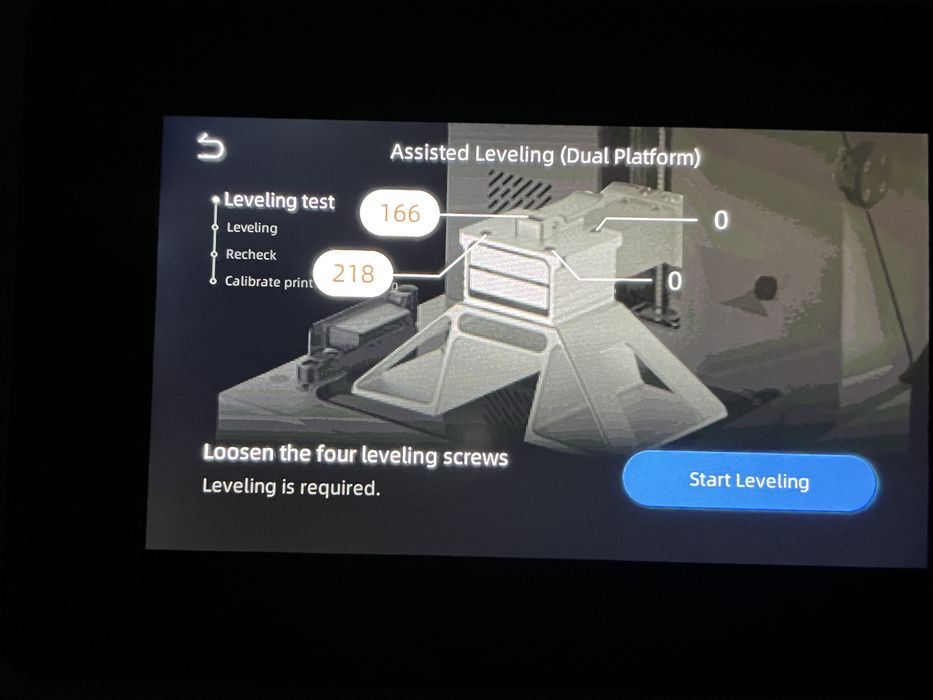
Turning one screw too much will cause another screw’s value to increase. Several screws might need to be juggled back and forth before getting close to zero on all four. The process is automatically considered to be complete when the values get close to zero. The rest of the procedure involves going through a similar process to double check for micro adjustment, before the Anycubic P1 3D Printer automatically calibrates and saves the values.
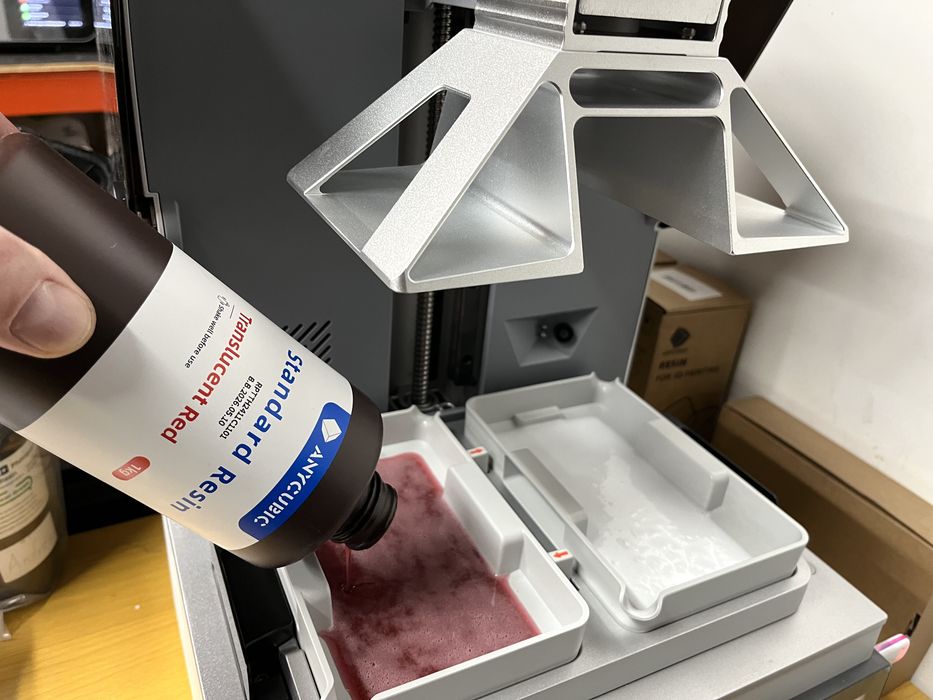
When all that was complete, we installed the dual vat collar, removed protective films and installed the dual resin vats, locking them both in place with the sliders before adding red standard resin to the left vat and white to the right. We noticed that the dual vat system was only mechanical and not capable of heating resin, so we anticipated that there might be some slightly different results for print quality.
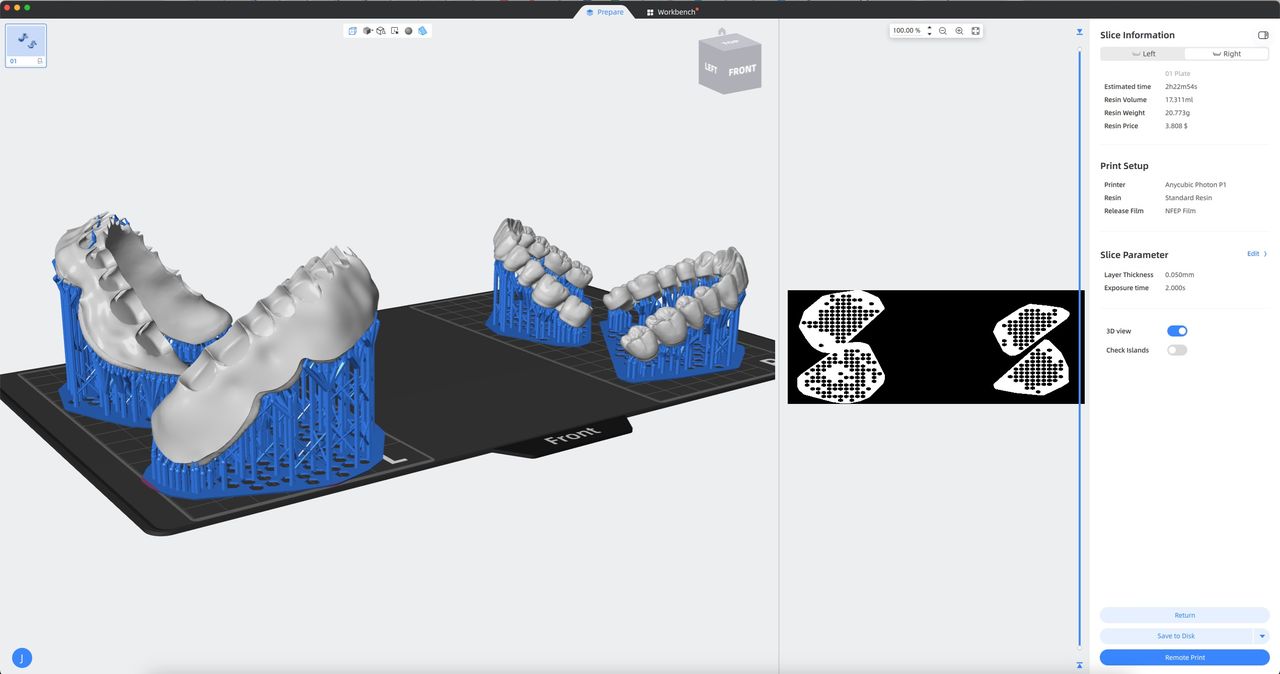
Our final print was Dentalmakers. We switched modes from Single to Dual in Photon Workshop and were greeted with a two section L & R platform. Each side operates independently with regards to exposure settings, so we placed a model on each side and made sure to choose standard resin for L and then again for R and then sliced the file, getting an estimated build time of 2h22m, using 38.351 ml of red resin and 14.634 of white.
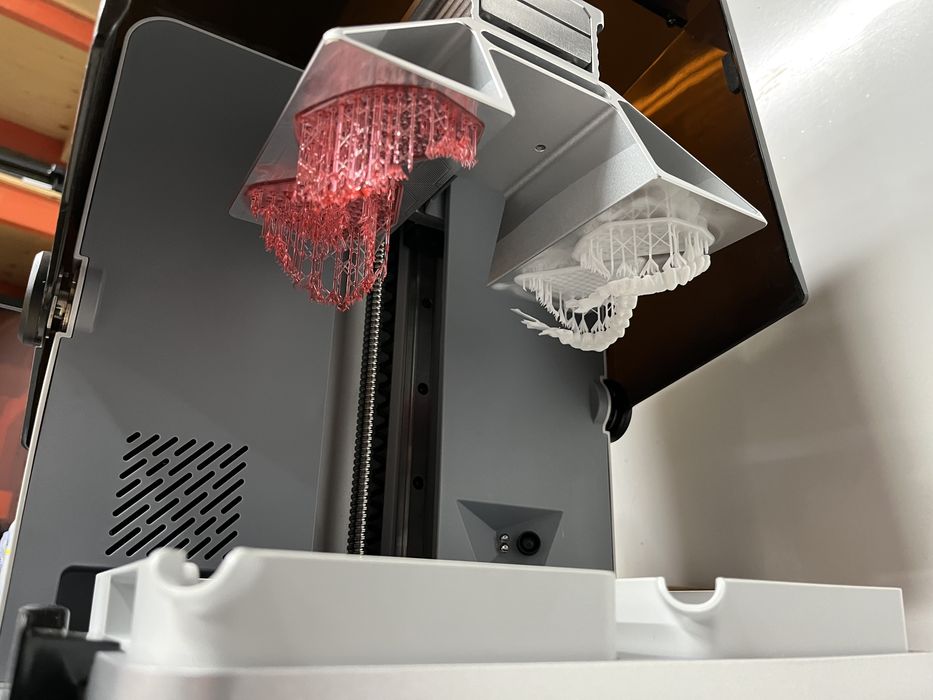
We came back later to find that the print had completed, but some supports had detached from the model causing some deformation. Upon close inspection we assumed that failure was due to the fact that the smaller vat’s NFEP would have less deflection and put greater peel force on the model. The lack of heat could also have contributed.
We cleaned the platforms and vats and re-sliced the file with medium supports with slightly increased density, getting an estimated build time of 2h22m, using 44ml of red and 17ml of white.
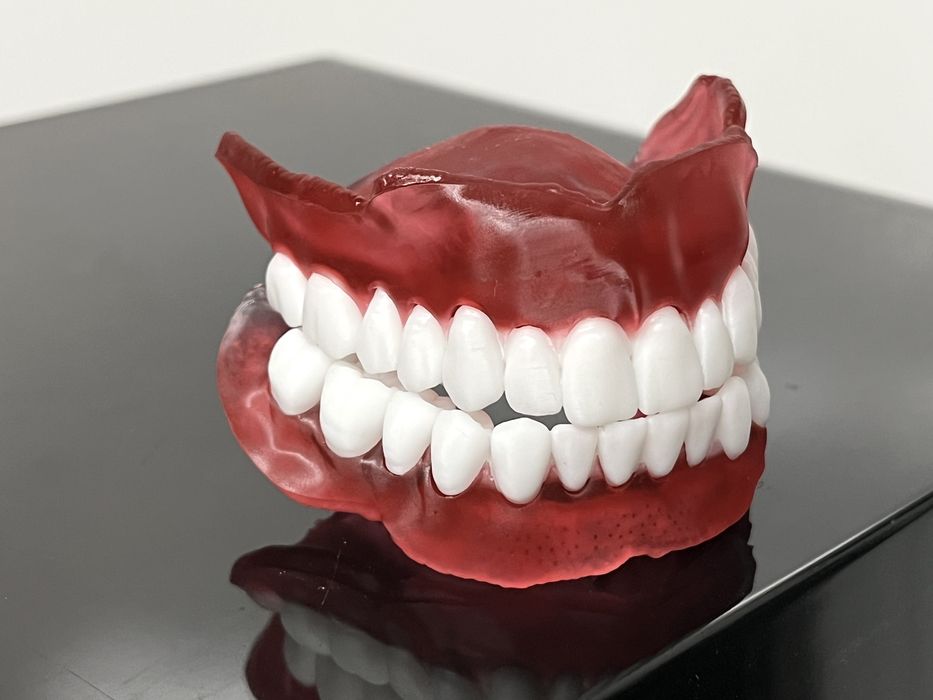
The print completed without incident with amazing surface quality, and when both pieces had all supports removed and were washed and cured, the teeth and gums fit together like a glove. A very impressive final print.
Anycubic P1 3D Printer Final Thoughts
As usual, Anycubic have done a great job packaging the printer for shipping by using the right combination of sturdy box and amount of soft foam inserts. Bagging the printer for easy extraction from the box is one of our favorite features.
The printer shipped with some decent goodies, and we like how a sturdy steel spatula was included to help remove prints from the platform, while a non-marring plastic spatula was also included to help with vat cleaning. But, if we were to be picky, it wouldn’t have been a bad idea to have included a spare NFEP sheet. Anyone new to resin printing might find themselves in need of one sooner rather than later as they make all the common mistakes associated with the learning curve of resin printing.
Setup of the stock printer was very easy and there was next to nothing to do for assembly, with most of the work being done by the Anycubic P1 3D Printer itself during initial setup. We really liked the tilting lid, as well as the quick release setups for the build platform and vat.
There isn’t any resin auto-dispensing on the P1, but the stock vat is a decent size and has auto-heating which really is the better feature. Manually adding resin to the vat mid-print is super easy with the tilting lid. Our only gripe being that the “platform hanger” only works with the lid being open throughout the process, allowing a substantial amount of fumes to escape, but not an issue if you are already ventilating air for the entire room.
We found we preferred the perforated platform to the stock solid version. We had thought that it would be tough to clean, but it was really quite the opposite and a very pleasant experience. It just needs a bit of quality time in the “platform hanger” to drip dry.
We also were skeptical about the Dual-Material Print Kit, but were pleasantly surprised with the results we got, although we found that stronger supports are advisable due to the smaller NFEP and associated peeling forces. It’s possible that the lack of heat could also play a role.
All-in-all we were extremely pleased with the excellent surface quality and high level of detail in the output from the P1 and we produced some of the highest quality prints we’ve ever done. That said, we are still perplexed about the spare lid and what to do with it. A spare NFEP would have been much more practical.
Good job Anycubic, we look forward to your next system!
ANYCUBIC
PHOTON P1
★ BEGINNER 8/10
★ ENTHUSIAST 10/10
★ PRODUCTION 9/10
BEST FEATURES
✔︎ Heated resin
✔︎ Assisted leveling
✔︎ Print quality
QUESTIONS
✖︎ Hanger lid open
✖︎ No Air Pure
✖︎ Vat storage
This is part three of a three part series, please read parts one and two.
Via Anycubic