
This is part 1 of a 3-part series. Please read part 2 and part 3.
Artec 3D provided us with a Leo 3D scanner, so we put it through some tests. First let’s look at features and setup.
Handheld 3D scanning is a tricky business. It involves all the usual challenges of software operation, capture processing, and subject, but with the added complexities of scanning motion and cable management.
Cable management? This is because most handheld 3D scanners must be connected to a nearby laptop that runs the complex software during 3D capture. If your subject requires capture from all sides, then you must manage the long cable between you, holding the scanner, and the laptop. There’s also the ubiquitous power cord, without which the handheld 3D scanner wouldn’t work. Typically these long cables require a second person to feed out the cable and make sure you don’t trip, much like you see with professional camera operators at major sports events.
While opening the Artec Leo shipping box at the lab, I thought about this recurring issue and began thinking of options for my “second”.
But then, everything changed.
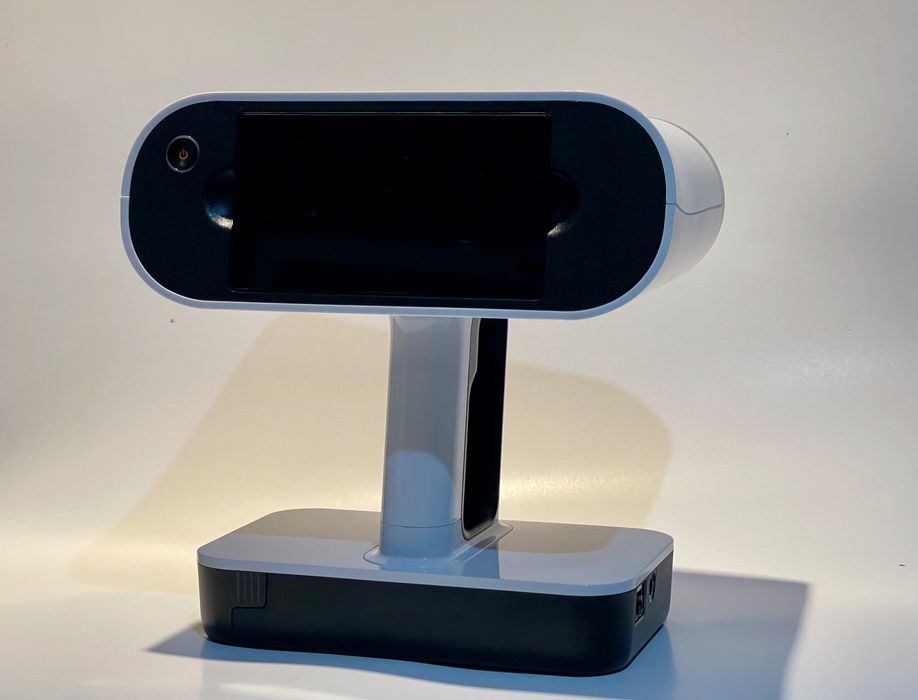
The Artec Leo is a very different kind of handheld 3D scanner. It requires NO CABLES.
None. At least during capture, that is.
The device contains all the necessary processing power and storage capacity to acquire and hold multiple large-sized 3D captures, and that can all be done without any connection to a laptop.
Even better, the Artec Leo is battery operated. This means there isn’t even a power cable during operation. 3D capture with the Artec Leo is completely cable-free!
But let’s take you through my experience as it unfolded.
Unboxing The Artec Leo 3D Scanner

The Artec Leo ships in its normal carrying case. This is a heavy-duty case that’s sufficiently rugged to allow transport of the delicate Artec Leo to field locations, where it can typically be used.
That’s one thing you immediately notice about the Artec Leo: the lack of cables gives you complete freedom to take the device anywhere, inside or outside, to capture a 3D model. 3D scanners requiring a laptop connection are more easily set up at interior locations where you can manage cables. Yes, you can use both outdoors, but it’s just a lot simpler with the Artec Leo: pick it up and go. No laptop required.
I should point out that the Artec Leo does come with some cables. There’s a power cable to charge the battery on the Artec Leo. This is done periodically offline and doesn’t have to be connected during scanning operations.
There’s also an Ethernet cable that’s used after 3D capture to transfer the data to a laptop for final processing. Remember, although the Artec Leo is a cable-less device, its purpose is capture, not complete processing. For that you need a laptop with Artec Studio software installed.
For purposes of this test, Artec 3D shipped me a laptop with Artec Studio pre-installed. Normally Artec Leo operators would have to supply their own laptop separately, on which the software could be installed. It’s possible that Artec 3D resellers might package a suitable laptop with the scanner, but that’s up to them.
That’s it for shipping; the Artec Leo is fully assembled, and there’s not much required to get it going beyond plugging it in to ensure the battery is charged.
Artec Leo Training
But it’s not quite as simple as that. You will need some basic training to become accustomed to the device.
Artec 3D provided this to me online with an interactive session with one of their experts. I presume this is the same treatment afforded to other clients, although individual resellers may offer something different.
There’s two parts to the training: capture and processing.
Capture is the process of operating the handheld device, and how you operate its menus — remember, it’s a standalone computer with its own controls. This involves understanding a series of settings, as well as how to orient and move the scanner itself.
Processing is the work required to transferring the raw 3D capture data to the laptop and convert it into a useful 3D model. While there are many options that can be used, it’s not that difficult to get started.
I found the interactive training to be incredibly informative and easy to follow. The video link allowed the trainer to immediately show me what to do, and correct me if I was doing something wrong.
Artec Leo 3D Scanner Operation
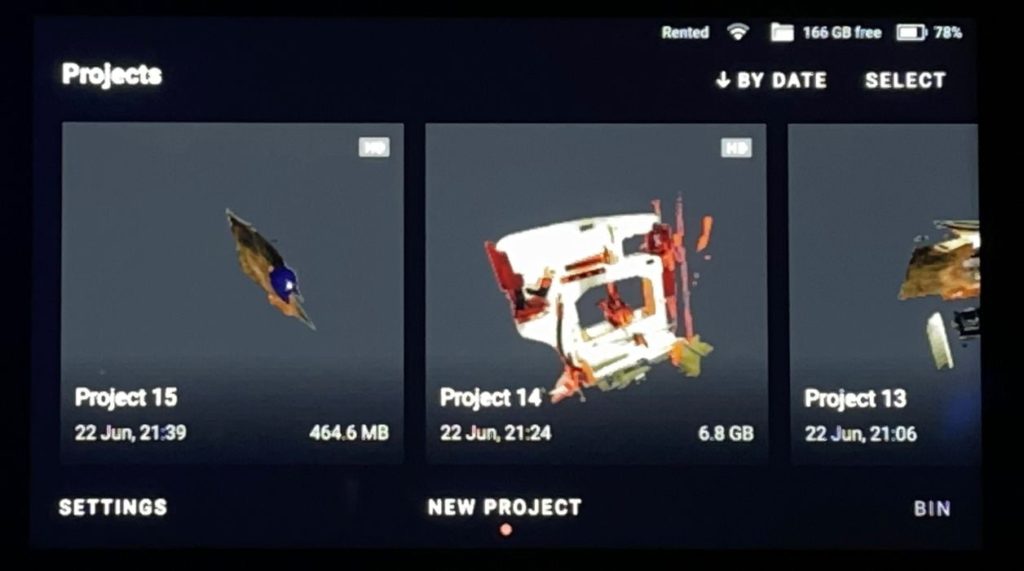
The Artec Leo is a standalone computer, and as such it has a touchscreen interface on the back side of the device. Through this screen you can not only set options for the scan, but also manage previously-captured scans.
The screen is also critically important during the actual scanning work, as through it you can see what the scanner is collecting.
This is critically important, and I will explain why.
I’ve used some handheld 3D scanners that did not have an on-board screen. For these you would have to turn around and look at the laptop’s screen to see what’s going on. This back-and-forth looking not only makes you dizzy, but also catastrophically messes up your capture.
Scans must be captured by smoothly moving the scanner’s view across the subject’s surface. You must capture ALL of the surfaces, and that’s very hard to do if your brain can’t register the current alignment with the laptop screen as you walk around an object. Also, don’t trip on the cables!
These difficulties are entirely absent with the Artec Leo 3D scanner: there’s no cables to trip on, but more importantly your eyes are glued to the screen. You can immediately understand how the view aligns with the scanner’s orientation, and it is quite easy to sweep across a subject.
When I learned that the Artec Leo was fully handheld, I feared there could be a problem. Typically using handheld devices can be tiring, as you must slowly and carefully sweep the scanner view across all surfaces of the subject. This requires twisting and turning in a precise manner, and with other handheld 3D scanners I’ve sometimes had to stop to let my arm get a rest.
With the Artec Leo being fully standalone, it is much heavier than other handhelds I’ve used. Fearing the worst, I gave it a try.
Yes, my arm got tired pretty fast. But then I learned something interesting about the Artec Leo 3D scanner from the trainer. He asked during the training session:
“Why are you moving it so slowly?”
I was moving it at the speed I normally do with 3D scanners: very slow. This slowness allows the scanner to properly capture an area without losing track of itself in 3D space. If you move any faster, the scanner would lose track and you’d have to start over.
The Artec Leo 3D scanner is different. You can move it extremely quickly (relatively speaking) and it still properly captures the scene.
This added speed completely counteracts the heaviness of the 3D scanner: you’re finished before you get tired.
This is part 1 of a 3-part series. Please read part 2 and part 3.
Via Artec 3D