
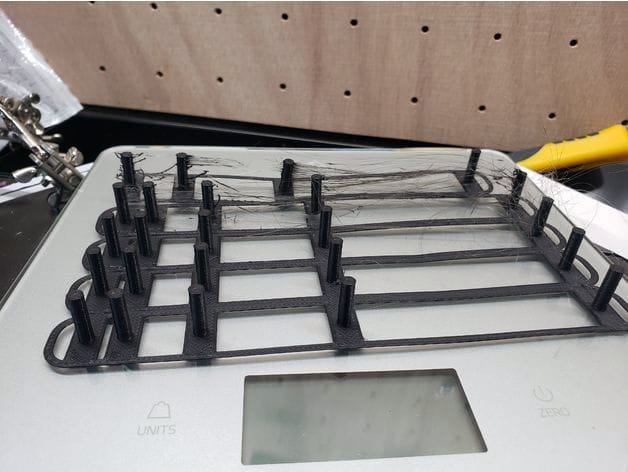
![A great way to fine tune 3D print parameters [Source: Viet Nguyen]](https://fabbaloo.com/wp-content/uploads/2020/05/image-asset_img_5eb09f5c4f94f.jpg)
This week’s selection is the extremely useful Variable Retraction Test by designer Viet Nguyen.
NY-based Nguyen created this 3D model in an attempt to overcome persistent problems with retraction.
For those unfamiliar, retraction is the process undertaken during 3D printing operations in which the filament is slightly backed out of the hot end during a non-printing movement. The idea is to suck up some softened filament from the nozzle’s tip to avoid having it drip onto the print during the movement. Another common effect is to generate “stringies” between upright segments of the 3D model. These must be removed after printing, and often that’s a laborious process.
The actual retraction parameter is a value in millimeters that represents the amount of distance the extruder should pull the filament in reverse. Typically it’s between 0.5 and 5.0mm, but can differ depending on the circumstances.
The problem with retraction is that it’s almost never the same. This is because the drippiness of a material changes depending on the temperature and duration of the movement. Usually there is a process of experimentation to determine the optimum retraction settings on a given 3D model.
As with most 3D printing parameters, retraction is part of the balancing of effects. For example, a specific print might require very strong layer adhesion due to its intended use, and thus the extrusion temperature should be increased to ensure proper bonding. However, with increased temperature comes more probability of stringing, and the retraction parameter must be increased.
It’s not always easy to determine the correct retraction setting. Nguyen explains his motivation behind the creation of this 3D model:
“I printed a benchy and done simple stringing tests and those passed. On real prints, I kept getting stringing! I modeled this variable stringing test to test variable distances and in S3D I created 5 different processes, all at 45mm/sec retraction. first at 0mm, second at 2mm at so on up to 8mm. Then I fine-tuned from there, only 3 prints until I got my retraction dialed in. This is much easier and faster than printing 1 at a time doing trial and error.”
This is a brilliant idea that will save 3D printer operators a great deal of time and trouble.
The 3D model made by Nguyen is essentially a series of towers separated by increasingly greater distances. By 3D printing this item, one can easily see whether strings are generated.
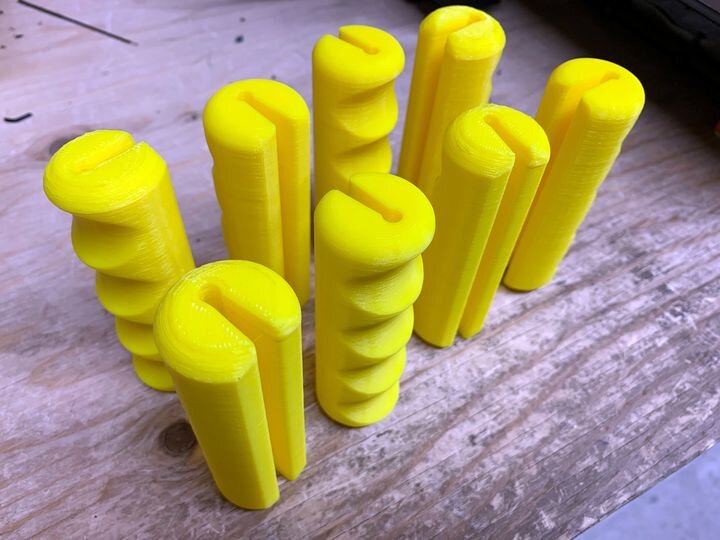
![Multiple 3D prints used to test retraction parameters [Source: Viet Nguyen]](https://fabbaloo.com/wp-content/uploads/2020/05/image-asset_img_5eb09f5ca3d5e.jpg)
Nguyen’s idea is to leverage one of Simplify3D’s highly useful features: separate build parameters. With this feature one can assign a different set of printing parameters to each 3D model on the build plate. This means that instance #1 could use one value for retraction, while instance #2 could use a slightly different value. All of these can be 3D printed in a single print job, and all it takes is to inspect the 3D prints afterwards to see which parameter came closest to eliminating strings.
What’s more interesting is to do the experiment more than once. If a wide range of parameters is used in the first experiment, then the second experiment could use a smaller range to hone in on the exact value required.
Strings, begone!
Via Thingiverse and Reddit


This week’s selection is a 3D printed Coronavirus!